mn create-app example.micronaut.micronautguide --build=maven --lang=javaTable of Contents
- 1. Getting Started
- 2. Costs
- 3. What you will need
- 4. Solution
- 5. Writing the Application
- 6. Google Cloud Platform
- 7. Google App Engine
- 8. App Engine Build Plugins
- 9. Application Deployment Configuration
- 10. App Engine Deploy
- 11. Running the App
- 12. Logging
- 13. Cleaning Up
- 14. Next Steps
- 15. Help with the Micronaut Framework
- 16. License
Deploy to Google App Engine
Learn how to deploy a Micronaut application to the Google App Engine Java flexible environment.
Authors: Sergio del Amo
Micronaut Version: 5.0.4
1. Getting Started
In this guide, we will create a Micronaut application written in Java.
You will deploy a Micronaut application to Google App Engine flexible environment.
2. Costs
| This guide uses paid services; you may need to enable Billing in Google Cloud to complete some steps in this guide. |
3. What you will need
To complete this guide, you will need the following:
-
Some time on your hands
-
A decent text editor or IDE (e.g. IntelliJ IDEA)
-
JDK 21 or greater installed with
JAVA_HOMEconfigured appropriately -
You need a Google Cloud Platform (GCP) account and a GCP project.
4. Solution
We recommend that you follow the instructions in the next sections and create the application step by step. However, you can go right to the completed example.
-
Download and unzip the source
5. Writing the Application
Create an application using the Micronaut Command Line Interface or with Micronaut Launch.
If you don’t specify the --build argument, Gradle with the Kotlin DSL is used as the build tool. If you don’t specify the --lang argument, Java is used as the language.If you don’t specify the --test argument, JUnit is used for Java and Kotlin, and Spock is used for Groovy.
|
The previous command creates a Micronaut application with the default package example.micronaut in a directory named micronautguide.
5.1. Controller
To create a microservice that responds with "Hello World", you first need a controller.
Create a controller:
src/main/java/example/micronaut/HelloController.java
package example.micronaut;

import io.micronaut.http.MediaType;
import io.micronaut.http.annotation.Controller;
import io.micronaut.http.annotation.Get;
import io.micronaut.http.annotation.Produces;

@Controller("/hello") (1)
public class HelloController {
    @Get (2)
    @Produces(MediaType.TEXT_PLAIN) (3)
    public String index() {
        return "Hello World"; (4)
    }
}| 1 | The class is defined as a controller with the @Controller annotation mapped to the path /hello. |
| 2 | The @Get annotation maps the index method to an HTTP GET request on /hello. |
| 3 | By default, a Micronaut response uses application/json as Content-Type. We are returning a String, not a JSON object, so we set it to text/plain with the @Produces annotation. |
| 4 | A String "Hello World" is returned as the result. |
5.2. Test
Create a test to verify that when you make a GET request to /hello you get Hello World as a response:
src/test/java/example/micronaut/HelloControllerTest.java
package example.micronaut;

import static org.junit.jupiter.api.Assertions.assertEquals;
import static org.junit.jupiter.api.Assertions.assertNotNull;

import io.micronaut.http.HttpRequest;
import io.micronaut.http.MediaType;
import io.micronaut.http.client.HttpClient;
import io.micronaut.http.client.annotation.Client;
import io.micronaut.test.extensions.junit5.annotation.MicronautTest;
import org.junit.jupiter.api.Test;

import jakarta.inject.Inject;

@MicronautTest (1)
public class HelloControllerTest {

    @Inject
    @Client("/")  (2)
    HttpClient client;

    @Test
    public void testHello() {
        HttpRequest<?> request = HttpRequest.GET("/hello").accept(MediaType.TEXT_PLAIN);  (3)
        String body = client.toBlocking().retrieve(request);

        assertNotNull(body);
        assertEquals("Hello World", body);
    }
}| 1 | Annotate the class with @MicronautTest so the Micronaut framework will initialize the application context and the embedded server. More info. |
| 2 | Inject the HttpClient bean and point it to the embedded server. |
| 3 | Creating HTTP Requests is easy thanks to the Micronaut framework fluid API. |
6. Google Cloud Platform
Signup for the Google Cloud Platform
6.1. Cloud SDK
Install the Cloud SDK CLI for your operating system.
Cloud SDK includes the gcloud command-line tool. Run the init command in your terminal:
gcloud initLog in to your Google Cloud Platform:
gcloud auth login6.2. Google Cloud Platform Project
Create a new project with a unique name (replace xxxxxx with alphanumeric characters of your choice):
gcloud projects create micronaut-guides-xxxxxx| In GCP, project ids are globally unique, so the id you used above is the one you should use in the rest of this guide. |
Change your project:
gcloud config set project micronaut-guides-xxxxxxIf you forget the project id, you can list all projects:
gcloud projects list7. Google App Engine
We are going to deploy the Micronaut application developed in this guide to the Google App Engine flexible environment
App Engine allows developers to focus on doing what they do best: writing code. Based on Google Compute Engine, the App Engine flexible environment automatically scales your app up and down while balancing the load. Microservices, authorization, SQL and NoSQL databases, traffic splitting, logging, versioning, security scanning, and content delivery networks are all supported natively.
Run the command:
gcloud app create
to initialize an App Engine application within the current Google Cloud project.
| You will need to choose the region where you want your App Engine application located. |
8. App Engine Build Plugins
To deploy to App Engine, add the Google App Engine Maven plugin to your project.
In your Maven App Engine Java app, add the following plugin to your pom.xml:
pom.xml
<dependency>
    <groupId>com.google.cloud.tools</groupId>
    <artifactId>appengine-maven-plugin</artifactId>
    <version>2.4.3</version>
    <scope>compile</scope>
</dependency>
9. Application Deployment Configuration
To deploy to Google App Engine, add the file src/main/appengine/app.yaml
Then configure the Java 8 runtime in the flexible environment
The Java 8 runtime does not include any web-serving framework. The only requirement is that your app should listen and respond on port 8080. The sample code here shows how you can add your own framework, such as Spring Boot, to the Java 8 runtime.
This describes the application’s deployment configuration:
src/main/appengine/app.yaml
runtime: java
env: flex
10. App Engine Deploy
You will need to use JDK 8.
pom.xml
...
..
.
    <properties>
        ...
        ..
        <jdk.version>1.8</jdk.version>
        <release.version>1.8</release.version>
To deploy the app to Google App Engine run:
./mvnw package appengine:deploy -Dapp.deploy.projectId=PROJECT_ID -Dapp.deploy.version=1Replace PROJECT_ID with the ID of your Cloud project.
Initial deployment may take a while. When finished, you will be able to access your app:
....
...
..
.
Deployed service [default] to [ https://micronaut-guides.ue.r.appspot.com]

You can stream logs from the command line by running:
  $ gcloud app logs tail -s default

To view your application in the web browser, run:
  $ gcloud app browse
....
...
..
.
If you go to the Versions section in the App Engine administration panel, you will see the deployed app.
11. Running the App
curl -i https://micronaut-guides.ue.r.appspot.com/helloHTTP/2 200
date: Mon, 04 Oct 2021 05:29:04 GMT
content-type: text/plain
content-length: 11
via: 1.1 google
alt-svc: h3=":443"; ma=2592000,h3-29=":443"; ma=2592000,h3-T051=":443"; ma=2592000,h3-Q050=":443"; ma=2592000,h3-Q046=":443"; ma=2592000,h3-Q043=":443"; ma=2592000,quic=":443"; ma=2592000; v="46,43"
Hello World12. Logging
For the version you would like to inspect, select Logs in the diagnose dropdown:
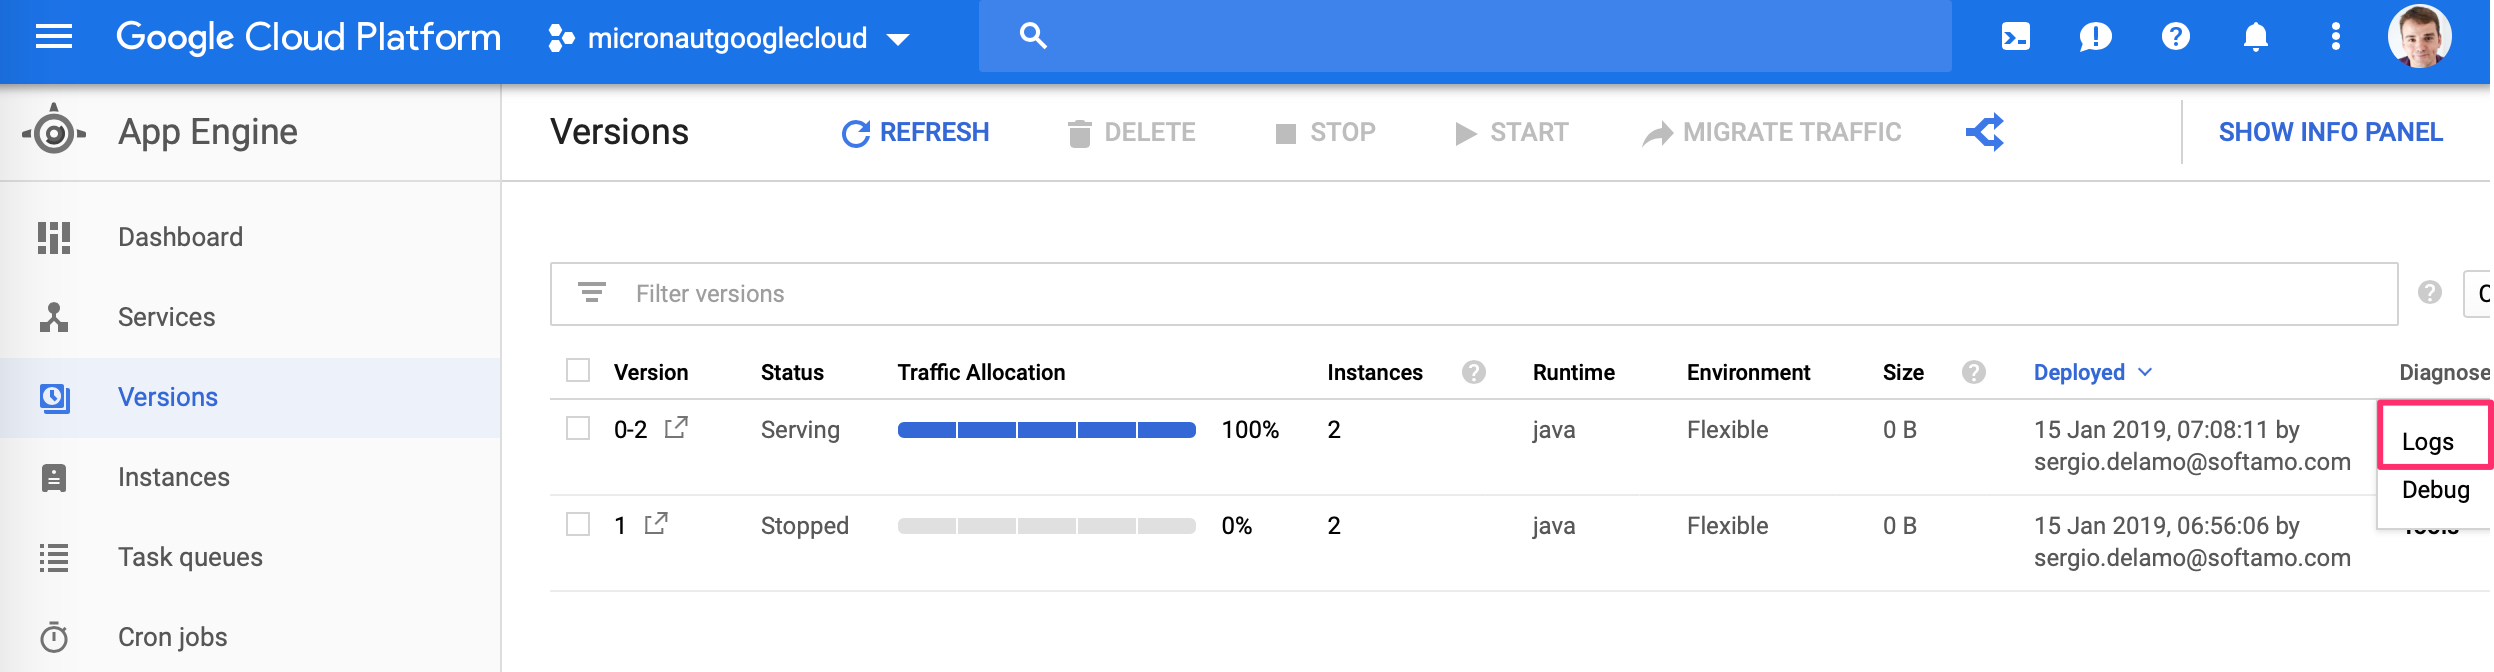
Application log messages written to stdout and stderr are automatically collected and can be viewed in the Logs Viewer.
Check Writing Application Logs documentation to read more about logs in the flexible environment.
13. Cleaning Up
After you’ve finished this guide, you can clean up the resources you created on Google Cloud Platform so you won’t be billed for them in the future. The following sections describe how to delete or turn off these resources.
13.1. Deleting the project
The easiest way to eliminate billing is to delete the project you created for the tutorial.
|
Deleting a project has the following consequences:
|
13.1.1. Via the CLI
To delete the project using the Cloud SDK, run the following command, replacing YOUR_PROJECT_ID with the project ID:
gcloud projects delete YOUR_PROJECT_ID13.1.2. Via the Cloud Platform Console
In the Cloud Platform Console, go to the Projects page.
In the project list, select the project you want to delete and click Delete project. After selecting the checkbox next to the project name, click Delete project
In the dialog, type the project ID, and then click Shut down to delete the project.
Deleting or turning off specific resources
You can individually delete or turn off some of the resources that you created during the tutorial.
13.2. Deleting app versions
To delete an app version:
In the Cloud Platform Console, go to the App Engine Versions page.
Click the checkbox next to the non-default app version you want to delete.
| The only way you can delete the default version of your App Engine app is by deleting your project. However, you can stop the default version in the Cloud Platform Console. This action shuts down all instances associated with the version. You can restart these instances later if needed. |
In the App Engine standard environment, you can stop the default version only if your app has manual or basic scaling.
Click the Delete button at the top of the page to delete the app version.
14. Next Steps
If you want to learn more about Google Cloud and Micronaut integration, check out the codelab Deploy a Micronaut Application Containerized with Jib to Google Kubernetes Engine.
15. Help with the Micronaut Framework
The Micronaut Foundation sponsored the creation of this Guide. A variety of consulting and support services are available.
16. License
| All guides are released with an Apache License 2.0 for the code and a Creative Commons Attribution 4.0 license for the writing and media (images). |