mn create-function-app example.micronaut.micronautguide \
    --features=aws-lambda,graalvm \
    --build=gradle \
--lang=kotlinTable of Contents
Micronaut RequestStreamHandler as a GraalVM Native Executable to AWS Lambda
Learn how to distribute a Micronaut function with an AWS Lambda RequestStreamHandler built as a GraalVM native executable to an AWS Lambda custom runtime.
Authors: Sergio del Amo
Micronaut Version: 5.0.4
In this guide, we will deploy a Micronaut serverless function to AWS Lambda using a RequestStreamHandler.
1. Getting Started
In this guide, we will create a Micronaut application written in Kotlin.
2. What you will need
To complete this guide, you will need the following:
-
Some time on your hands
-
A decent text editor or IDE (e.g. IntelliJ IDEA)
-
JDK 21 or greater installed with
JAVA_HOMEconfigured appropriately
3. Solution
We recommend that you follow the instructions in the next sections and create the application step by step. However, you can go right to the completed example.
-
Download and unzip the source
4. Writing the Application
Create an application using the Micronaut Command Line Interface or with Micronaut Launch.
If you don’t specify the --build argument, Gradle with the Kotlin DSL is used as the build tool. If you don’t specify the --lang argument, Java is used as the language.If you don’t specify the --test argument, JUnit is used for Java and Kotlin, and Spock is used for Groovy.
|
If you use Micronaut Launch, select serverless function as application type and add the aws-lambda feature.
The previous command creates a Micronaut application with the default package example.micronaut in a directory named micronautguide.
4.1. RequestStreamHandler
To use your own serialization, implement the RequestStreamHandler interface. With this interface, Lambda passes your handler an input stream and output stream. The handler reads bytes from the input stream, writes to the output stream, and returns void.
The application contains a class extending MicronautRequestStreamHandler
Replace the generated FunctionRequestHandler with the following:
src/main/kotlin/example/micronaut/FunctionRequestHandler.kt
package example.micronaut

import io.micronaut.context.env.Environment
import io.micronaut.core.annotation.Introspected
import io.micronaut.function.aws.MicronautRequestStreamHandler

@Introspected
class FunctionRequestHandler : MicronautRequestStreamHandler() { (1)

    override fun resolveFunctionName(env: Environment): String = "requestfunction" (2)
}| 1 | The class extends MicronautRequestStreamHandler |
| 2 | It specifies a function name. |
You will use MicronautRequestStreamHandler in combination with a class annotated with @FunctionBean that implements one of the interfaces from the java.util.function package.
src/main/kotlin/example/micronaut/RequestFunction.kt
package example.micronaut

import com.amazonaws.services.lambda.runtime.events.APIGatewayProxyRequestEvent
import com.amazonaws.services.lambda.runtime.events.APIGatewayProxyResponseEvent
import io.micronaut.function.FunctionBean
import io.micronaut.json.JsonMapper
import jakarta.inject.Inject
import java.io.IOException
import java.util.function.Function

@FunctionBean("requestfunction") (1)
class RequestFunction : Function<APIGatewayProxyRequestEvent, APIGatewayProxyResponseEvent> { (2)

    @Inject (3)
    lateinit var jsonMapper: JsonMapper

    override fun apply(requestEvent: APIGatewayProxyRequestEvent): APIGatewayProxyResponseEvent {
        val response = APIGatewayProxyResponseEvent()
        try {
            val json = String(jsonMapper.writeValueAsBytes(mapOf("message" to "Hello World")))
            response.statusCode = 200
            response.body = json
        } catch (e: IOException) {
            response.statusCode = 500
        }
        return response
    }
}| 1 | The class is annotated with @FunctionBean. It specifies requestfunction as an annotation value, which matches what we set in FunctionRequestHandler.. |
| 2 | It implements java.util.function.Function, which accepts a single argument and returns a single result. We use APIGatewayProxyRequestEvent and APIGatewayProxyResponseEvent from the AWS Lambda Java Events library. |
| 3 | Field injection |
4.2. Tests
You can test the handler behaves as expected, as shown in the following example:
src/test/kotlin/example/micronaut/FunctionRequestHandlerTest.kt
package example.micronaut

import com.amazonaws.services.lambda.runtime.events.APIGatewayProxyRequestEvent
import io.micronaut.json.JsonMapper
import org.junit.jupiter.api.AfterAll
import org.junit.jupiter.api.Assertions.assertEquals
import org.junit.jupiter.api.BeforeAll
import org.junit.jupiter.api.Test
import java.io.ByteArrayInputStream
import java.io.ByteArrayOutputStream
import java.io.InputStream

class FunctionRequestHandlerTest {

    @Test
    fun testHandler() {
        val jsonMapper = handler.applicationContext.getBean(JsonMapper::class.java)
        ByteArrayOutputStream().use { baos ->
            createInputStreamRequest(jsonMapper).use { inputStream ->
                handler.execute(inputStream, baos) (3)
                assertEquals(
                    """{"statusCode":200,"body":"{\"message\":\"Hello World\"}"}""",
                    baos.toString()
                )
            }
        }
    }

    private fun createInputStreamRequest(jsonMapper: JsonMapper): InputStream =
        ByteArrayInputStream(jsonMapper.writeValueAsBytes(createRequest()))

    private fun createRequest(): APIGatewayProxyRequestEvent =
        APIGatewayProxyRequestEvent()
            .withHttpMethod("GET")
            .withPath("/")

    companion object {
        private lateinit var handler: FunctionRequestHandler

        @BeforeAll
        @JvmStatic
        fun setupServer() {
            handler = FunctionRequestHandler() (1)
        }

        @AfterAll
        @JvmStatic
        fun stopServer() {
            if (::handler.isInitialized) {
                handler.applicationContext.close() (2)
            }
        }
    }
}| 1 | When you instantiate the Handler, the application context starts. |
| 2 | Remember to close your application context when you end your test. You can use your handler to obtain it. |
| 3 | Invoke the execute method of the handler. |
5. Testing the Application
To run the tests:
./gradlew testThen open build/reports/tests/test/index.html in a browser to see the results.
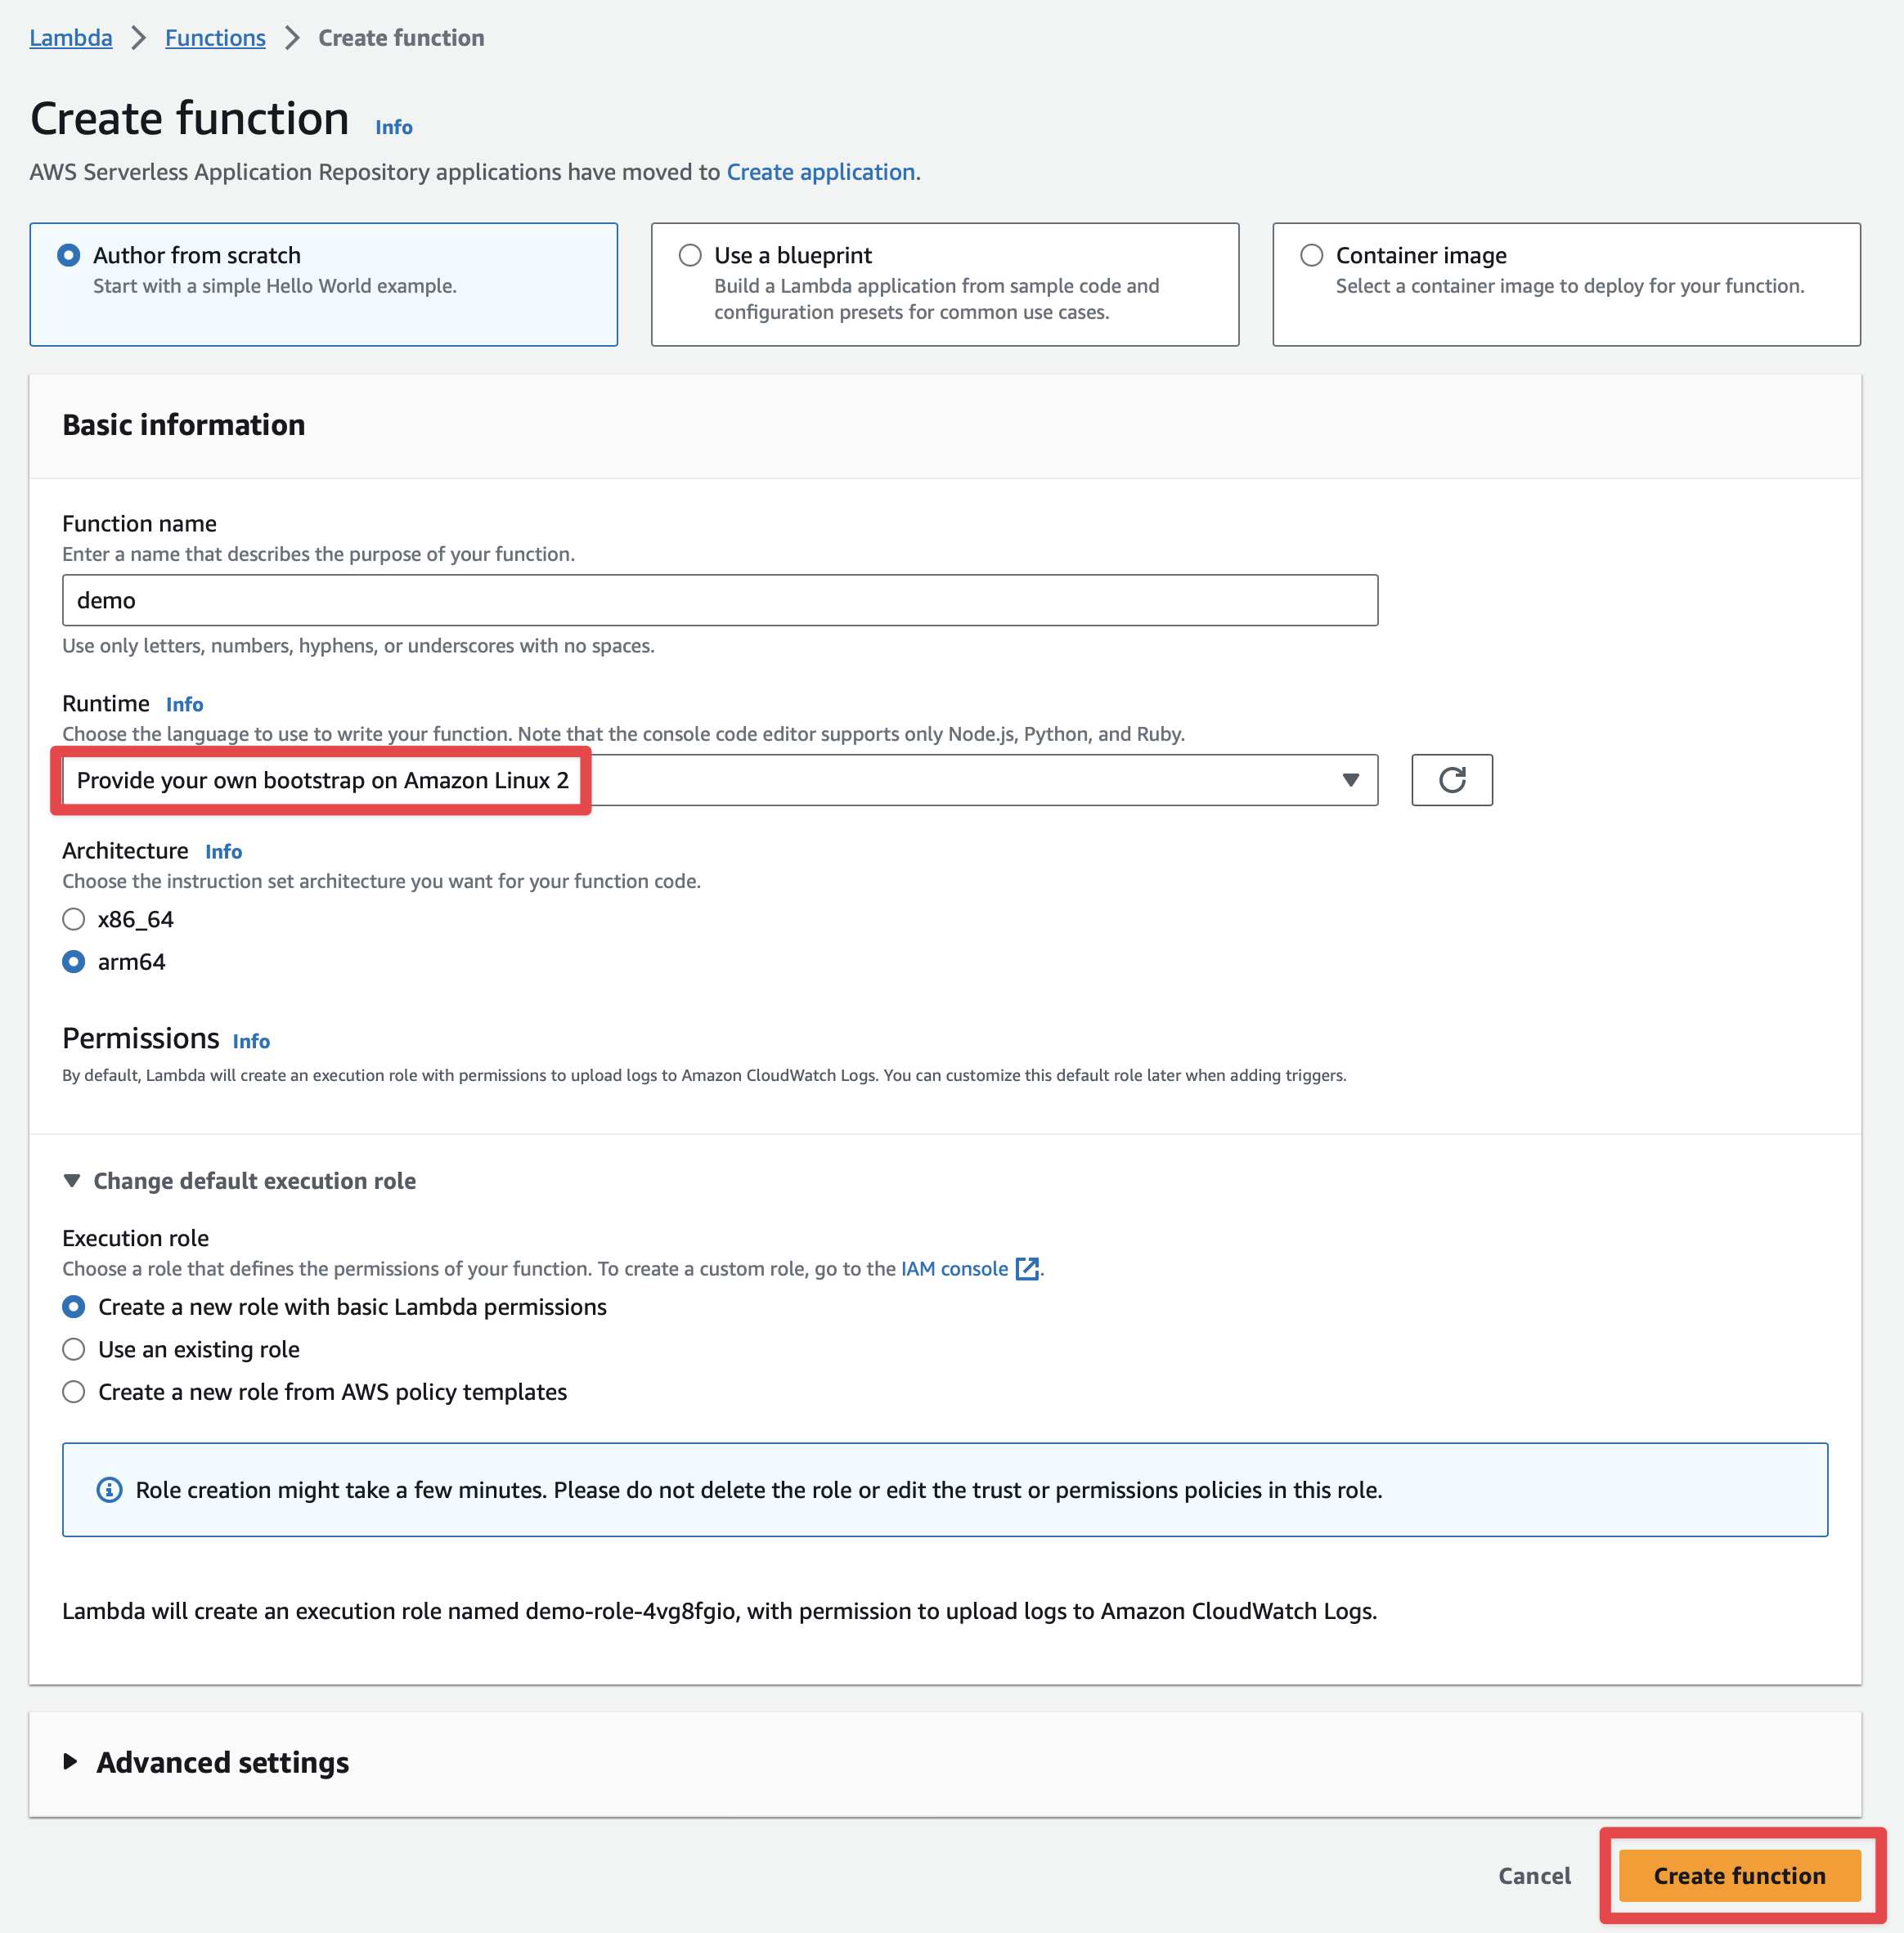
6. Lambda
Create a Lambda function. For the runtime, select Custom Runtime. Select the x86_64 or arm64 architecture to match the computer you use to build the GraalVM Native Image.
The Micronaut framework eases the deployment of your functions as a Custom AWS Lambda runtime.
The main API you interact with is AbstractMicronautLambdaRuntime. This abstract class can be subclassed to create your custom runtime mainClass. That class includes the code to perform the
Processing Tasks described in the Custom Runtime documentation.
6.1. LambdaRuntime
Create a class that will be the entry point of the GraalVM native image.
src/main/kotlin/example/micronaut/FunctionLambdaRuntime.kt
package example.micronaut

import com.amazonaws.services.lambda.runtime.RequestStreamHandler
import com.amazonaws.services.lambda.runtime.events.APIGatewayProxyRequestEvent
import com.amazonaws.services.lambda.runtime.events.APIGatewayProxyResponseEvent
import io.micronaut.function.aws.runtime.AbstractRequestStreamHandlerMicronautLambdaRuntime
import java.net.MalformedURLException

class FunctionLambdaRuntime : AbstractRequestStreamHandlerMicronautLambdaRuntime<APIGatewayProxyRequestEvent, APIGatewayProxyResponseEvent>() {

    override fun createRequestStreamHandler(vararg args: String): RequestStreamHandler? =
        FunctionRequestHandler()

    companion object {
        @JvmStatic
        fun main(args: Array<String>) {
            try {
                FunctionLambdaRuntime().run(*args)
            } catch (e: MalformedURLException) {
                e.printStackTrace()
            }
        }
    }
}
6.2. Build GraalVM Native Executable
./gradlew buildNativeLambdaThe above command generates a ZIP file which contains a GraalVM Native Executable of the application, and a bootstrap file which executes the native executable. The GraalVM Native Executable of the application is generated inside a Docker container.
Once you have a ZIP file, upload it.

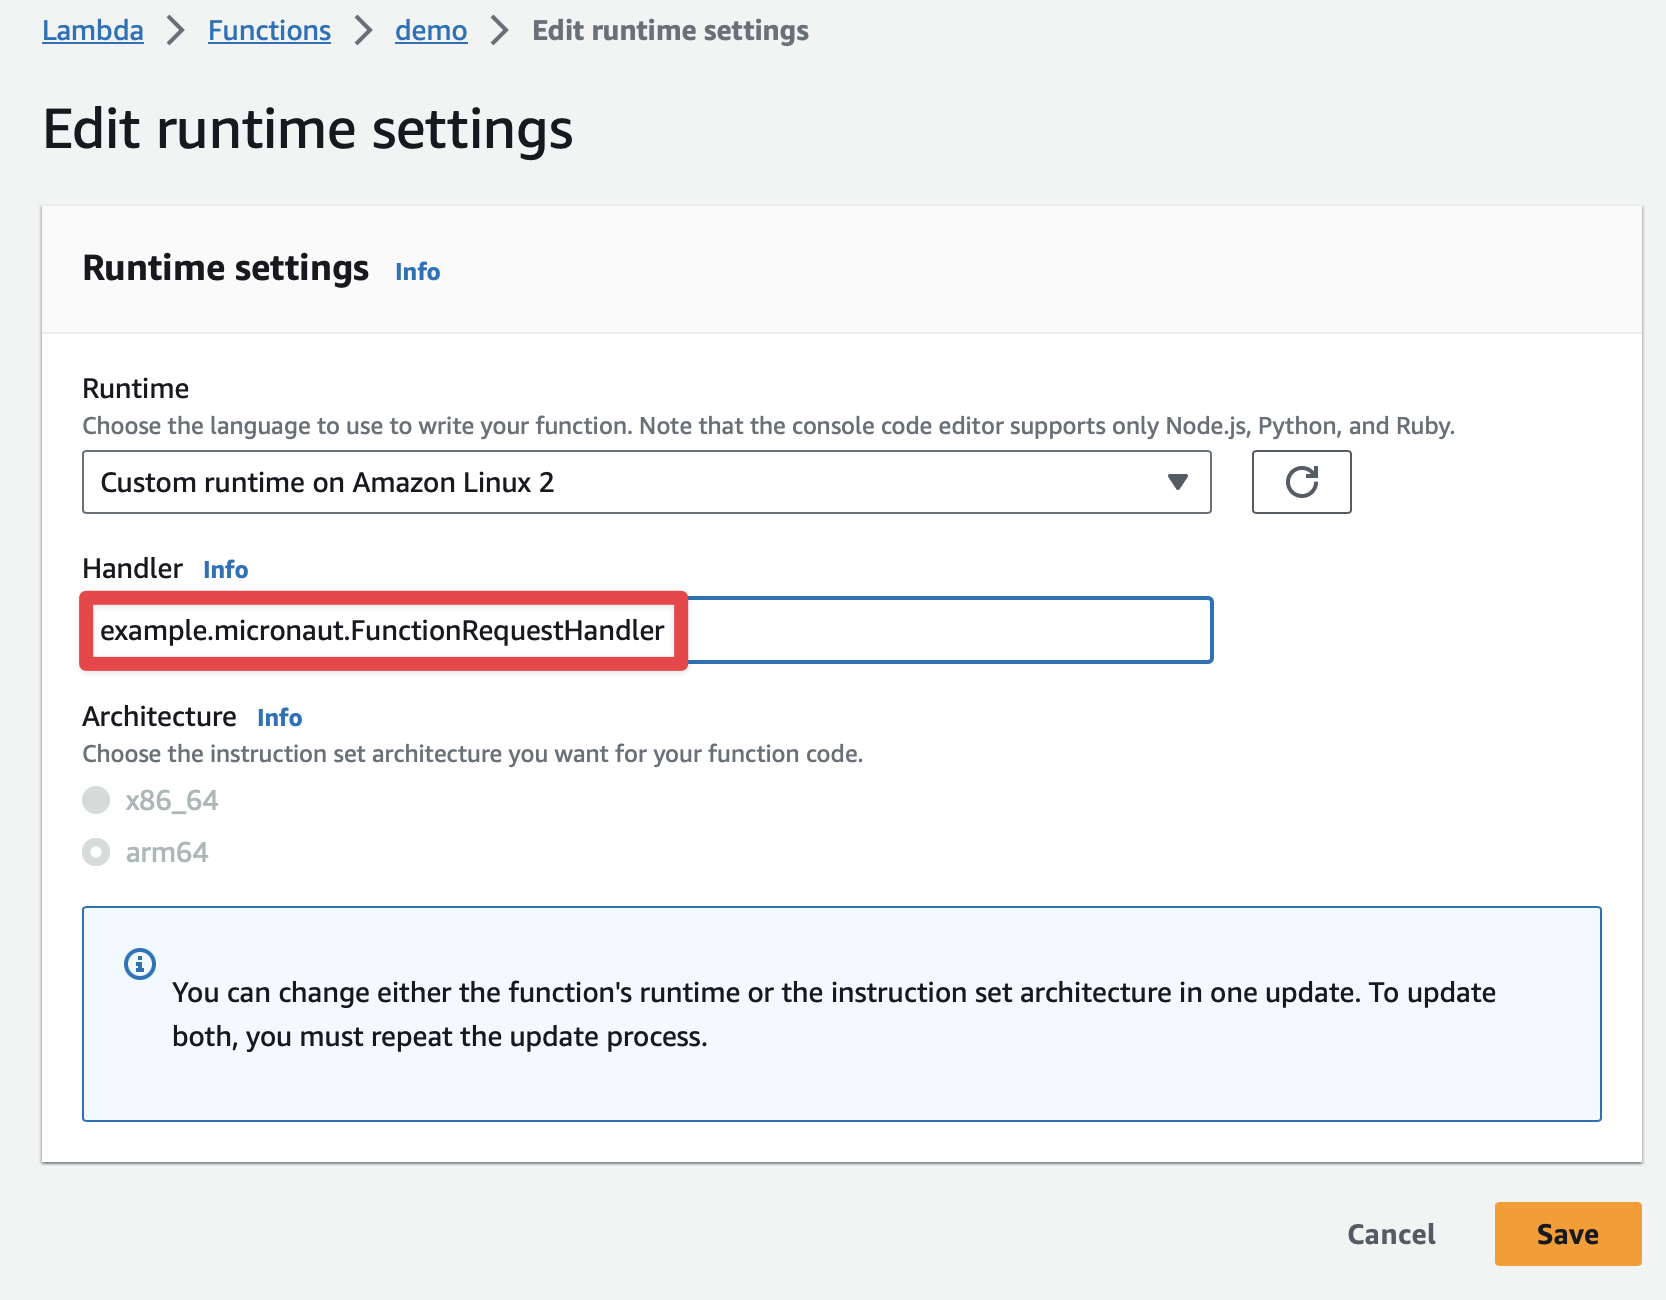
6.3. Handler
The handler used is the one created at FunctionLambdaRuntime.
Thus, you don’t need to specify the handler in the AWS Lambda console.
However, you can specify it in the console as well:
example.micronaut.FunctionRequestHandler
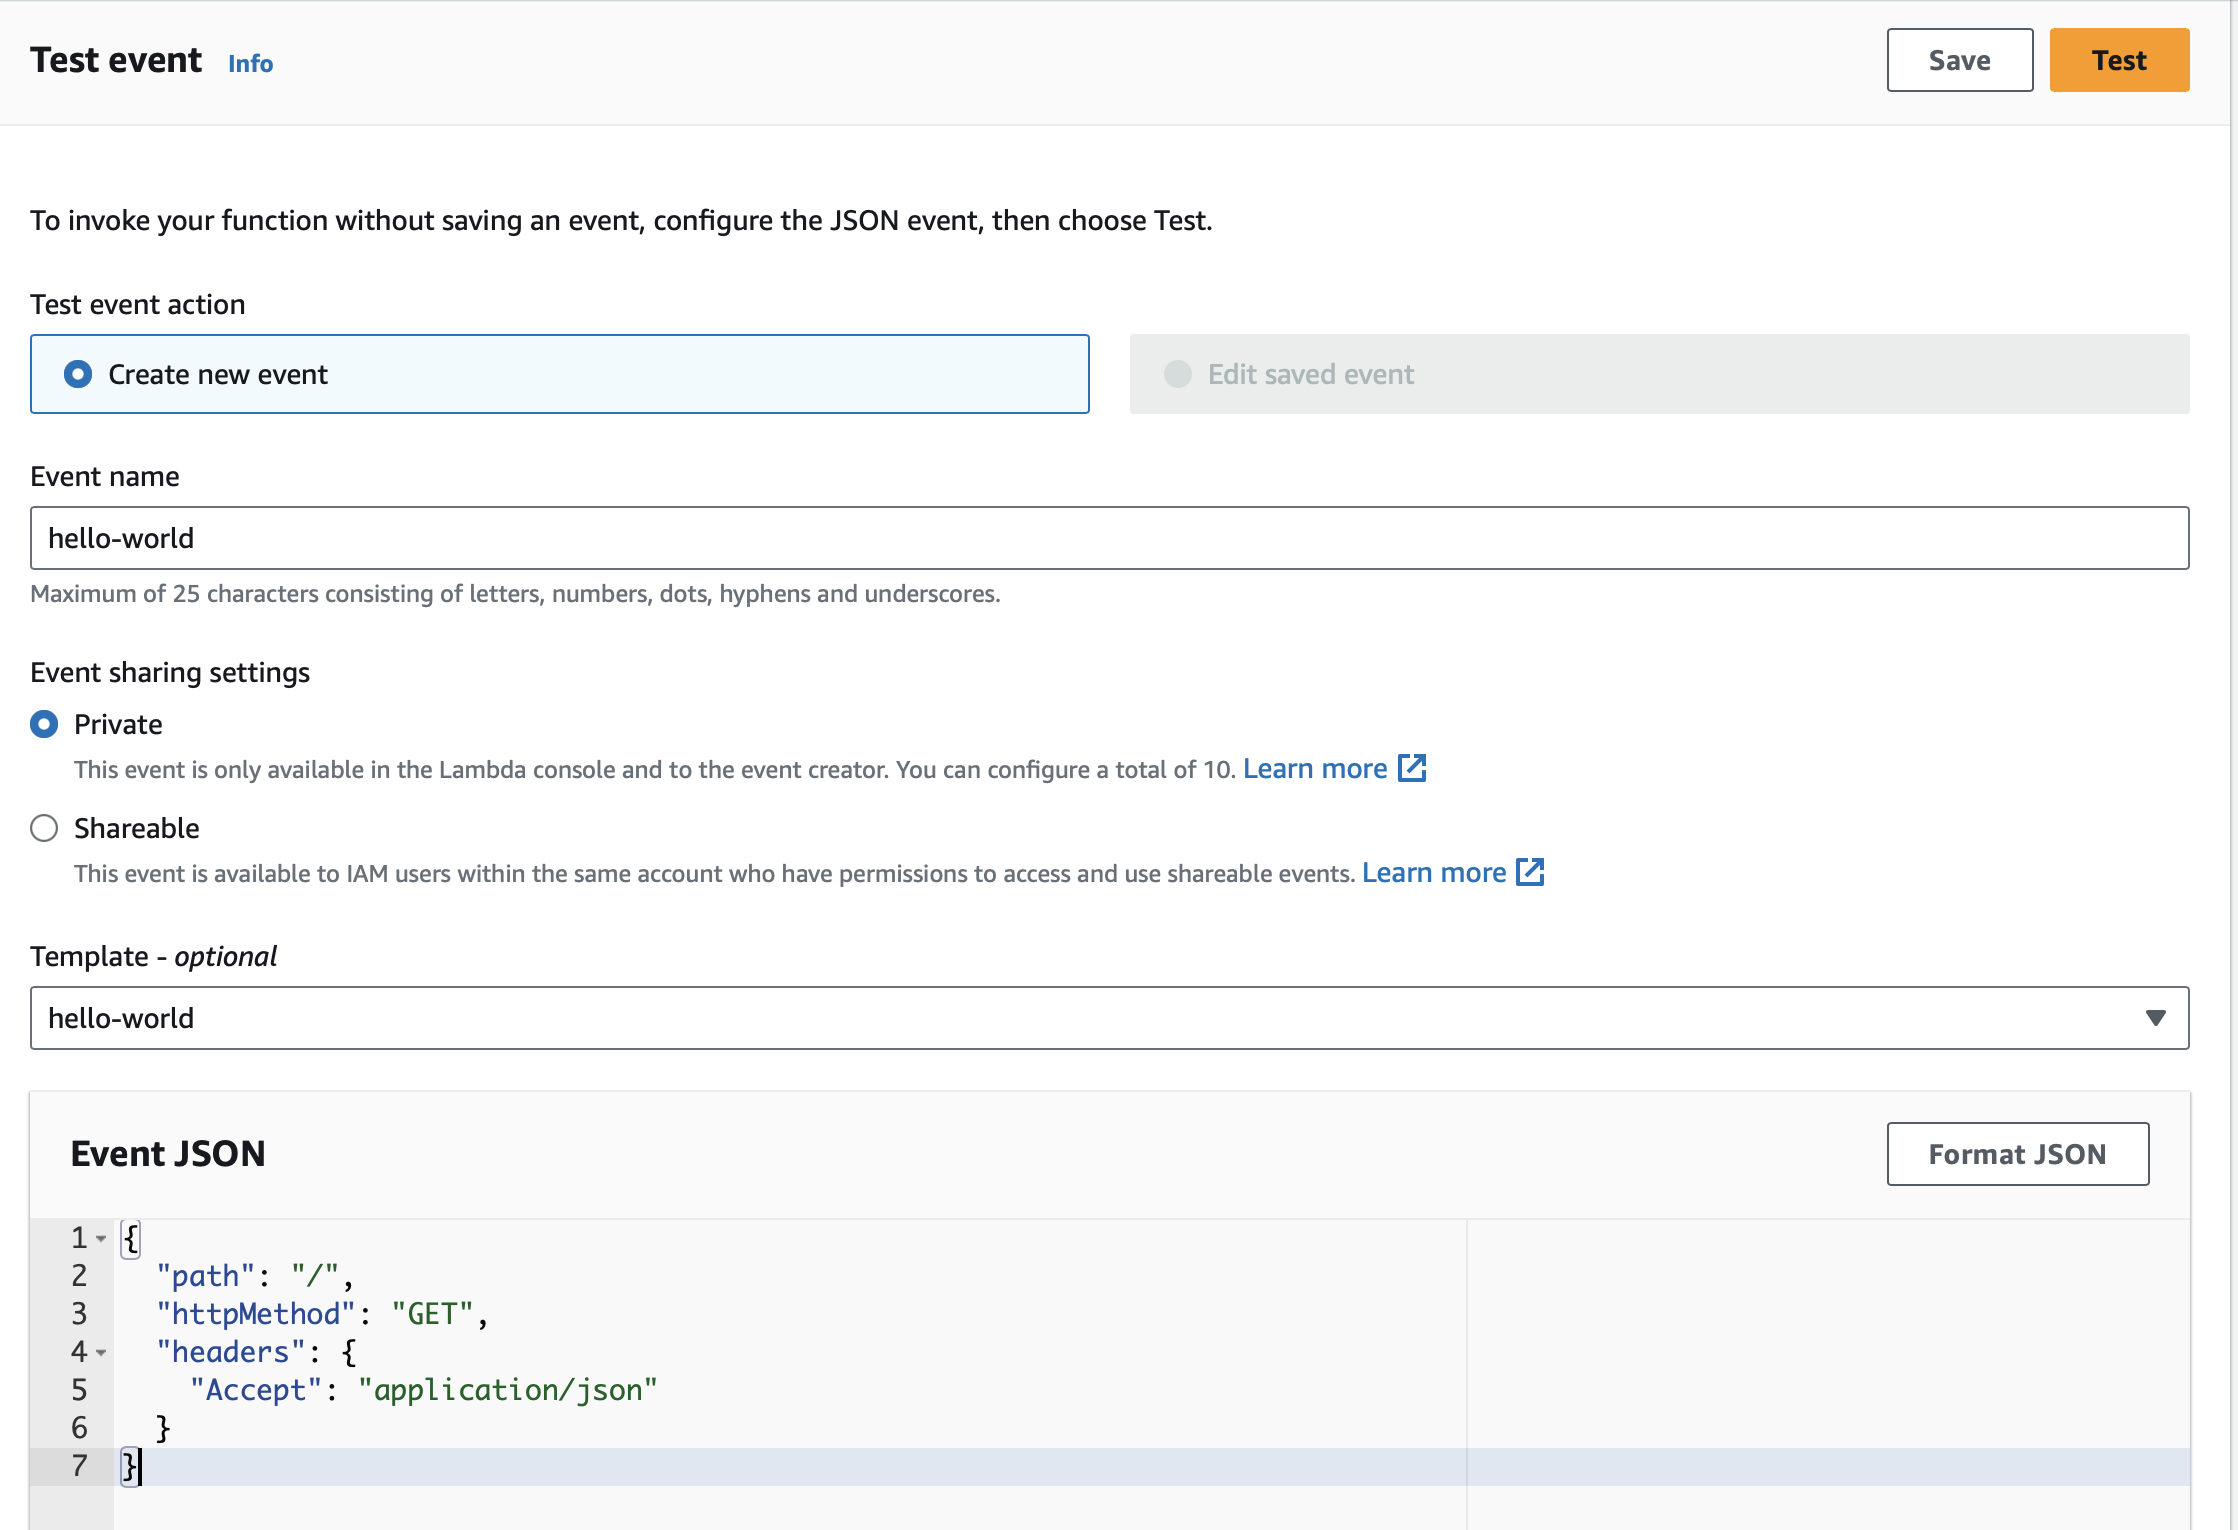
6.4. Test
You can test it easily with a JSON Event:
{
  "path": "/",
  "httpMethod": "GET",
  "headers": {
    "Accept": "application/json"
  }
}
When working with Amazon API Gateway, it’s easy to use apigateway-aws-proxy as an Event Template to get started:
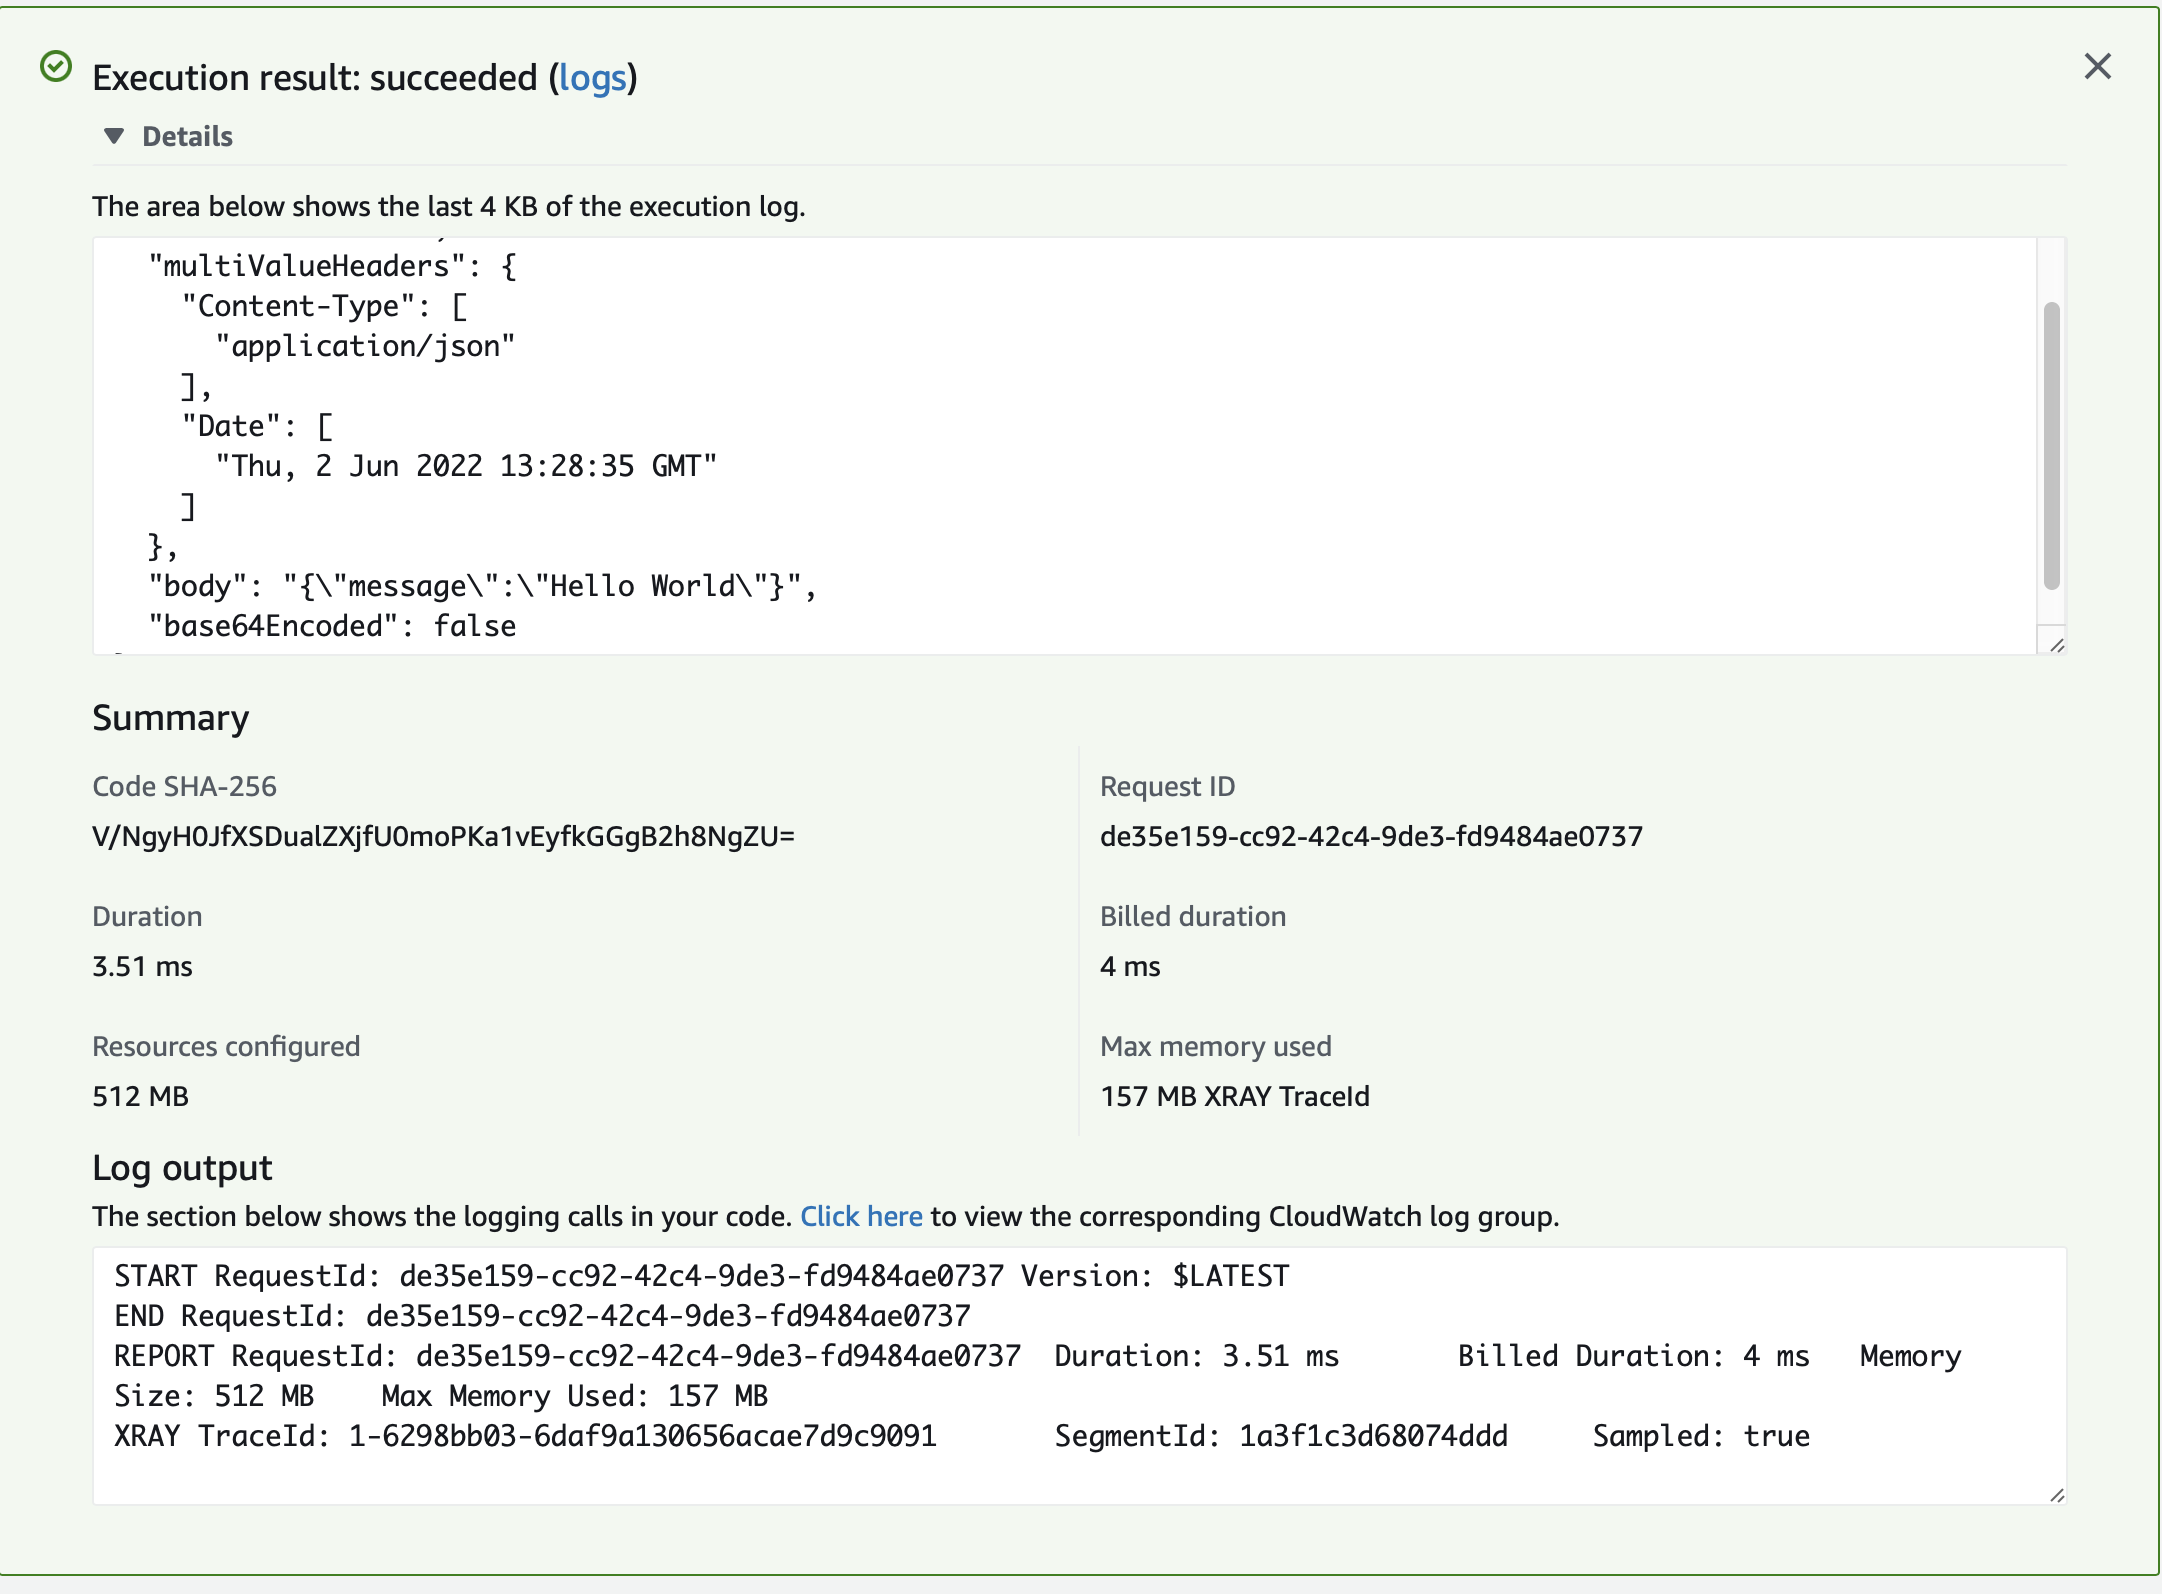
You should see a 200 response:
7. Next Steps
Explore more features with Micronaut Guides.
Read more about:
8. Help with the Micronaut Framework
The Micronaut Foundation sponsored the creation of this Guide. A variety of consulting and support services are available.
9. License
| All guides are released with an Apache License 2.0 for the code and a Creative Commons Attribution 4.0 license for the writing and media (images). |