

Many-to-Many with Micronaut Data JDBC and Oracle
Learn how to map a many-to-many association with Micronaut Data JDBC and Oracle.
On this guide
In this section
Getting Started
In this guide, we will create a Micronaut application written in Java.
What you will need
To complete this guide, you will need the following:
-
Some time on your hands
-
A decent text editor or IDE (e.g. IntelliJ IDEA)
-
JDK 21 or greater installed with
JAVA_HOMEconfigured appropriately
Solution
We recommend that you follow the instructions in the next sections and create the application step by step. However, you can go right to the completed example.
-
Download and unzip the source
Many-To-Many Relationship
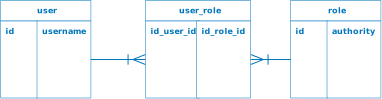
A relationship is a connection between two types of entities. In the case of a many-to-many relationship, both sides can relate to multiple instances of the other side.
In this guide, you are going to create a many-to-many relationship between User and Role entities using Micronaut Data JDBC.
A user can have many roles and the same role can be applied to multiple users.
The application consumes a database schema with the following structure:
Writing the Application
Create an application using the Micronaut Command Line Interface or with Micronaut Launch.
mn create-app example.micronaut.micronautguide \
    --features=data-jdbc,liquibase,oracle,validation,graalvm \
    --build=maven \
    --lang=java \
--test=junit|
Note
|
If you don’t specify the --build argument, Gradle with the Kotlin DSL is used as the build tool. If you don’t specify the --lang argument, Java is used as the language.If you don’t specify the --test argument, JUnit is used for Java and Kotlin, and Spock is used for Groovy.
|
The previous command creates a Micronaut application with the default package example.micronaut in a directory named micronautguide.
If you use Micronaut Launch, select Micronaut Application as application type and add data-jdbc, liquibase, oracle, validation, and graalvm features.
|
Note
|
If you have an existing Micronaut application and want to add the functionality described here, you can view the dependency and configuration changes from the specified features, and apply those changes to your application. |
The previous command creates a Micronaut application with the default package example.micronaut in a directory named micronautguide.
|
Note
|
If you have an existing Micronaut application and want to add the functionality described here, you can view the dependency and configuration changes from the specified features, and apply those changes to your application. |
Micronaut Data JDBC
Add Micronaut Data JDBC dependencies to the project:
<!-- Add the following to your annotationProcessorPaths element -->
<path>
    <groupId>io.micronaut.data</groupId>
    <artifactId>micronaut-data-processor</artifactId>
</path>
<dependency>
    <groupId>io.micronaut.data</groupId>
    <artifactId>micronaut-data-jdbc</artifactId>
    <scope>compile</scope>
</dependency>
<dependency>
    <groupId>io.micronaut.sql</groupId>
    <artifactId>micronaut-jdbc-hikari</artifactId>
    <scope>compile</scope>
</dependency>
Oracle Driver
Add also the Oracle Driver
<dependency>
    <groupId>com.oracle.database.jdbc</groupId>
    <artifactId>ojdbc11</artifactId>
    <scope>runtime</scope>
</dependency>
Database Configuration
And the database configuration:
Database Migration with Liquibase
We need a way to create the database schema. For that, we use Micronaut integration with Liquibase.
Add the following snippet to include the necessary dependencies:
<dependency>
    <groupId>io.micronaut.liquibase</groupId>
    <artifactId>micronaut-liquibase</artifactId>
    <scope>compile</scope>
</dependency>
Configure the database migrations directory for Liquibase in application.properties.
liquibase.datasources.default.change-log=classpath\:db/liquibase-changelog.xmlCreate the following files with the database schema creation:
<?xml version="1.0" encoding="UTF-8"?>
<databaseChangeLog
  xmlns="http://www.liquibase.org/xml/ns/dbchangelog"
  xmlns:xsi="http://www.w3.org/2001/XMLSchema-instance"
  xsi:schemaLocation="http://www.liquibase.org/xml/ns/dbchangelog
         http://www.liquibase.org/xml/ns/dbchangelog/dbchangelog-3.1.xsd">
  <include file="changelog/01-schema.xml" relativeToChangelogFile="true"/>
</databaseChangeLog><?xml version="1.0" encoding="UTF-8"?>
<databaseChangeLog
xmlns="http://www.liquibase.org/xml/ns/dbchangelog"
xmlns:xsi="http://www.w3.org/2001/XMLSchema-instance"
xsi:schemaLocation="http://www.liquibase.org/xml/ns/dbchangelog
http://www.liquibase.org/xml/ns/dbchangelog/dbchangelog-3.1.xsd">
<changeSet id="01" author="username">
<createSequence sequenceName="users_seq" startValue="1" incrementBy="1"/>
<createSequence sequenceName="role_seq" startValue="1" incrementBy="1"/>
<createTable tableName="users">
<column name="id" type="BIGINT" autoIncrement="true">
<constraints primaryKey="true" primaryKeyName="pk_user" nullable="false"/>
</column>
<column name="username" type="VARCHAR(255)">
<constraints nullable="false" unique="true" uniqueConstraintName="uk_user_username"/>
</column>
</createTable>
<createTable tableName="role">
<column name="id" type="BIGINT" autoIncrement="true">
<constraints primaryKey="true" primaryKeyName="pk_role" nullable="false"/>
</column>
<column name="authority" type="VARCHAR(255)">
<constraints nullable="false" unique="true" uniqueConstraintName="uk_role_authority"/>
</column>
</createTable>
<createTable tableName="user_role">
<column name="user_id" type="BIGINT">
<constraints nullable="false"/>
</column>
<column name="role_id" type="BIGINT">
<constraints nullable="false"/>
</column>
</createTable>
<addPrimaryKey tableName="user_role" constraintName="pk_user_role" columnNames="user_id, role_id"/>
<addForeignKeyConstraint
baseTableName="user_role"
baseColumnNames="user_id"
constraintName="fk_user_role_user"
referencedTableName="users"
referencedColumnNames="id"
onDelete="CASCADE"/>
<addForeignKeyConstraint
baseTableName="user_role"
baseColumnNames="role_id"
constraintName="fk_user_role_role"
referencedTableName="role"
referencedColumnNames="id"
onDelete="CASCADE"/>
</changeSet>
</databaseChangeLog>Entities
User
Role
Create a Role domain class to store authorities within the application.
UserRole
Create a UserRole entity that stores a many-to-many relationship between User and Role.
Projection
Create a User record that represents a user and their assigned roles.
JDBC Repositories
Create the following JDBC repositories:
User Repository
Role Repository
UserRole Repository
A domain class fulfills the M in the Model View Controller (MVC) pattern and represents a persistent entity that is mapped onto an underlying database table.
Test
Add a test that verifies the many-to-many relationship:
Testing the Application
To run the tests:
./mvnw testIf you run the test, you will see an Oracle Database container being started by Micronaut Test Resources through integration with Testcontainers to provide throwaway containers for testing.
Micronaut Test Resources Goals
zero-configuration: without adding any configuration, test resources should be spawned and the application configured to use them. Configuration is only required for advanced use cases.
classpath isolation: use of test resources shouldn’t leak into your application classpath, nor your test classpath
compatible with GraalVM native: if you build a native binary, or run tests in native mode, test resources should be available
easy to use: the Micronaut build plugins for Gradle and Maven should handle the complexity of figuring out the dependencies for you
extensible: you can implement your own test resources, in case the built-in ones do not cover your use case
technology agnostic: while lots of test resources use Testcontainers under the hood, you can use any other technology to create resources
Native Tests
The Maven plugin for GraalVM Native Image building allows you to run native tests.
This plugin supports running tests on the JUnit Platform as native images. This means that tests will be compiled and executed as native code.
First, add the following profile to pom.xml:
 <profile>
      <id>native</id>
      <build>
        <plugins>
          <plugin>
            <groupId>org.graalvm.buildtools</groupId>
            <artifactId>native-maven-plugin</artifactId>
            <extensions>true</extensions>
            <executions>
              <execution>
                <id>test-native</id>
                <goals>
                  <goal>test</goal>
                </goals>
                <phase>test</phase>
              </execution>
            </executions>
          </plugin>
        </plugins>
      </build>
    </profile>
Then, to execute the native tests, execute:
./mvnw -Pnative testINFO: A test may be disabled within a GraalVM native image via the @DisabledInNativeImage annotation.
Next Steps
Explore more features with Micronaut Guides.
License
|
Note
|
All guides are released with an Apache License 2.0 for the code and a Creative Commons Attribution 4.0 license for the writing and media (images). |