

Client Credentials Flow with Micronaut and Oracle Identity Domain
Learn how to use Client Credentials Flow between Micronaut microservices with an Authorization Server provided by Oracle Identity Domain.
On this guide
In this section
Getting Started
In this guide, we will create a Micronaut application written in Java.
What you will need
To complete this guide, you will need the following:
-
Some time on your hands
-
A decent text editor or IDE (e.g. IntelliJ IDEA)
-
JDK 21 or greater installed with
JAVA_HOMEconfigured appropriately -
An Oracle Cloud Infrastructure account. See Setting up Your Cloud Accounts.
-
An Oracle Cloud Infrastructure compartment.
Solution
We recommend that you follow the instructions in the next sections and create the application step by step. However, you can go right to the completed example.
-
Download and unzip the source
Application Diagram
Download the complete solution of the guide. You will use the sample app as a starting point. The application contains three microservices:
-
bookcatalogue- Returns a list of books. It uses a domain consisting of a book name and an ISBN. -
bookinventory- Exposes an endpoint to check whether a book has sufficient stock to fulfil an order. It uses a domain with a stock level and an ISBN. -
bookrecommendation- Uses the other services and exposes an endpoint that recommends book names that are in stock.
The bookrecommendation service consumes endpoints exposed by the other services. The following image illustrates the original application flow:
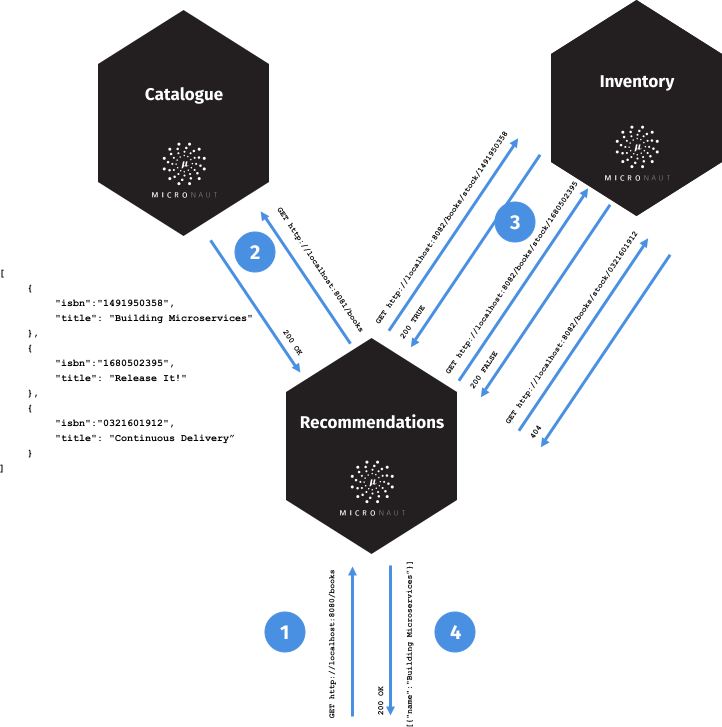
A request to bookrecommendation (http://localhost:8080/books) triggers several requests through our microservices mesh.
In this guide, you will secure the communication between the microservices. You will use a client credentials flow and obtain an access token from an Oracle Cloud Identity Domain authorization server.
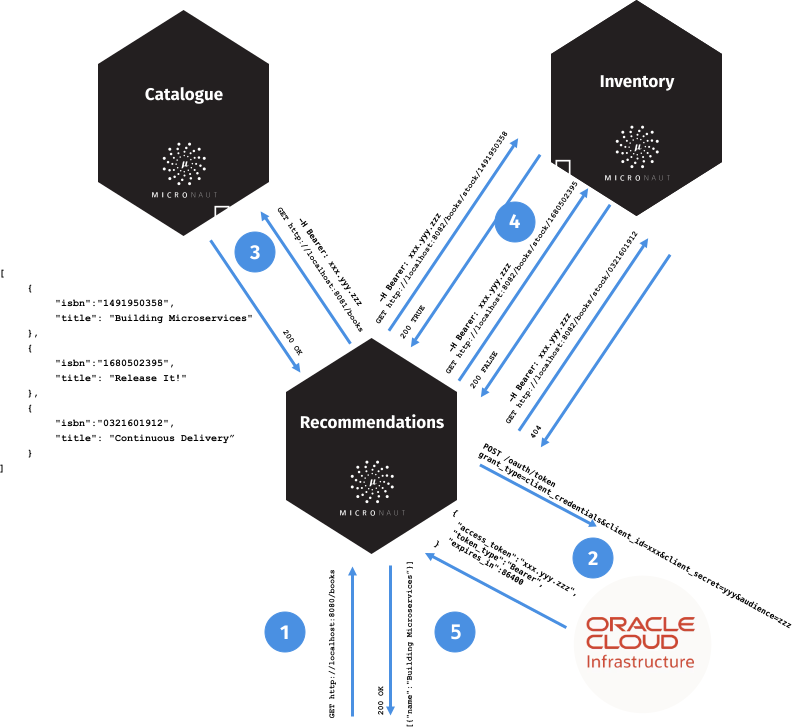
Configure OpenID Connect at Oracle Cloud Infrastructure
You will use the Oracle Cloud console to create an OAuth 2.0 "Confidential Application" to demonstrate using Client Credentials Grant with Micronaut® and Oracle Cloud Infrastructure.
Create an OCI Domain
Log in to your Oracle Cloud Infrastructure tenancy as an admin (or as a user with sufficient permissions to create users and applications).
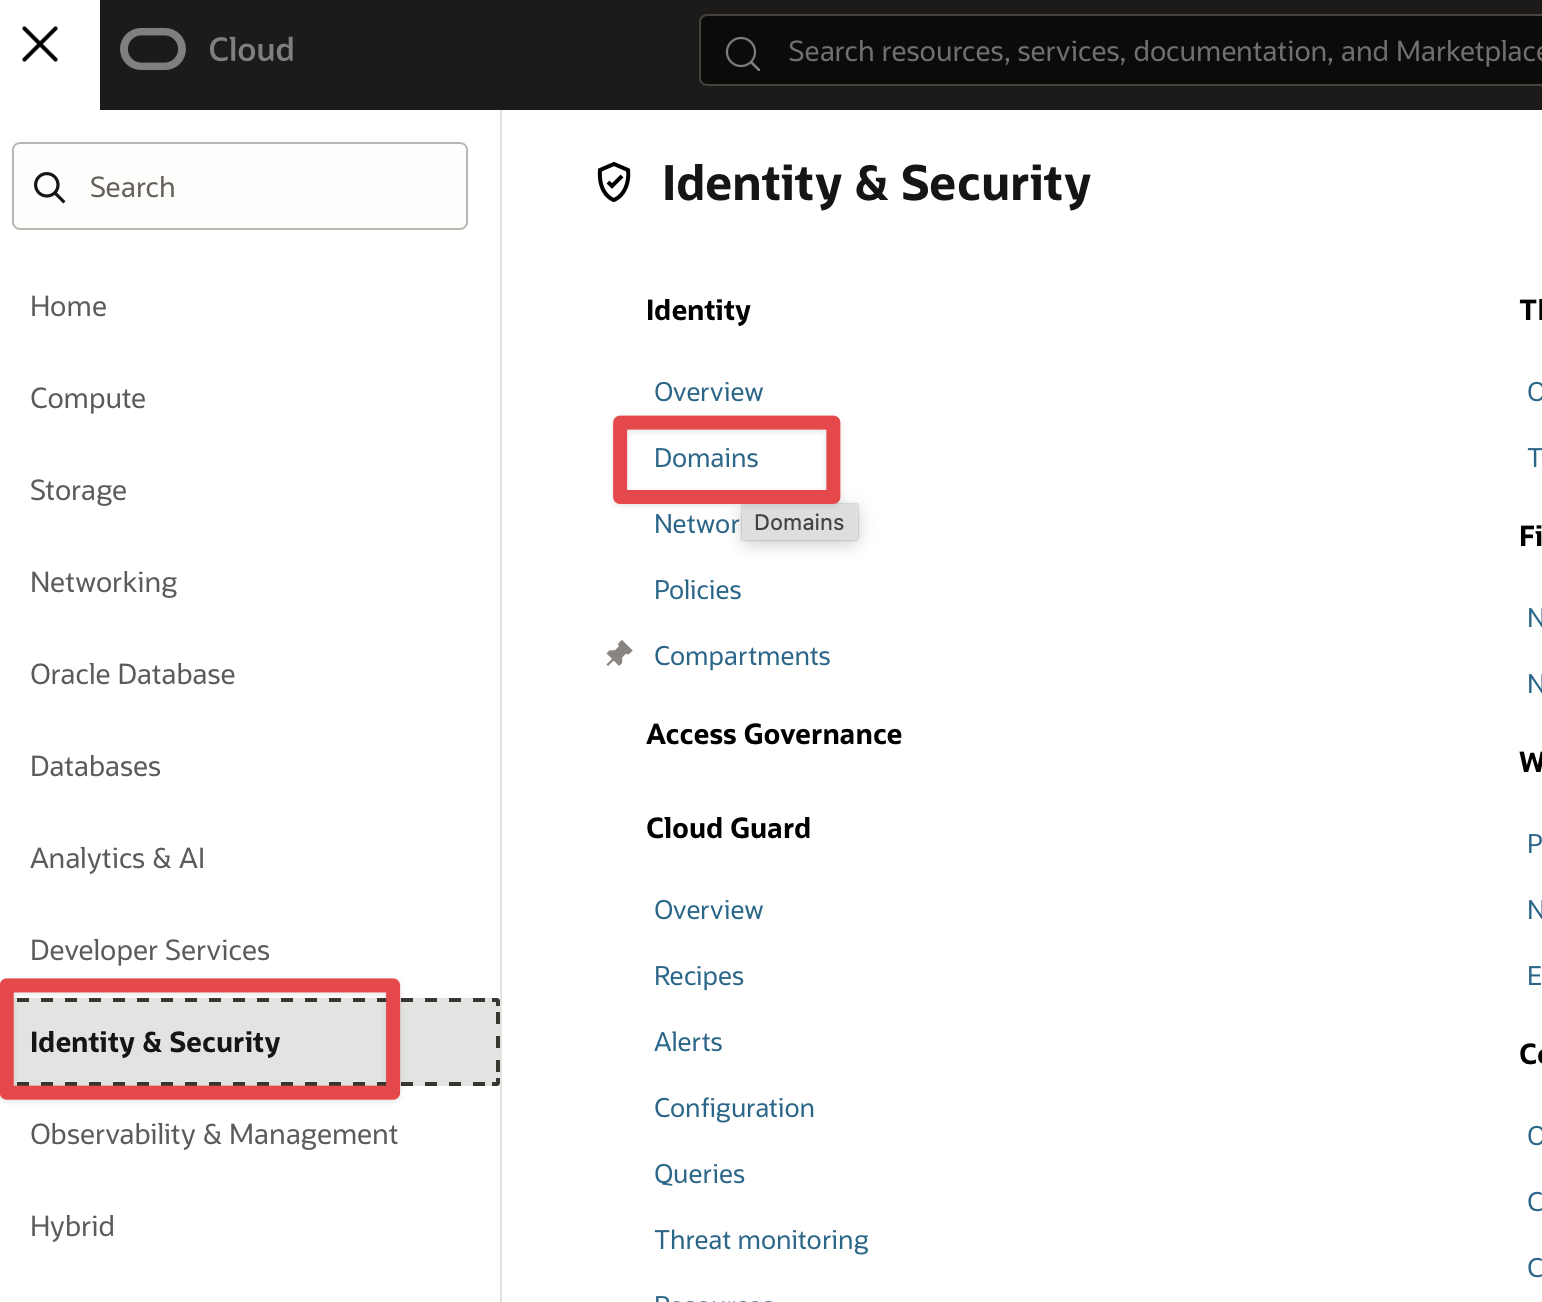
In the Oracle Cloud Console, open the navigation menu, click Identity & Security. Under Identity, click Domains.
-
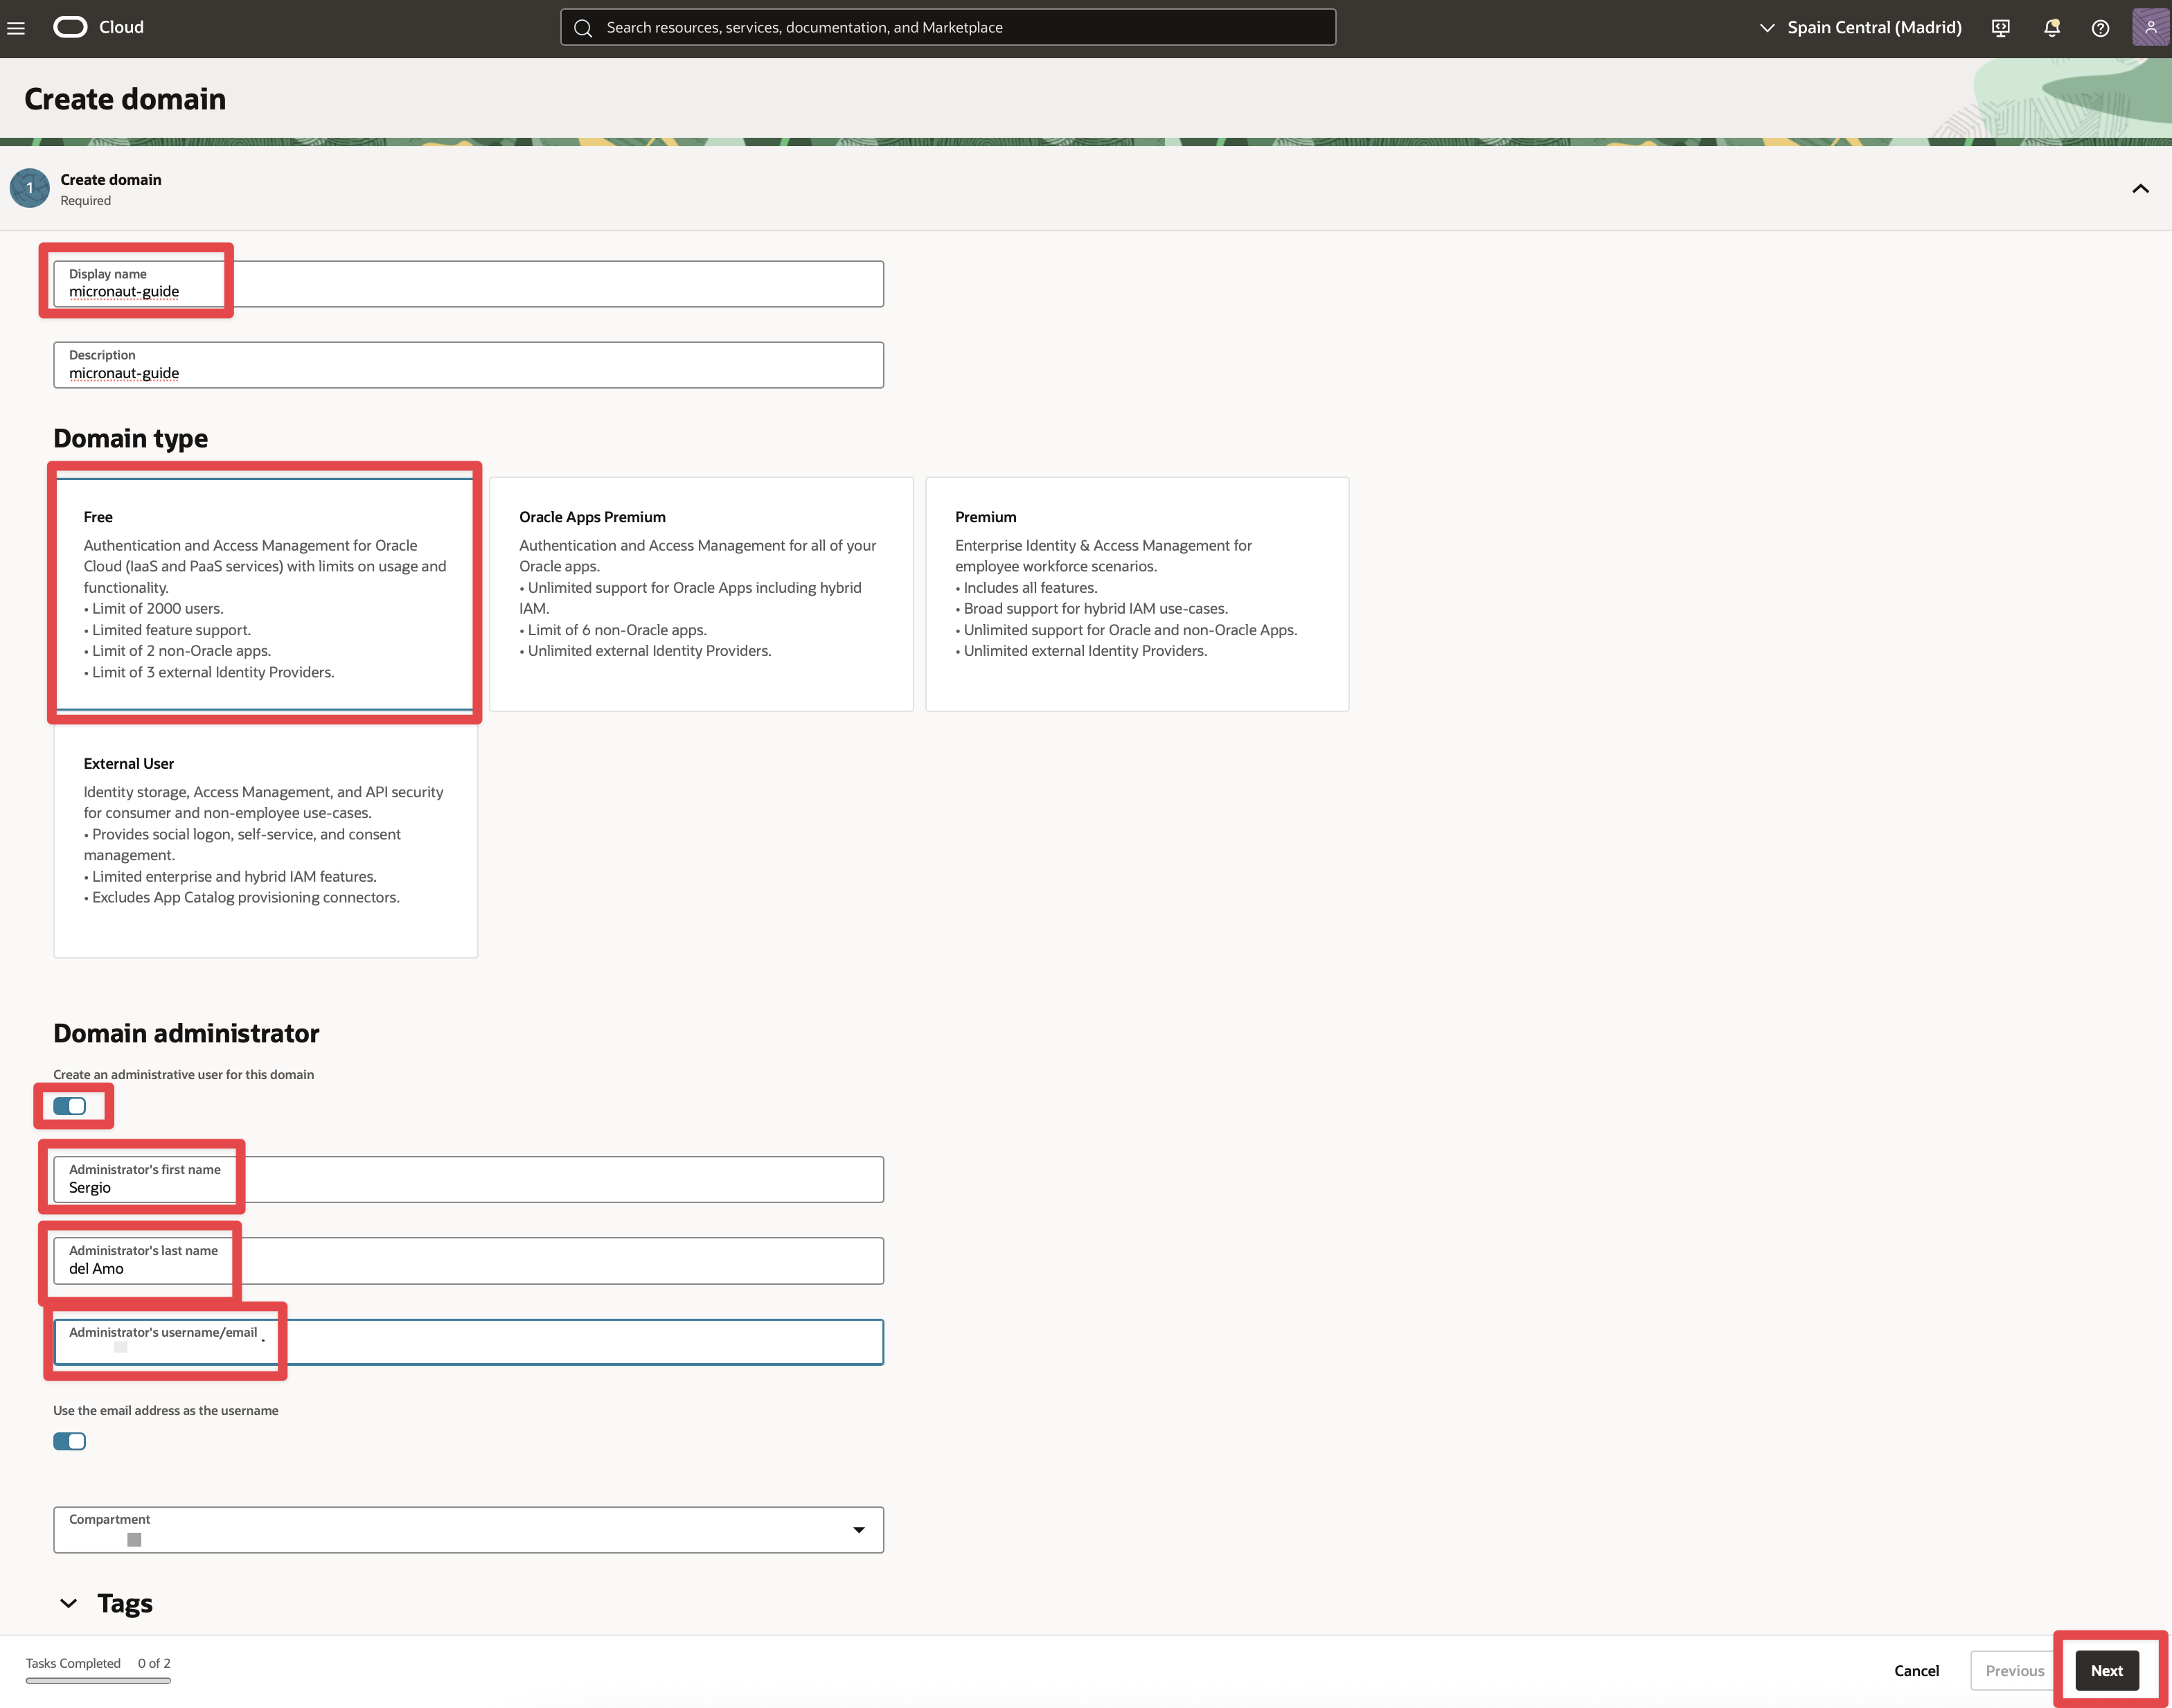
Click Create domain.
-
Enter a Display name, for example, "micronaut_guide_domain", and a short Description, then select the
FreeDomain type. -
Enter the domain administrator first and last name, and a valid email address. Click Next then Create.
-
Open the email sent to the email address you specified and click the link to set the password for the user.
Log in as the domain administrator to verify the password. Then log out and back in as an Oracle Cloud Infrastructure admin.
Create an integrated application
-
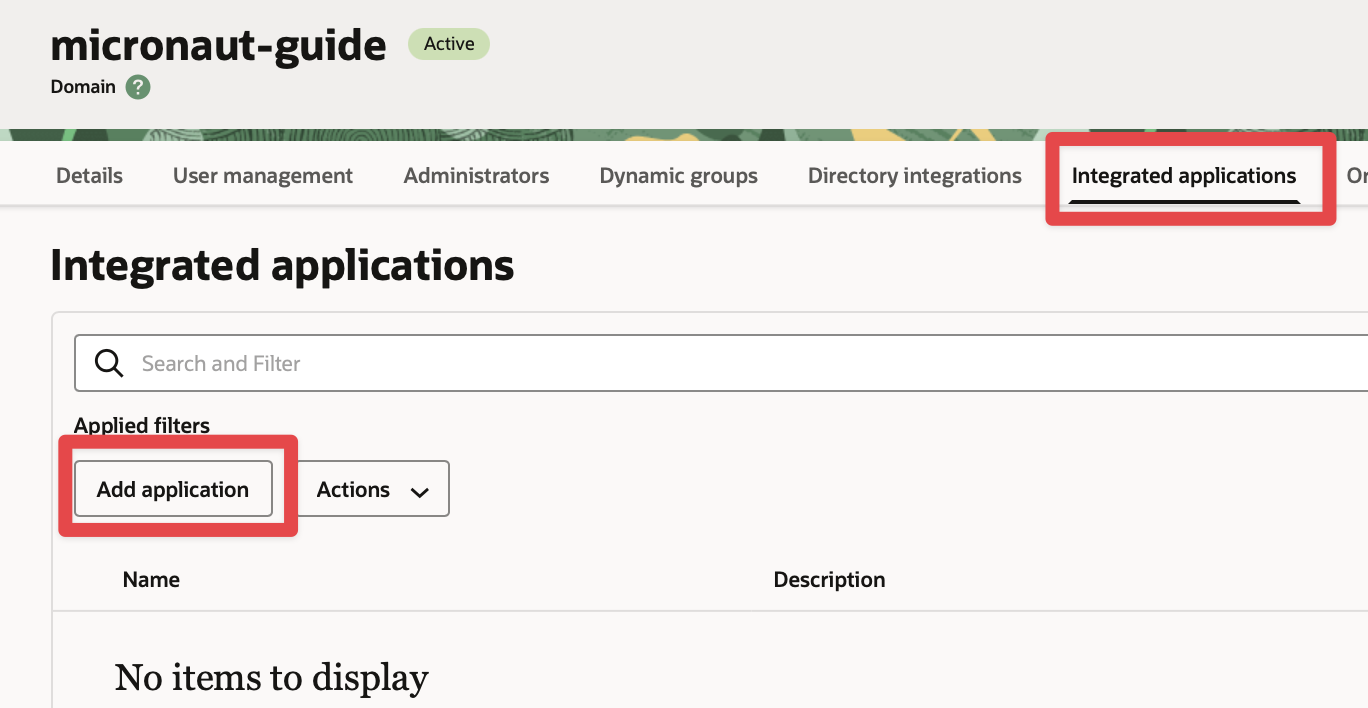
Click Integrated applications in the navigation menu.
-
Click the button Add application to add a new application.
-
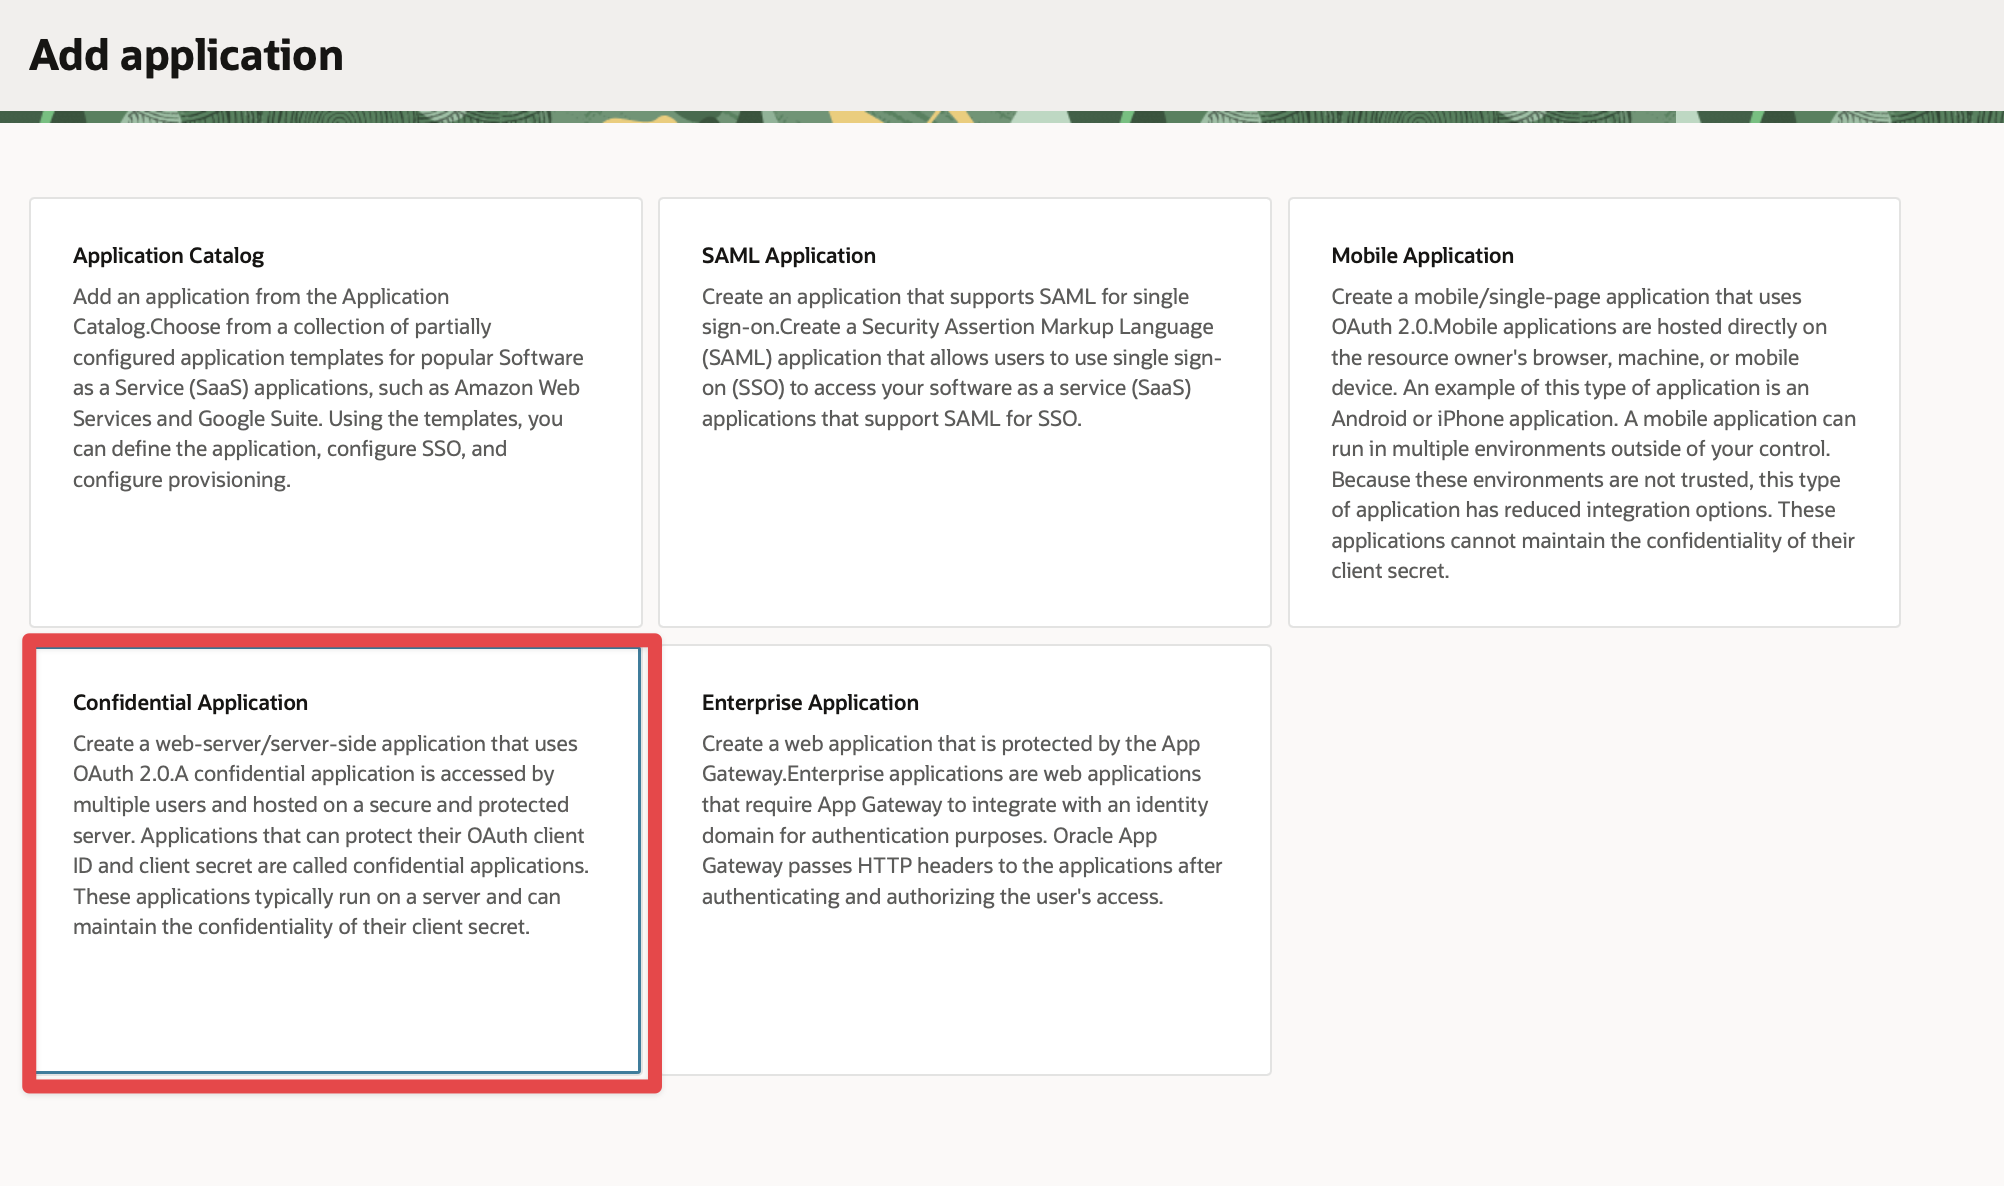
Select Confidential Application and click Launch workflow.
Edit OAuth Configuration
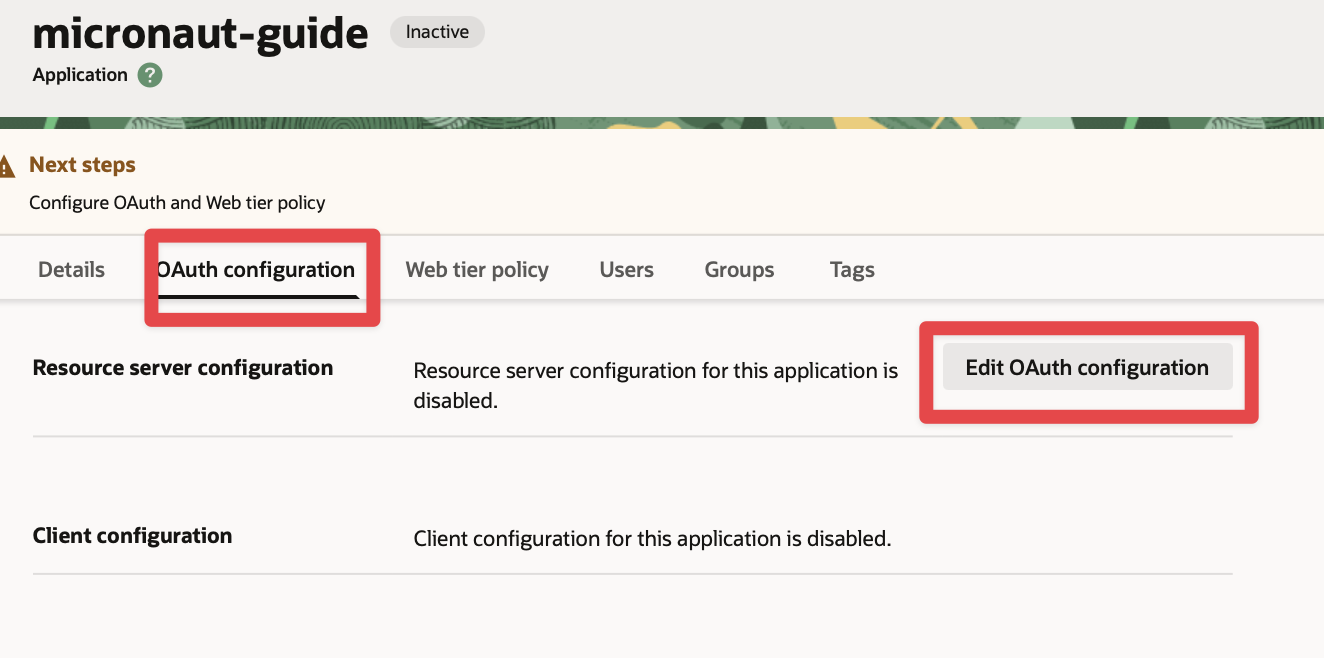
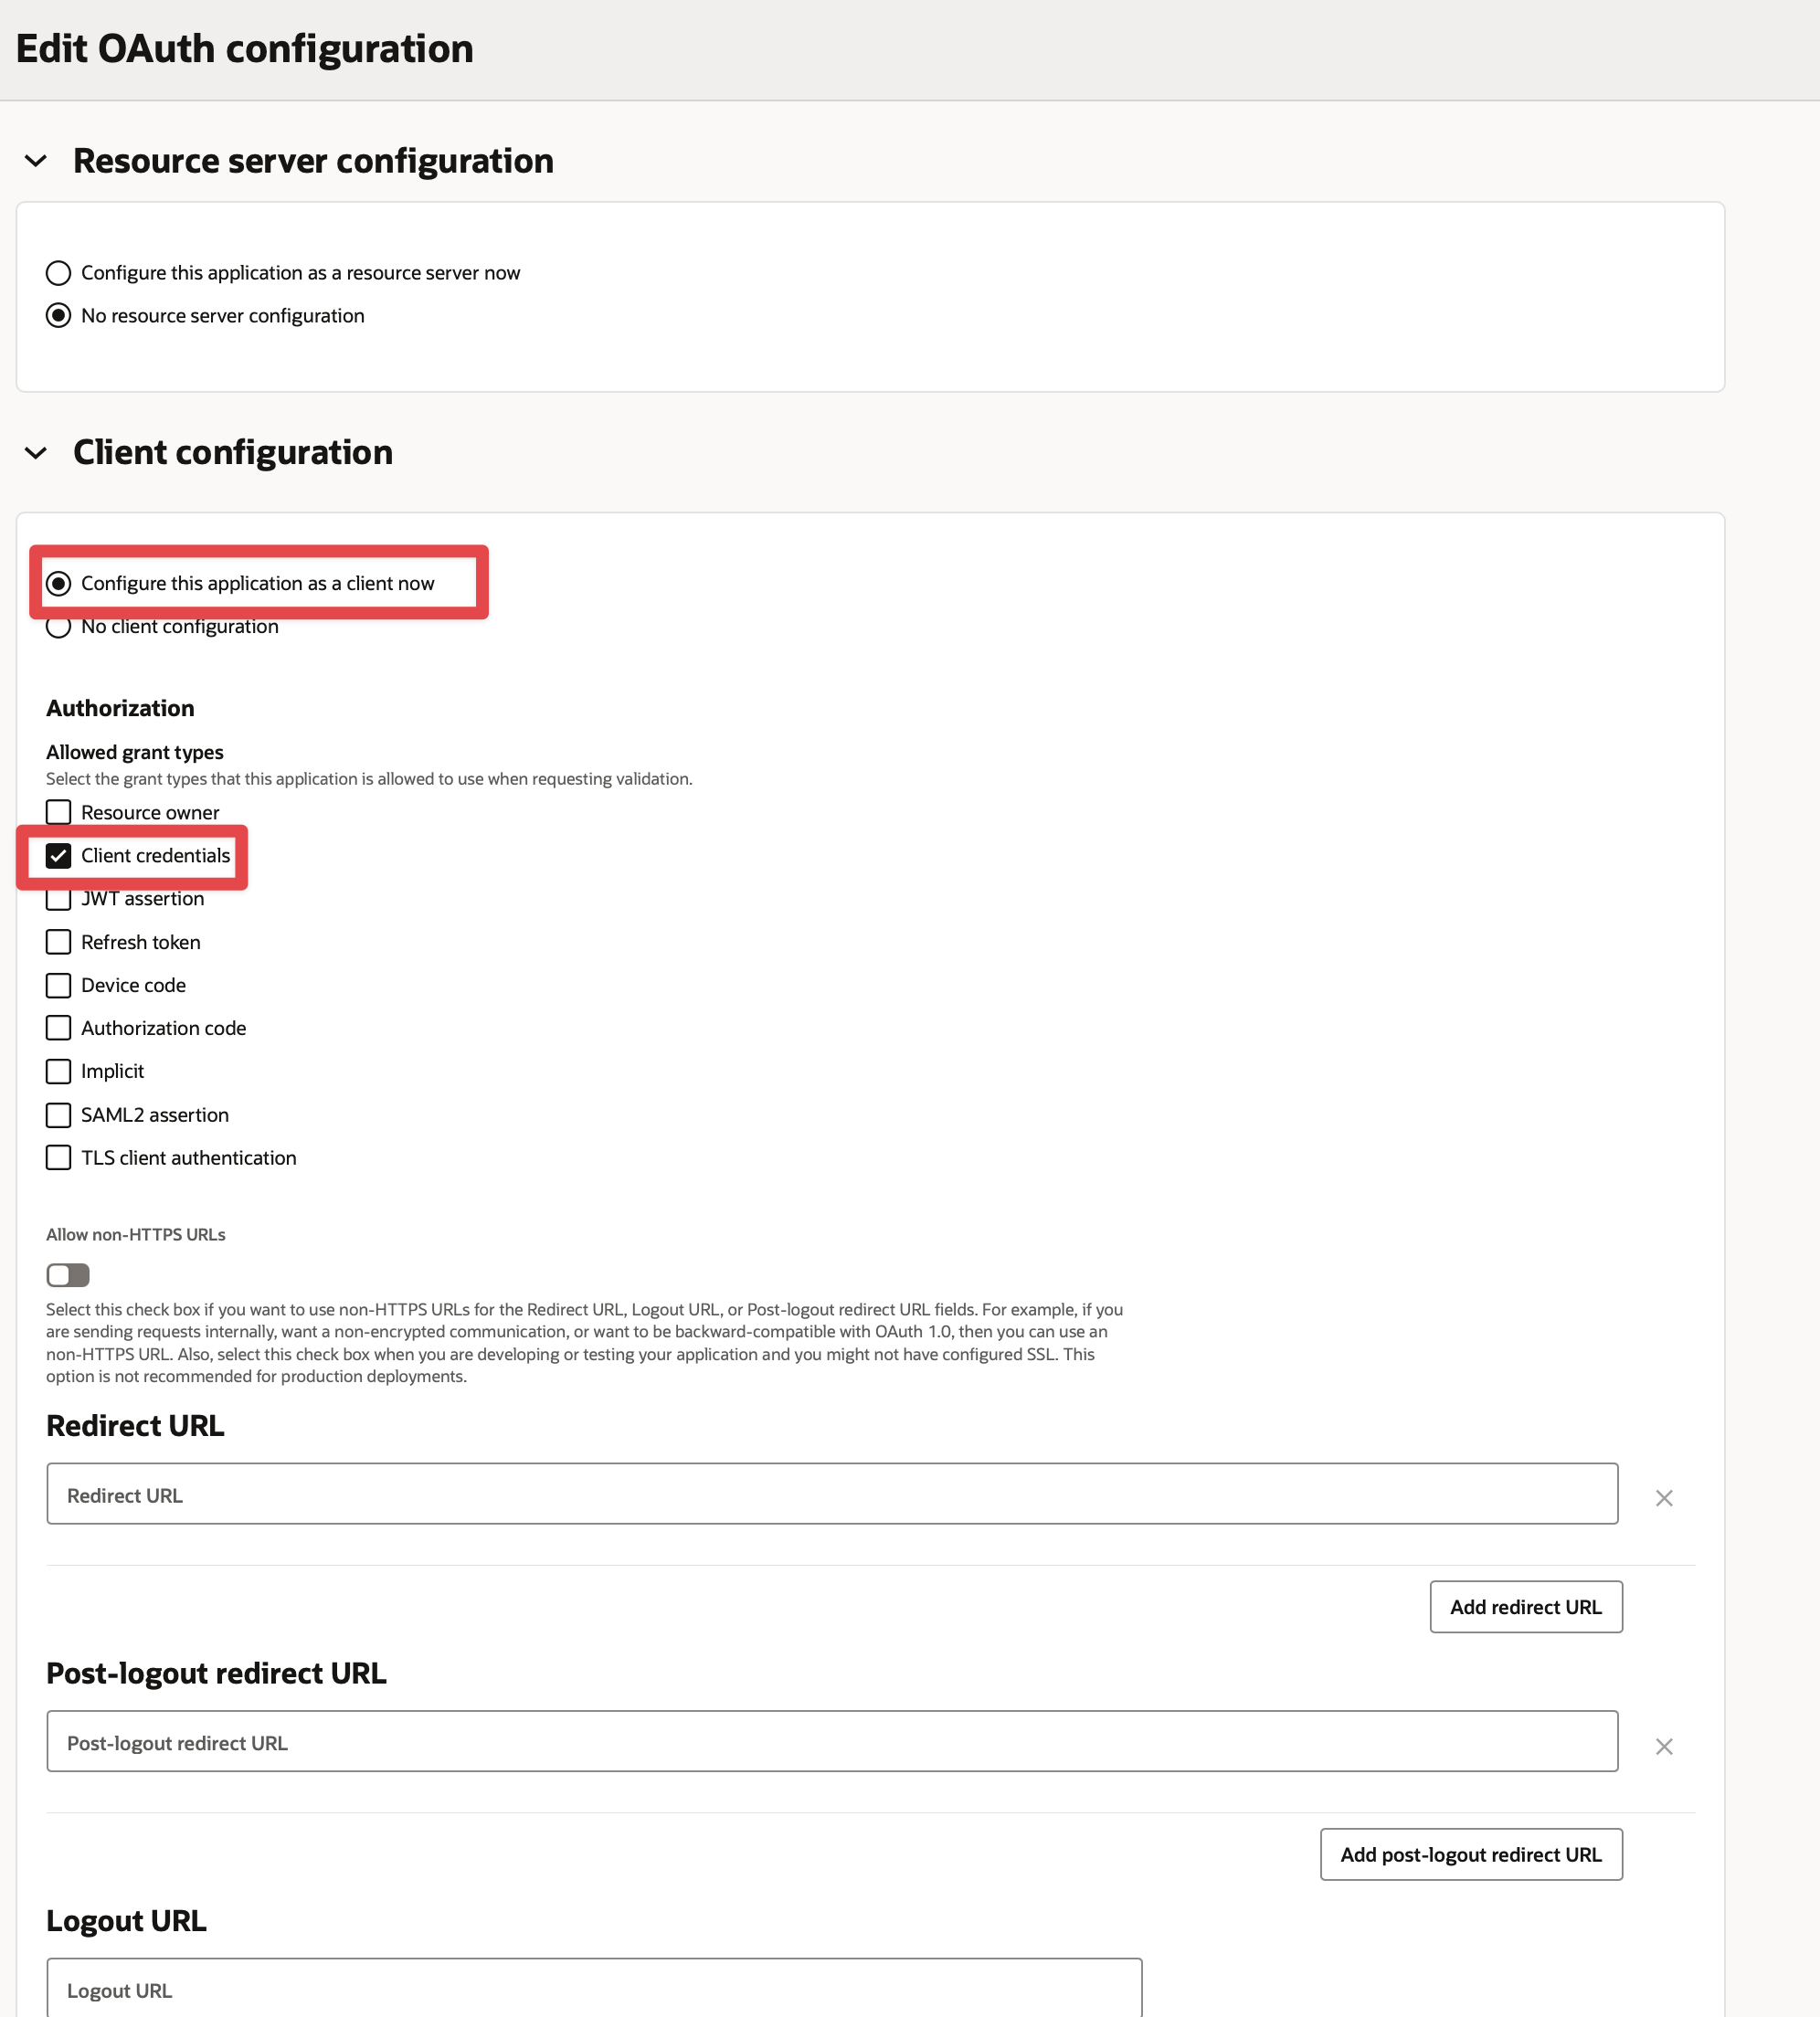
Edit OAuth configuration, and configure the application as a client with the Client Credentials grant type enabled.
Edit Resource configuration
Set a primary audience and a scope:
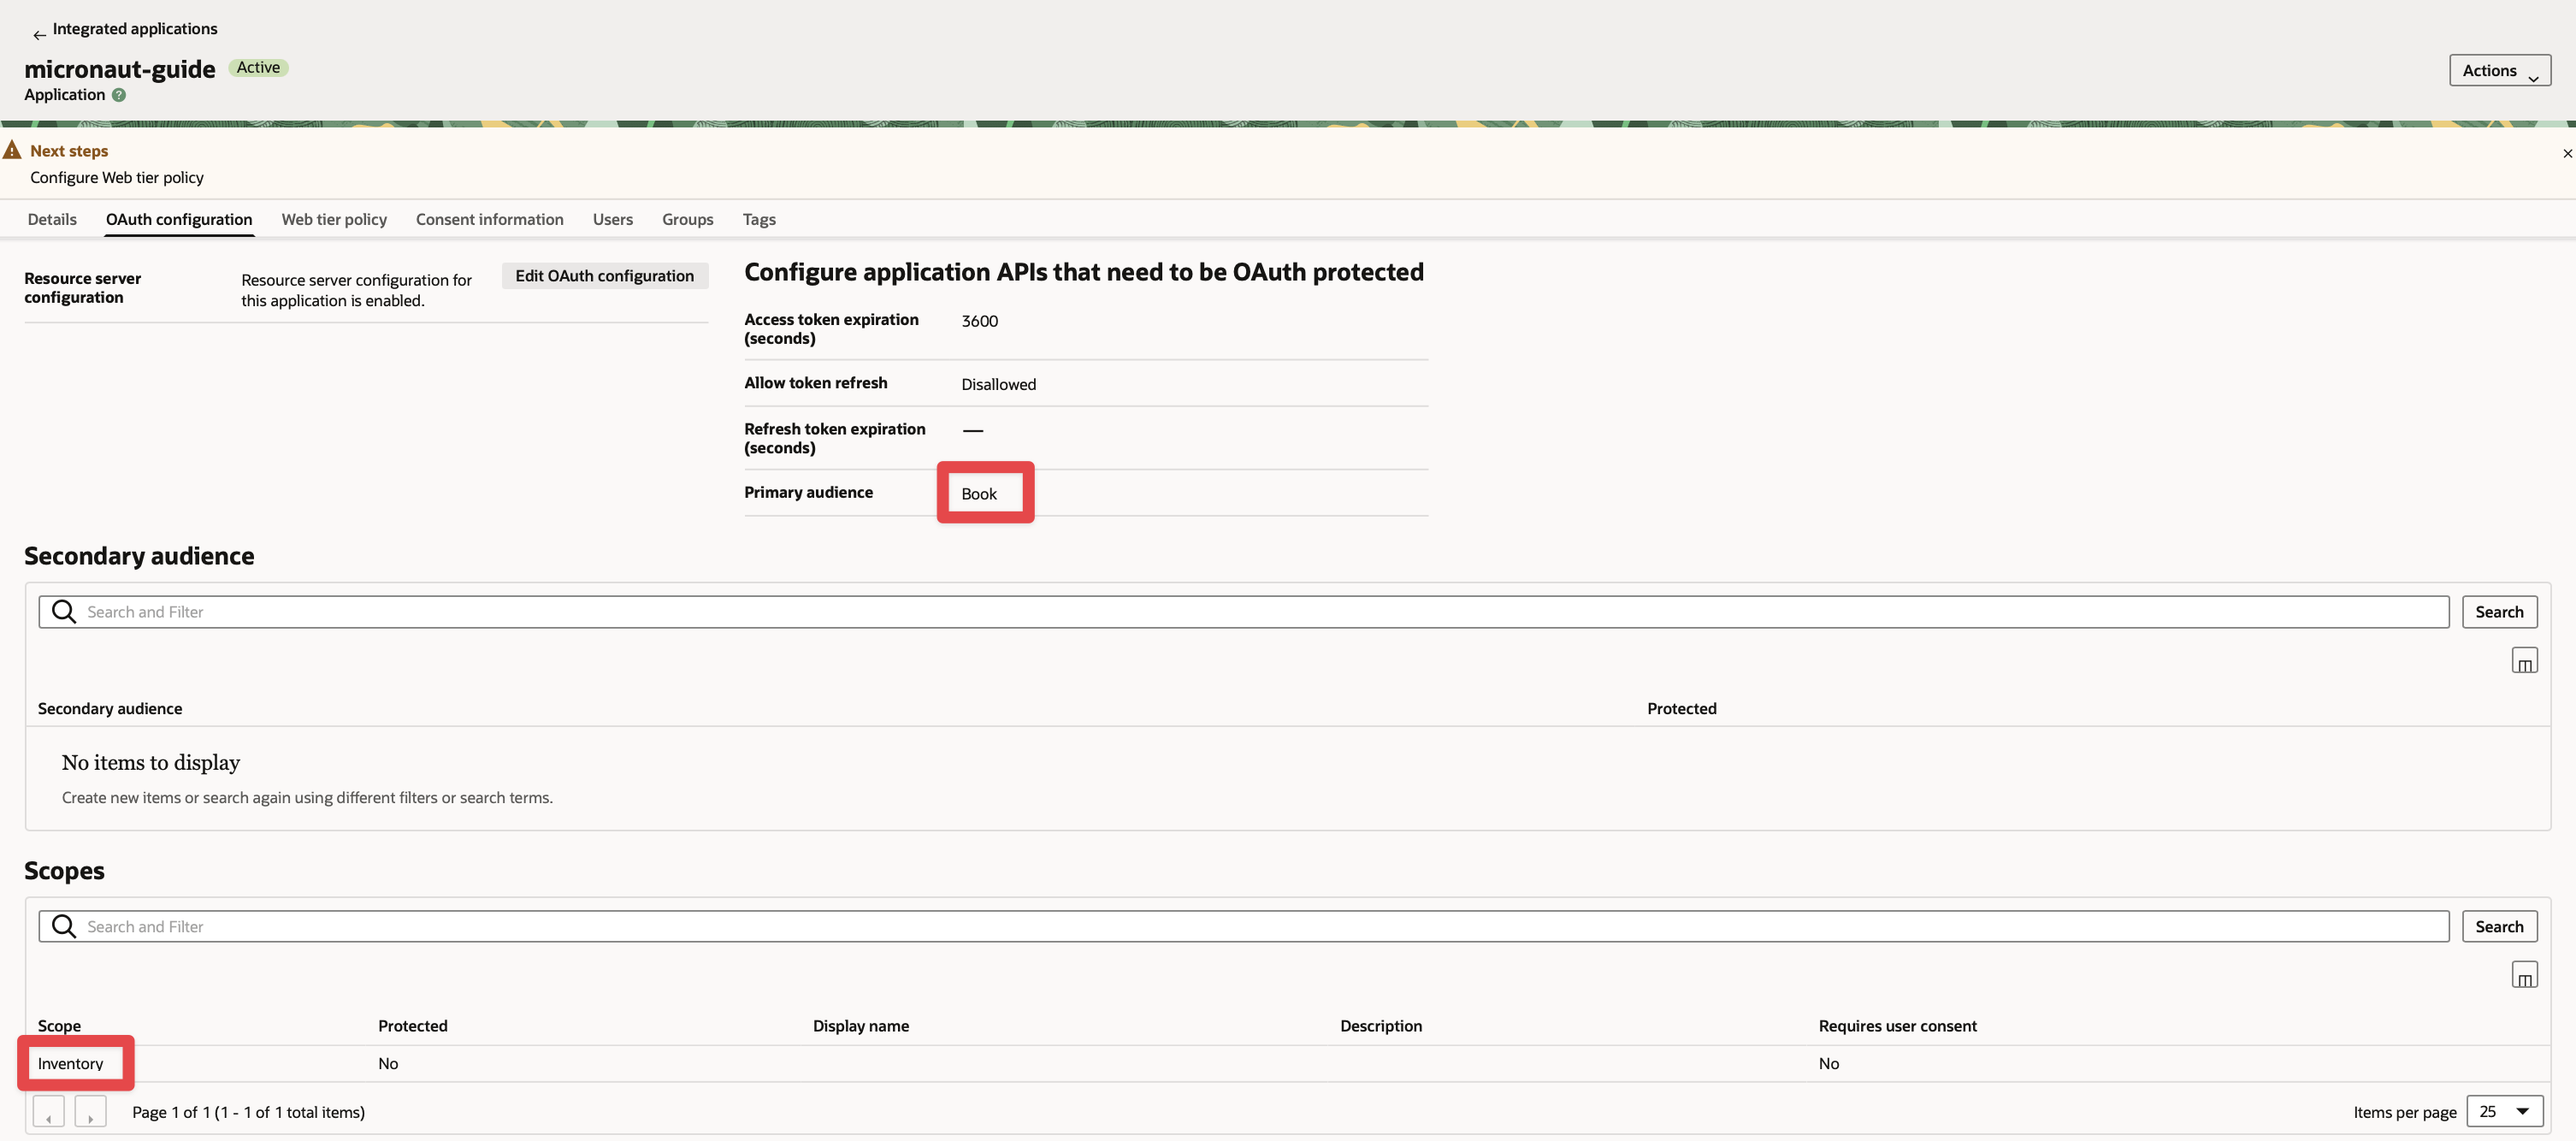
The scope you will enter in the application configuration is Primary Audience + Scope.
Enable Client Credentials
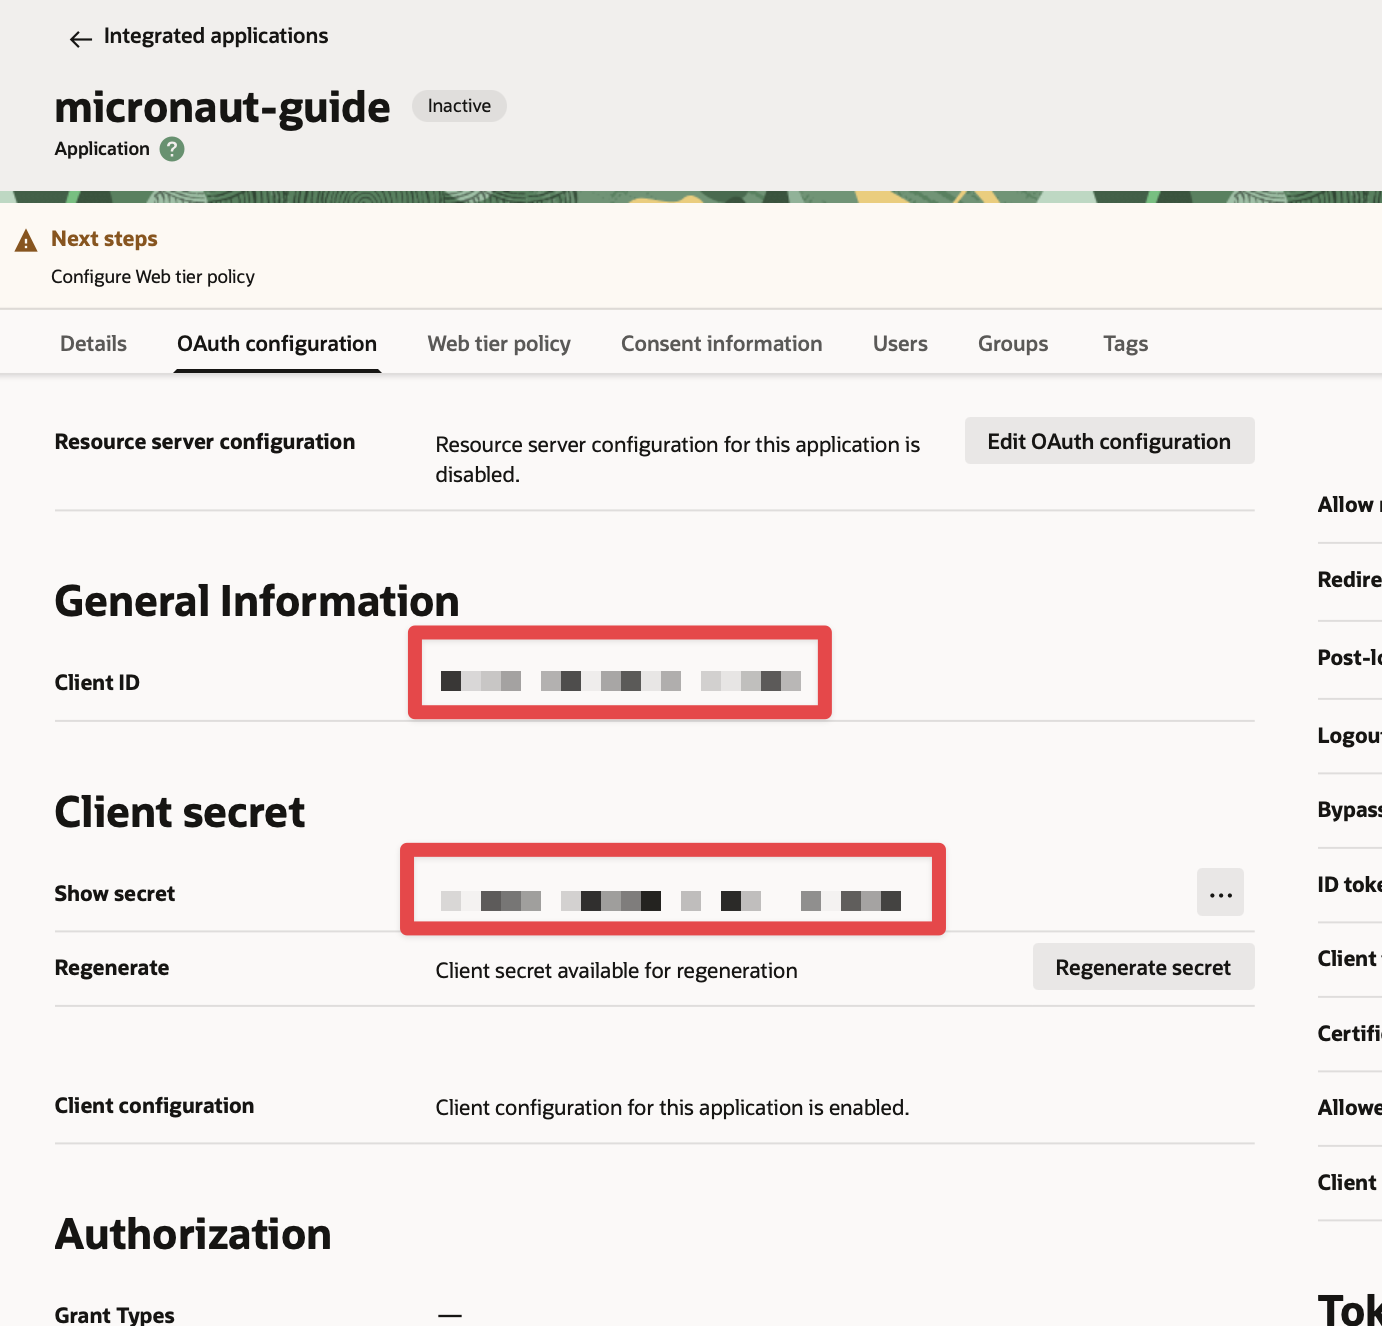
Obtain client id and client secret
You can obtain the application’s domain, client id, and secret in the Oracle Cloud Identity Domain console.
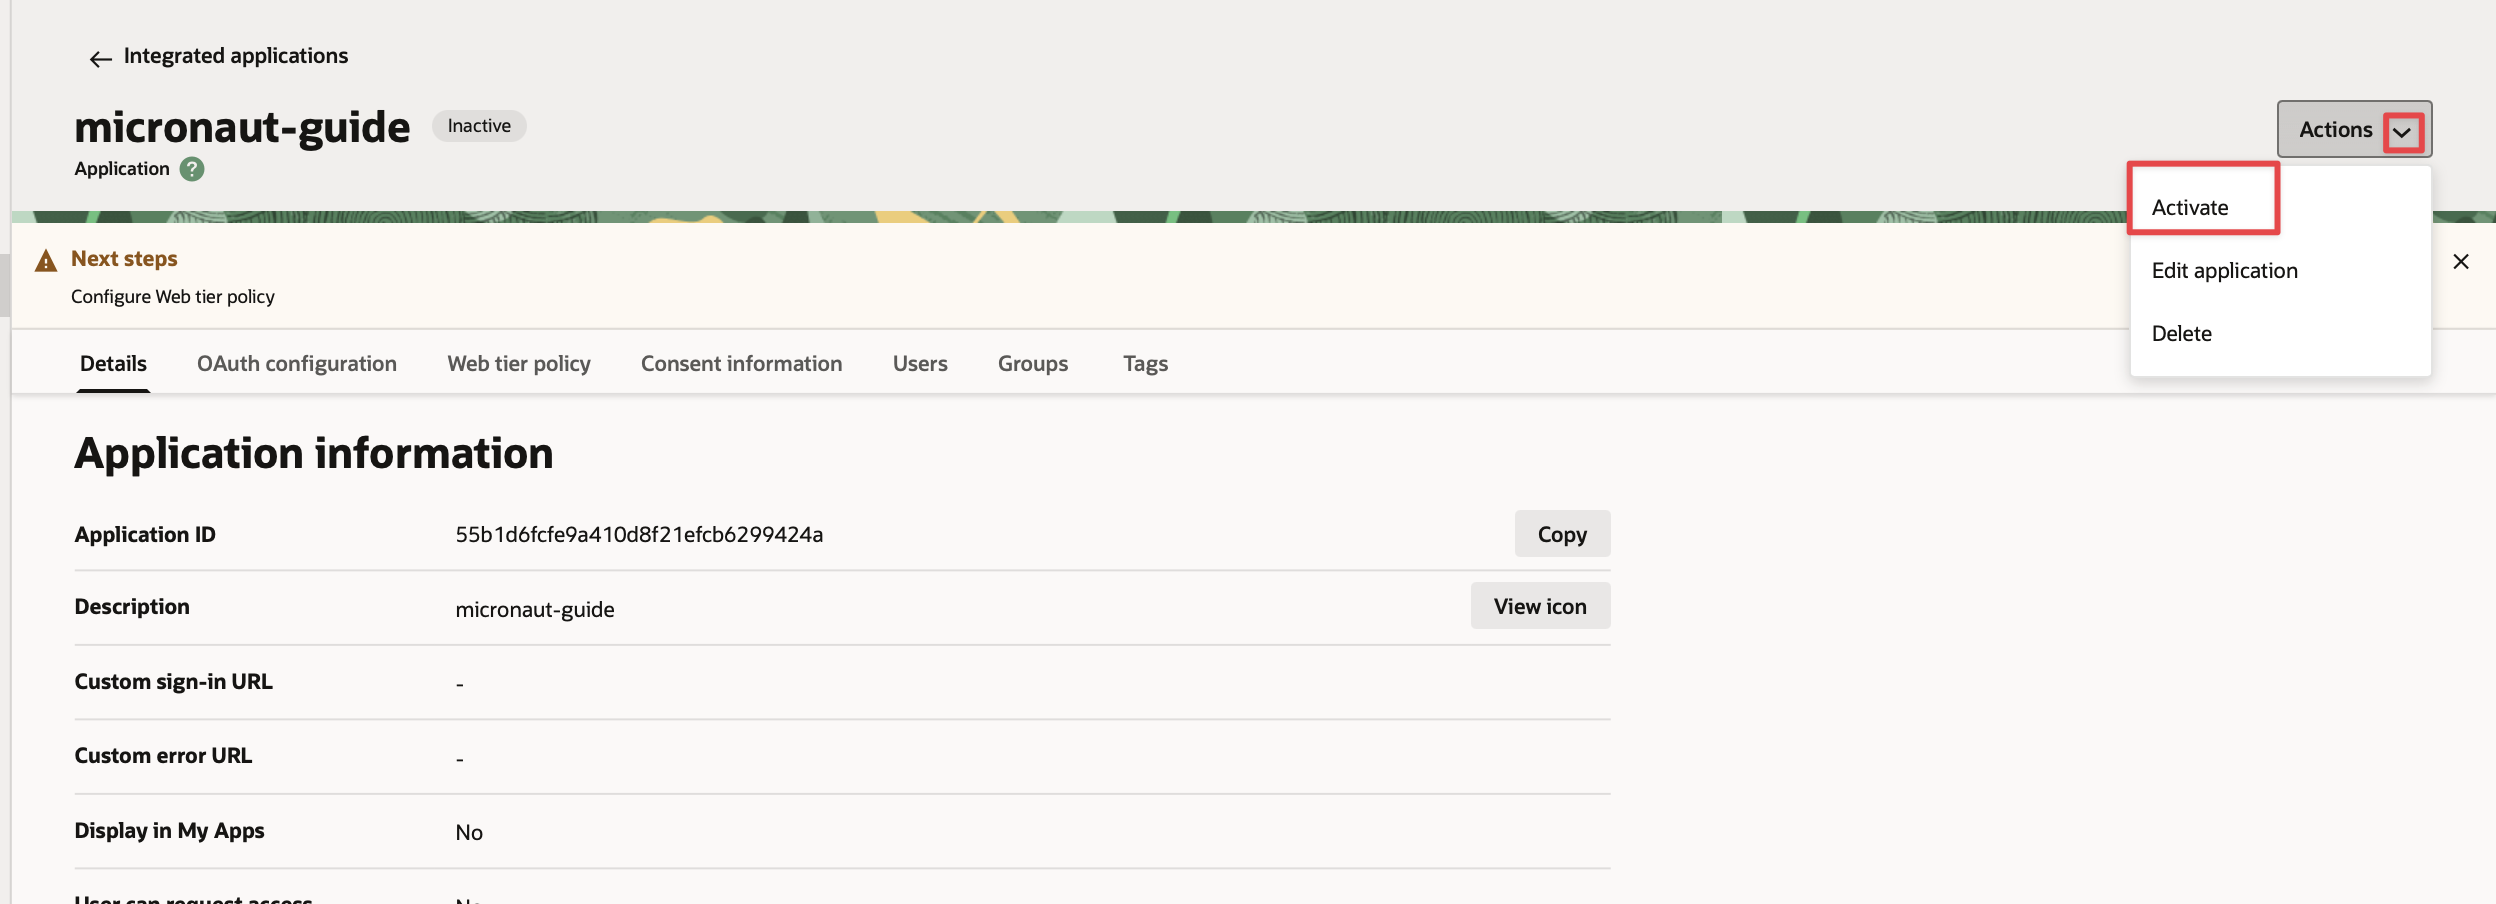
Activate
Activate the app:
Enable Signing Certificate Access
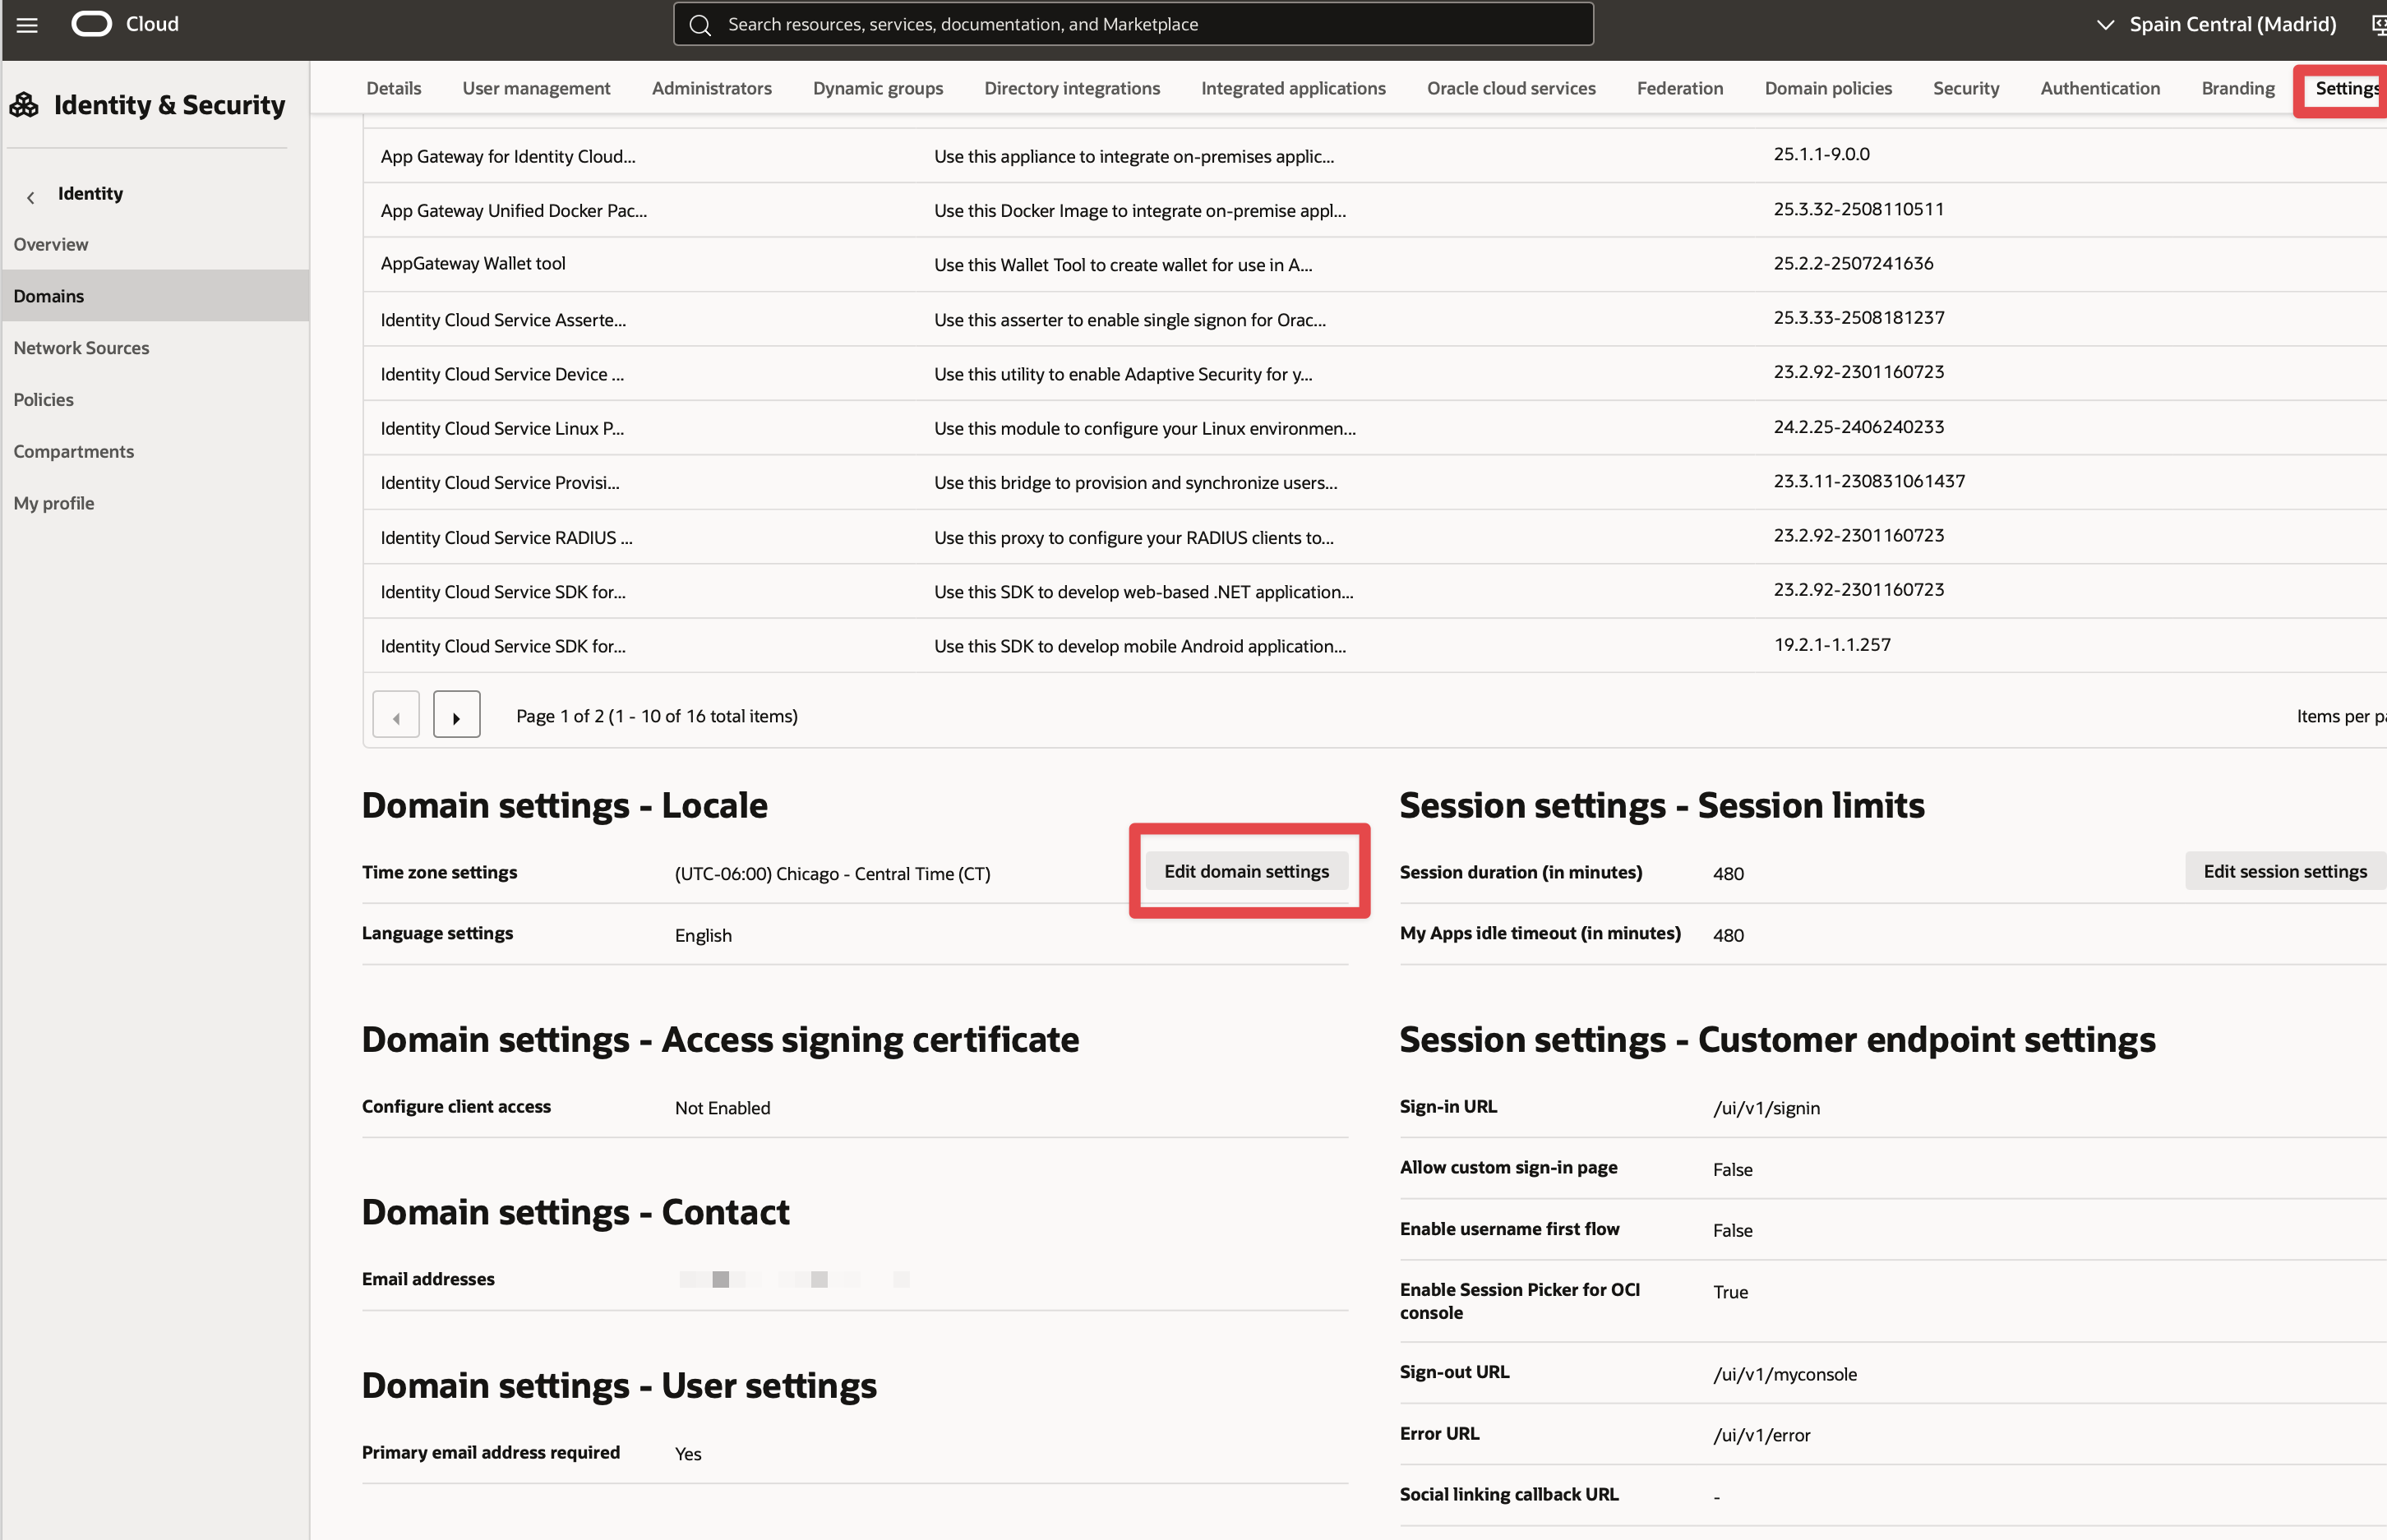
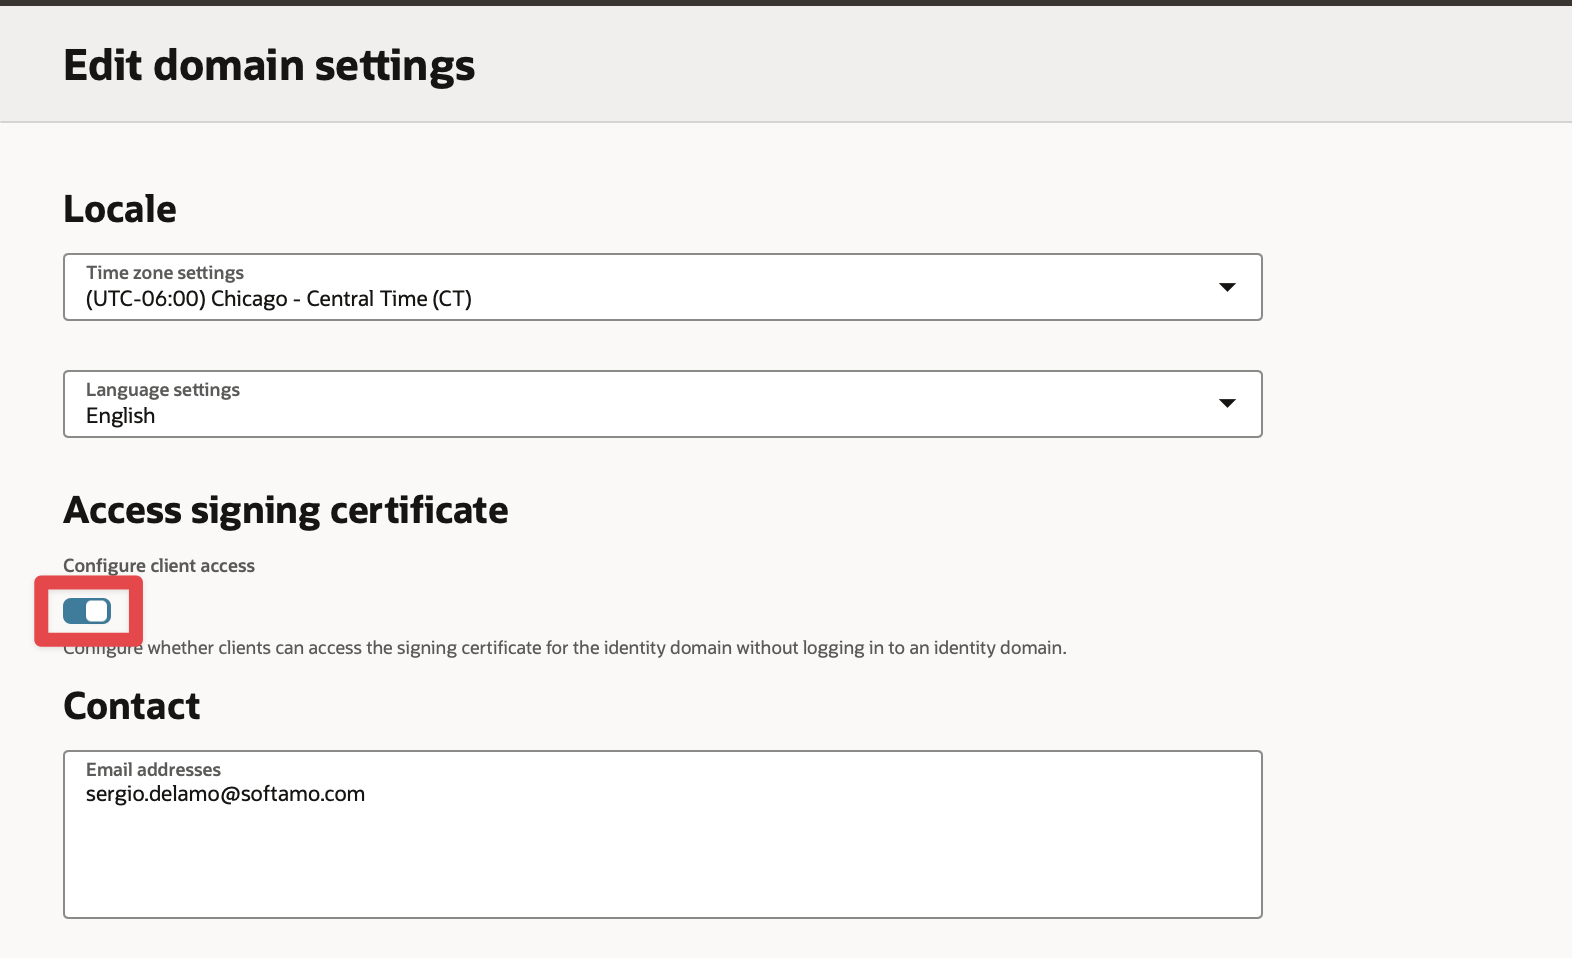
Make the signing certificate available to your application for JSON Web Tokens (JWT) validation without being authenticated.
-
In the Identity domain console, in the Navigation Drawer, click Settings, and then click Domain Settings.
-
Check the Configure client access to enable clients to access the tenant signing certificate without logging in to Oracle Identity Cloud Service.
-
Click Save changes to save the domain settings.
If you skip these steps, you will see errors like the following for valid logins because Micronaut Security cannot retrieve the JSON Web Key (JWK) to validate the JWT:
JWT signature validation failed for provider [oci]
Exception loading JWK from https://idcs-12bzlaba1124141.identity.oraclecloud.com/admin/v1/SigningCert/jwk
Server returned HTTP response code: 401
Writing the application
Dependencies
Update the build for all three applications (bookcatalogue, bookinventory, and bookrecommendation); add Micronaut JWT and Micronaut OAuth 2.0 dependencies:
implementation("io.micronaut.security:micronaut-security-oauth2")
implementation("io.micronaut.security:micronaut-security-jwt")
Changes to Book Inventory service
Annotate the stock method with @Secured:
To validate the tokens issued by Oracle Cloud Identity Domain, configure Validation with Remote JWKS:
micronaut.security.token.jwt.signatures.jwks.oci.url=${OAUTH_JWKS:`https://idcs-12bzlaba1124141.identity.oraclecloud.com/admin/v1/SigningCert/jwk`}You can add /.well-known/openid-configuration to your Oracle Cloud Identity Domain URL to obtain the OpenID Connect configuration.
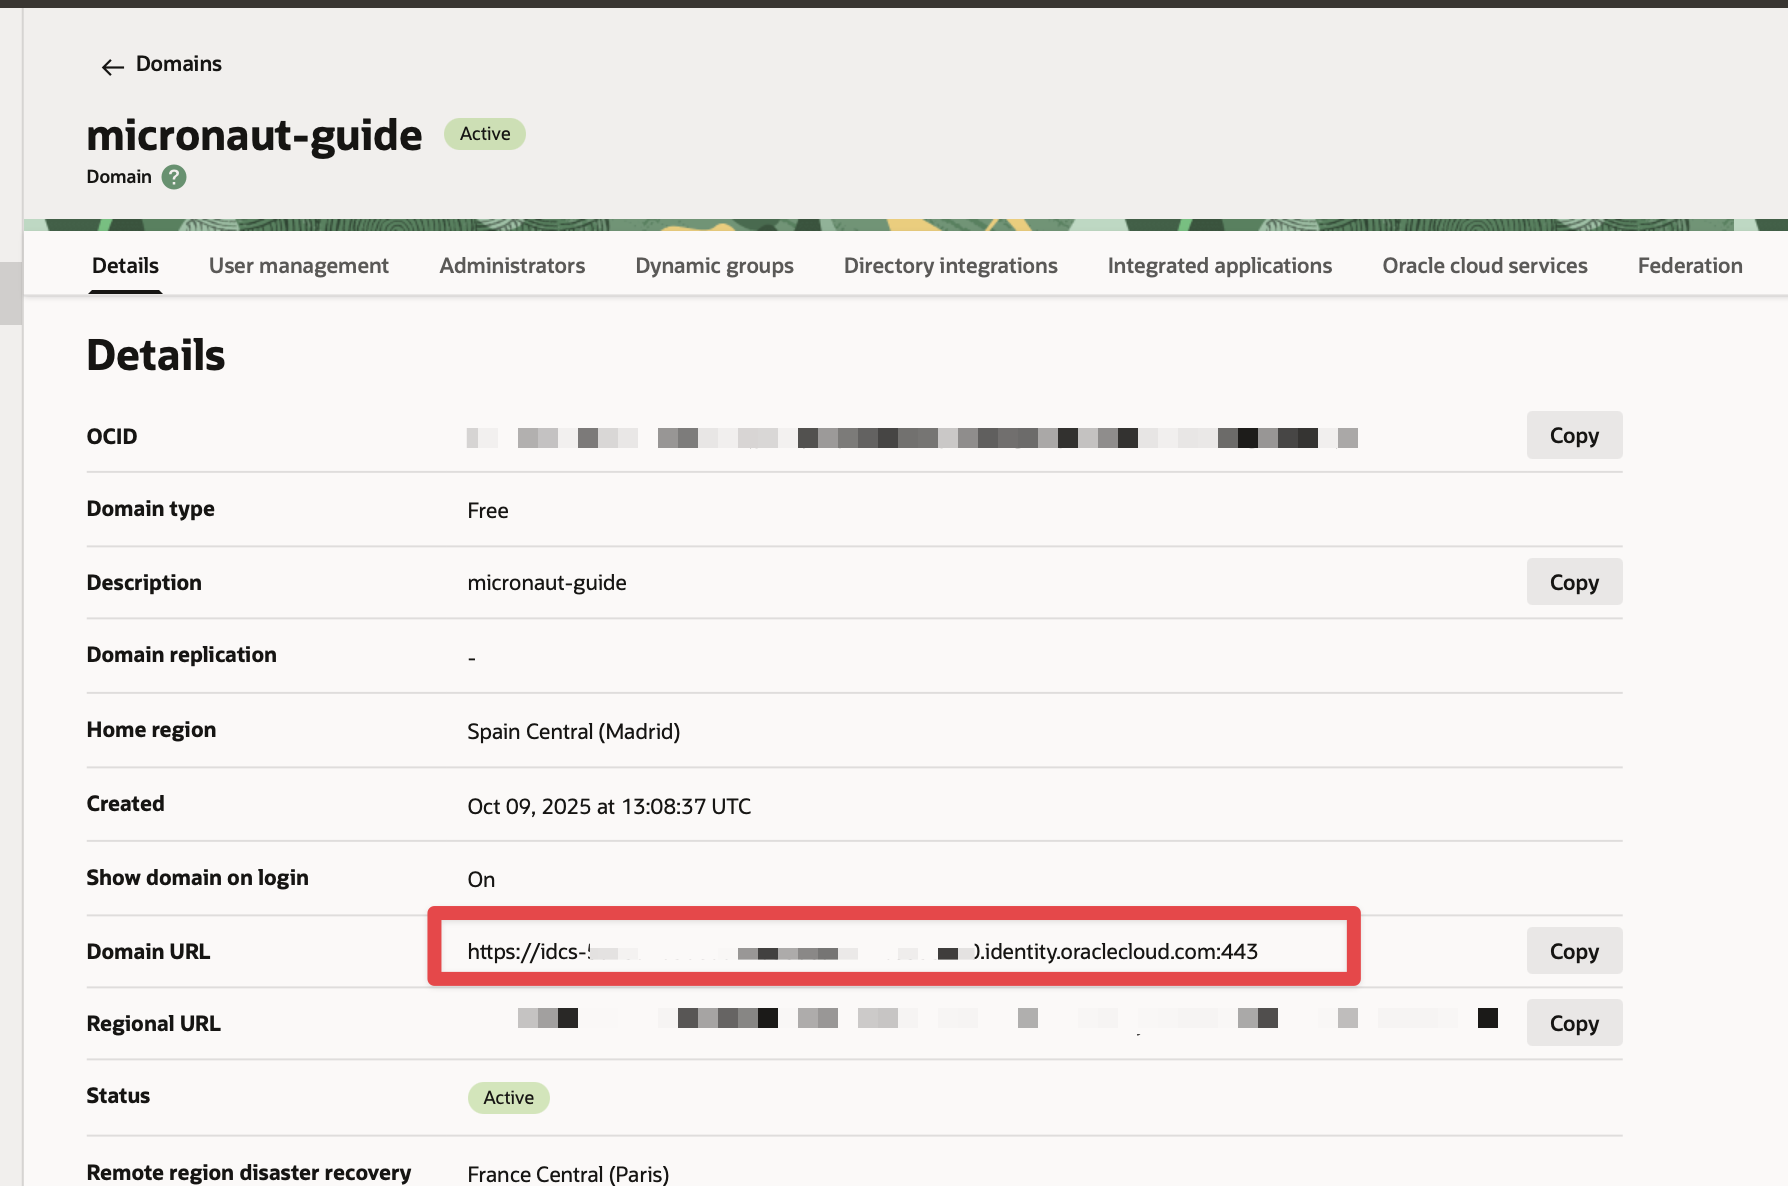
For example, if your domain is https://idcs-12bzlaba1124141.identity.oraclecloud.com, you can obtain the OpenID Connect configuration with https://idcs-12bzlaba1124141.identity.oraclecloud.com/.well-known/openid-configuration.
The jwks_uri entry contains the URL of the JWKS endpoint.
Changes to Book Catalogue service
Annotate the index method with @Secured:
To validate the tokens issued by Oracle Cloud Identity Domain, configure Validation with Remote JWKS:
micronaut.security.token.jwt.signatures.jwks.oci.url=${OAUTH_JWKS:`https://idcs-12bzlaba1124141.identity.oraclecloud.com/admin/v1/SigningCert/jwk`}You can obtain the JWKS URL in the .well-known/openid-configuration endpoint.
Changes to Book Recommendations service
Books Controller Security
The GET /books endpoint in the bookrecommendation service is open.
Annotate the index method with @Secured:
Configuration of HTTP Services URLs
Modify application-dev.properties to configure microservice URLs for the declarative HTTP clients:
micronaut.http.services.bookcatalogue.url=http://localhost:8081
micronaut.http.services.bookinventory.url=http://localhost:8082
Configuration
Add the following OAuth2 configuration:
The previous configuration uses several placeholders with default values. You will need to set up OAUTH_CLIENT_ID, OAUTH_CLIENT_SECRET, and OAUTH_TOKEN_URL environment variables in your Oracle Cloud Identity Domain application.
export OAUTH_CLIENT_ID=XXXXXXXXXX
export OAUTH_CLIENT_SECRET=YYYYYYYYYY
export OAUTH_TOKEN_URL=https://idcs-12bzlaba1124141.identity.oraclecloud.com/oauth2/v1/token
Running the Application
Run the bookcatalogue microservice
To run the application, execute ./gradlew run.
...
14:28:34.034 [main] INFO  io.micronaut.runtime.Micronaut - Startup completed in 499ms. Server Running: http://localhost:8081
Run the bookinventory microservice
To run the application, execute ./gradlew run.
...
14:31:13.104 [main] INFO  io.micronaut.runtime.Micronaut - Startup completed in 506ms. Server Running: http://localhost:8082
Run the bookrecommendation microservice
To run the application, execute ./gradlew run.
...
14:31:57.389 [main] INFO  io.micronaut.runtime.Micronaut - Startup completed in 523ms. Server Running: http://localhost:8080
You can run a cURL command to test the whole application:
curl http://localhost:8080/books[{"name":"Building Microservices"}]Generate a Micronaut Application Native Executable with GraalVM
We will use GraalVM, an advanced JDK with ahead-of-time Native Image compilation, to generate a native executable of this Micronaut application.
Compiling Micronaut applications ahead of time with GraalVM significantly improves startup time and reduces the memory footprint of JVM-based applications.
|
Note
|
Only Java and Kotlin projects support using GraalVM’s native-image tool. Groovy relies heavily on reflection, which is only partially supported by GraalVM.
|
GraalVM Installation
sdk install java 25.0.2-graalFor installation on Windows, or for a manual installation on Linux or Mac, see the GraalVM Getting Started documentation.
The previous command installs Oracle GraalVM, which is free to use in production and free to redistribute, at no cost, under the GraalVM Free Terms and Conditions.
Alternatively, you can use the GraalVM Community Edition:
sdk install java 25.0.2-graalceNative Executable Generation
To generate a native executable using Gradle, run:
./gradlew nativeCompileThe native executable is created in build/native/nativeCompile directory and can be run with build/native/nativeCompile/micronautguide.
It is possible to customize the name of the native executable or pass additional parameters to GraalVM:
Run the native executables and execute a cURL command to test the whole application:
curl http://localhost:8080/books[{"name":"Building Microservices"}]Next Steps
Read Micronaut OAuth 2.0 Documentation to learn more.
License
|
Note
|
All guides are released with an Apache License 2.0 for the code and a Creative Commons Attribution 4.0 license for the writing and media (images). |