

Secure a Micronaut application with Okta
Learn how to create a Micronaut application and secure it with an Authorization Server provided by Okta.
On this guide
In this section
Getting Started
In this guide, we will create a Micronaut application written in Groovy.
What you will need
To complete this guide, you will need the following:
-
Some time on your hands
-
A decent text editor or IDE (e.g. IntelliJ IDEA)
-
JDK 21 or greater installed with
JAVA_HOMEconfigured appropriately
Solution
We recommend that you follow the instructions in the next sections and create the application step by step. However, you can go right to the completed example.
-
Download and unzip the source
OAuth 2.0
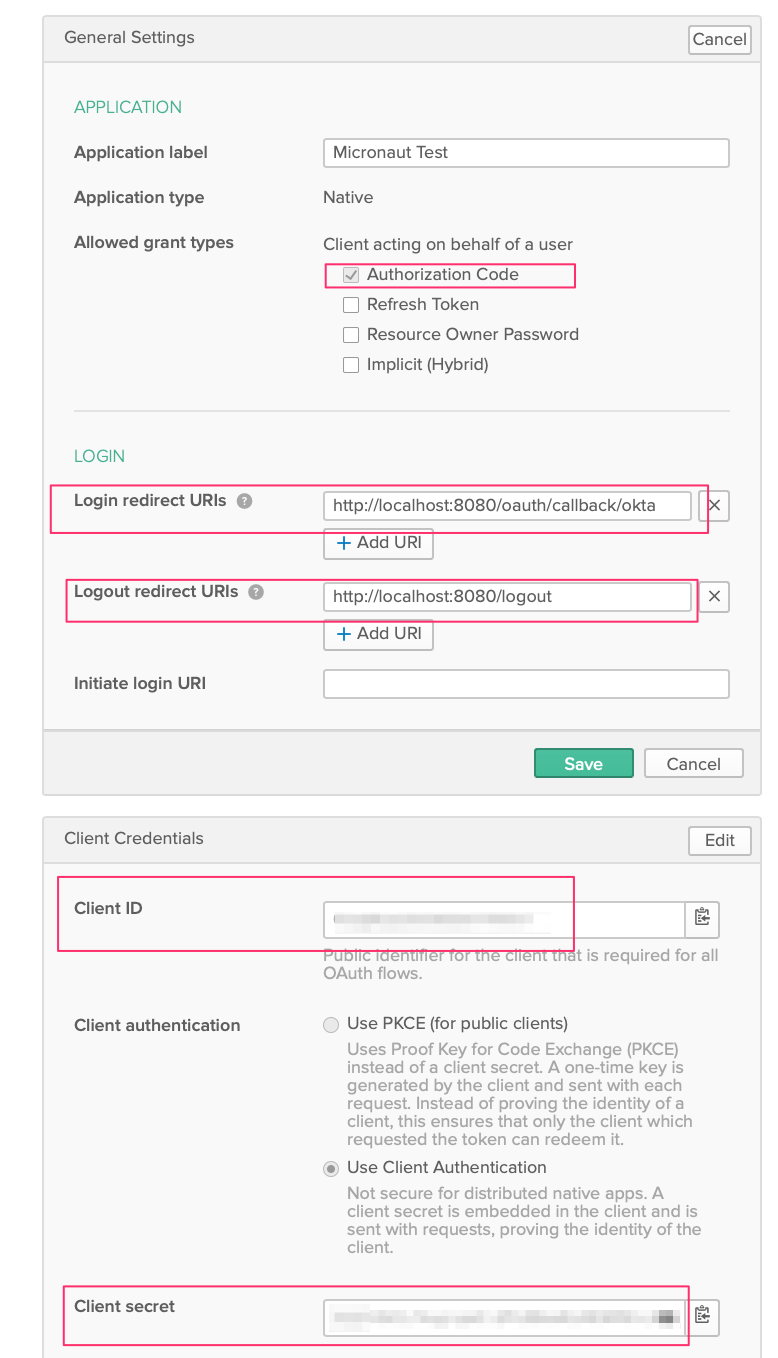
Sign up at developer.okta.com and create a Web application with the following characteristics:
-
Check
Authorization Codegrant type. -
Add
http://localhost:8080/oauth/callback/oktaas a login redirect URI. -
Add
http://localhost:8080/logoutas a Logout redirect URI. -
Annotate the Client ID and Secret.
Writing the Application
Create an application using the Micronaut Command Line Interface or with Micronaut Launch.
mn create-app example.micronaut.micronautguide --build=gradle --lang=groovy|
Note
|
If you don’t specify the --build argument, Gradle with the Kotlin DSL is used as the build tool. If you don’t specify the --lang argument, Java is used as the language.If you don’t specify the --test argument, JUnit is used for Java and Kotlin, and Spock is used for Groovy.
|
The previous command creates a Micronaut application with the default package example.micronaut in a directory named micronautguide.
Security Dependencies
To use OAuth 2.0 integration, add the following dependency:
implementation("io.micronaut.security:micronaut-security-oauth2")Also add JWT Micronaut JWT support dependencies:
implementation("io.micronaut.security:micronaut-security-jwt")Views
To use the Thymeleaf Java template engine to render views in a Micronaut application, add the following dependency on your classpath.
implementation("io.micronaut.views:micronaut-views-thymeleaf")Configuration
Add the following OAuth 2.0 configuration:
Environment Variables
The previous configuration uses several placeholders. You will need to set up OAUTH_CLIENT_ID, OAUTH_CLIENT_SECRET, OIDC_ISSUER_DOMAIN, and OIDC_ISSUER_AUTHSERVERID environment variables.
export OAUTH_CLIENT_ID=XXXXXXXXXX
export OAUTH_CLIENT_SECRET=YYYYYYYYYY
export OIDC_ISSUER_DOMAIN=https://dev-XXXXX.oktapreview.com
export OIDC_ISSUER_AUTHSERVERID=default
export OAUTH_ISSUER=https://dev-XXXXX.oktapreview.com/oauth2/default
Check OKTA .well-known/openid-configuration documentation.
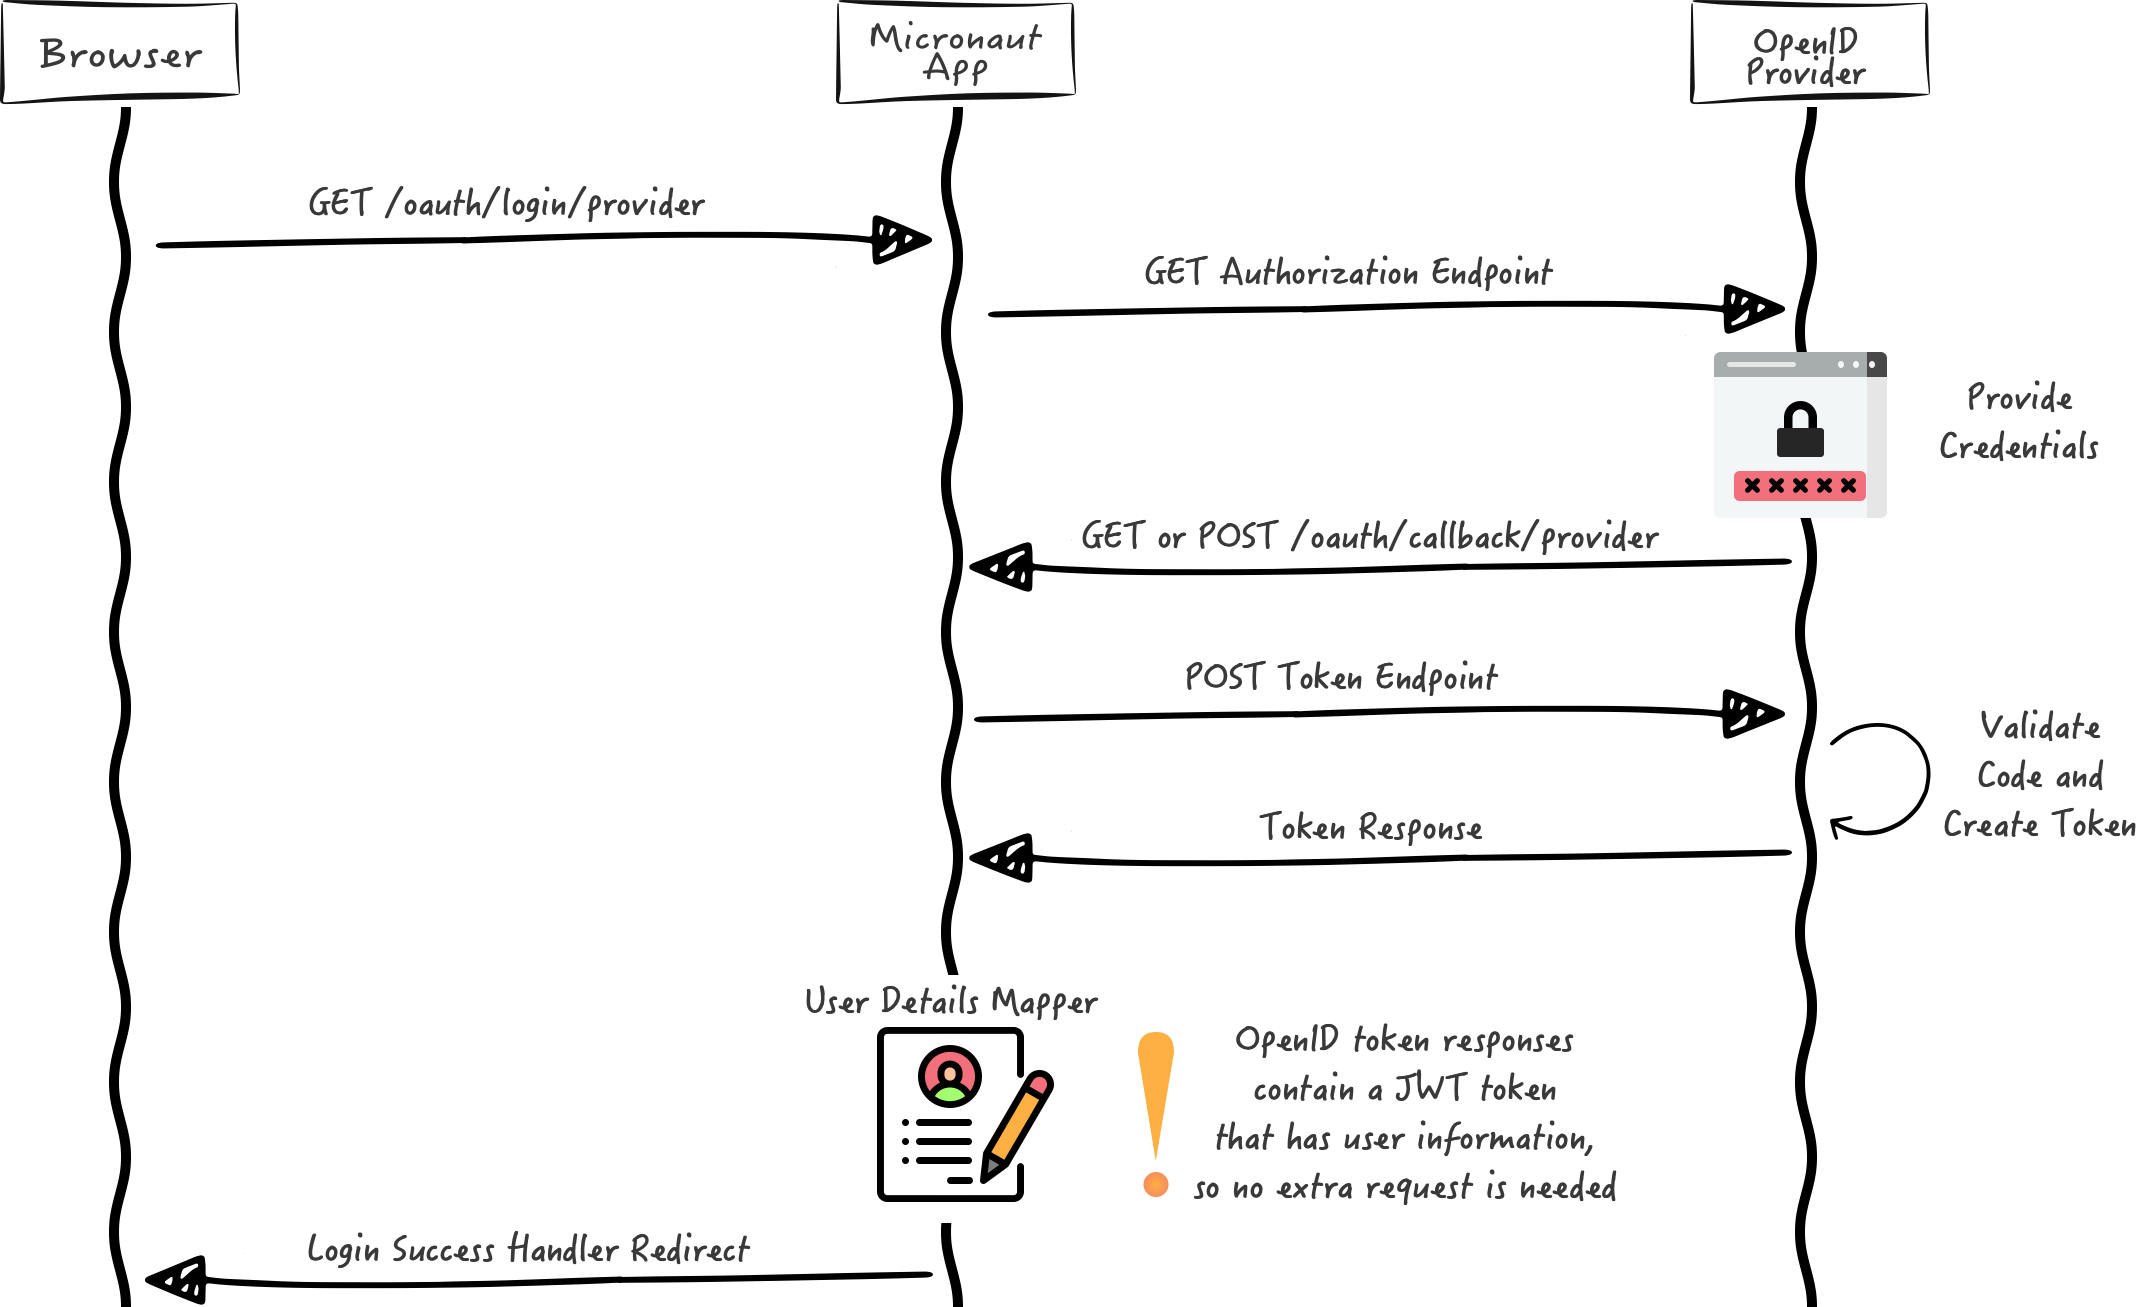
Authorization Code Grant
We want to use an Authorization Code grant type flow, which is described in the following diagram:
Home
Create a controller to handle the requests to /. You will display the email of the authenticated person if any. Annotate the controller endpoint with @View since we will use a Thymeleaf template.
Thymeleaf Template
Create a Thymeleaf template:
<!DOCTYPE html>
<html xmlns:th="http://www.thymeleaf.org">
<head>
    <title>Home</title>
</head>
<body>
<h1>Micronaut - Okta example</h1>

<h2 th:if="${security}">username: <span th:text="${security.attributes.get('email')}"></span></h2>
<h2 th:unless="${security}">username: Anonymous</h2>

<nav>
    <ul>
        <li th:unless="${security}"><a href="/oauth/login/okta">Enter</a></li>
        <li th:if="${security}"><a href="/oauth/logout">Logout</a></li>
    </ul>
</nav>
</body>
</html>
Also, note that we return an empty model in the controller. However, we are accessing security in the Thymeleaf template.
-
The SecurityViewModelProcessor injects into the model a
securitymap with the authenticated user. See User in a view documentation.
Running the Application
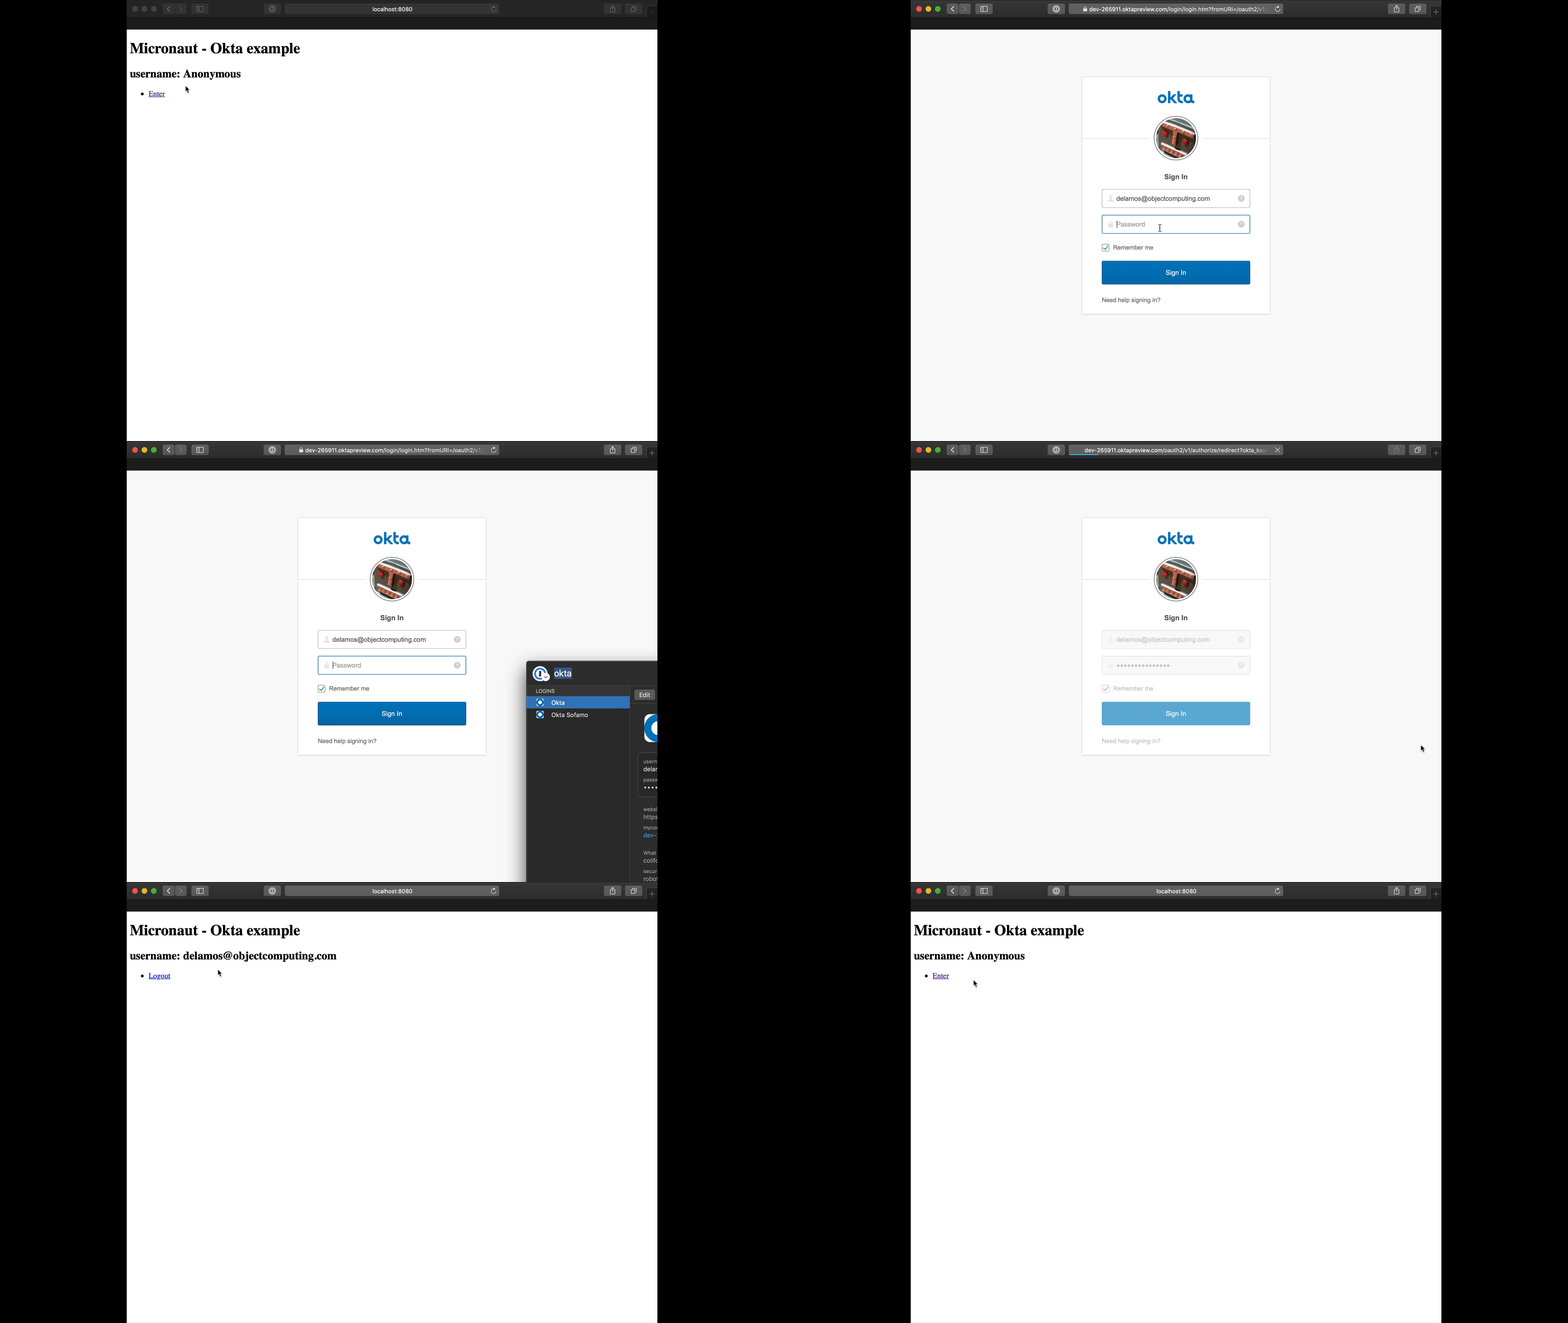
To run the application, use the ./gradlew run command, which starts the application on port 8080.
Next Steps
Read Micronaut OAuth 2.0 documentation to learn more.
License
|
Note
|
All guides are released with an Apache License 2.0 for the code and a Creative Commons Attribution 4.0 license for the writing and media (images). |