

Database authentication
Learn how to secure a Micronaut application using Database authentication.
On this guide
In this section
Getting Started
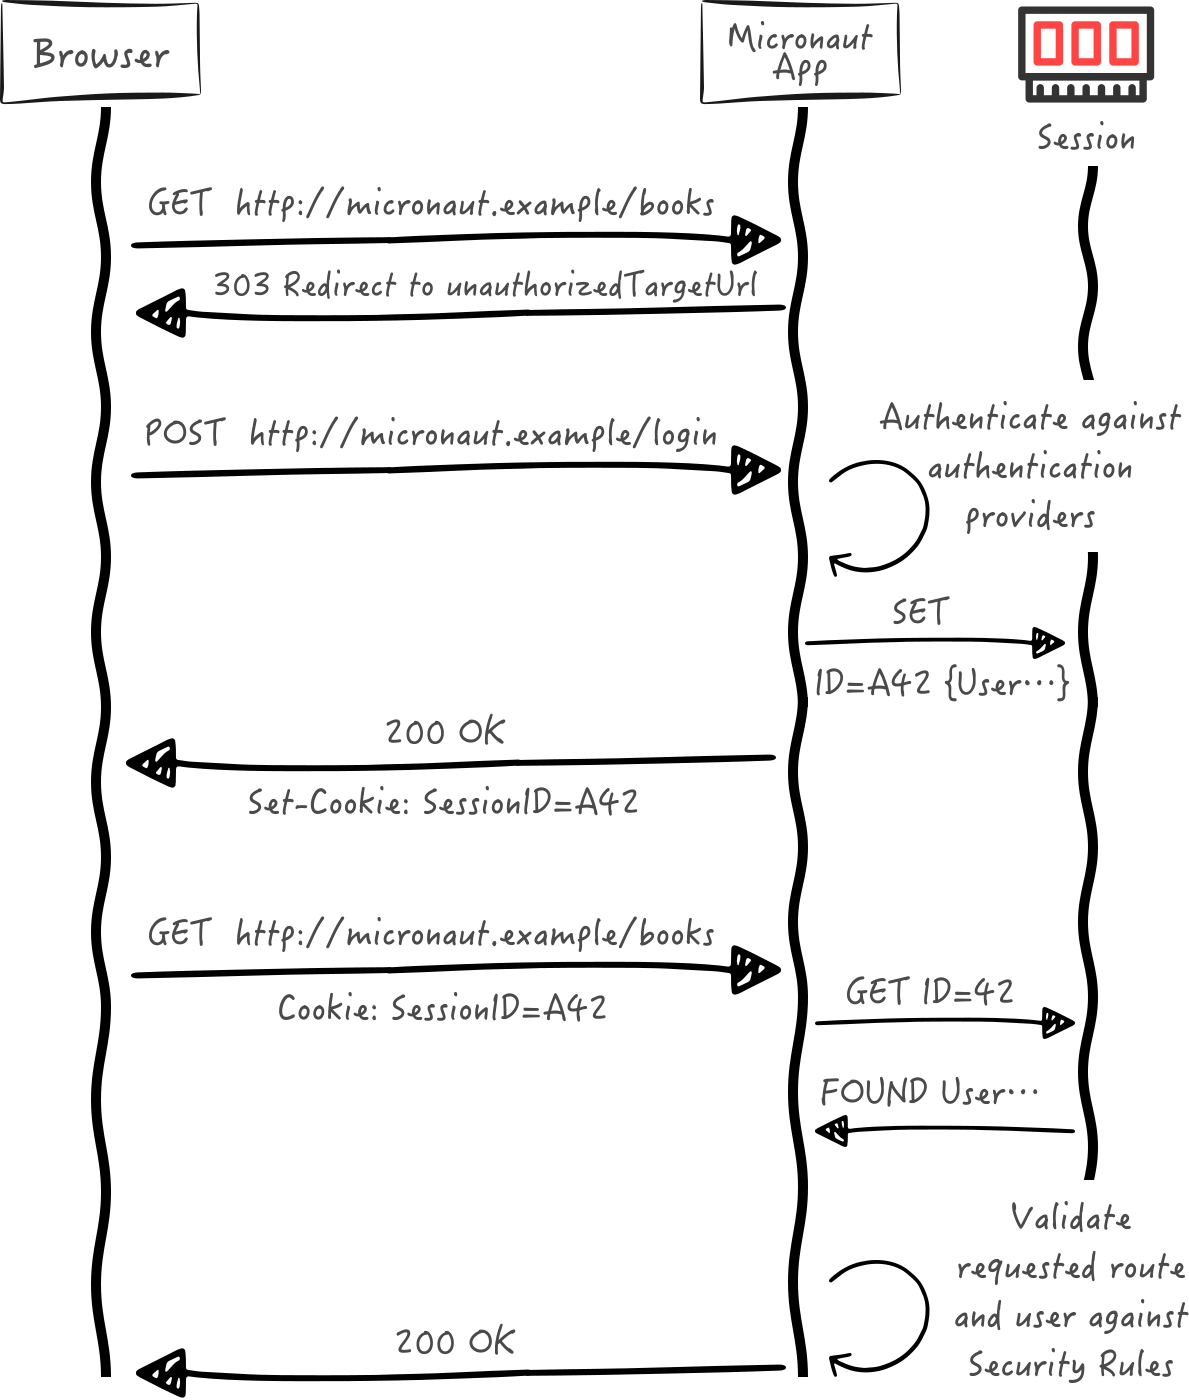
In this guide, we will create a Micronaut application written in Java with session and database authentication.
The following sequence illustrates the authentication flow:
What you will need
To complete this guide, you will need the following:
-
Some time on your hands
-
A decent text editor or IDE (e.g. IntelliJ IDEA)
-
JDK 21 or greater installed with
JAVA_HOMEconfigured appropriately
Solution
We recommend that you follow the instructions in the next sections and create the application step by step. However, you can go right to the completed example.
-
Download and unzip the source
Writing the Application
Create an application using the Micronaut Command Line Interface or with Micronaut Launch.
mn create-app example.micronaut.micronautguide \
    --features=data-jdbc,flyway,postgres,views-thymeleaf,validation,security-session,reactor \
    --build=gradle \
    --lang=java \
--test=junit|
Note
|
If you don’t specify the --build argument, Gradle with the Kotlin DSL is used as the build tool. If you don’t specify the --lang argument, Java is used as the language.If you don’t specify the --test argument, JUnit is used for Java and Kotlin, and Spock is used for Groovy.
|
The previous command creates a Micronaut application with the default package example.micronaut in a directory named micronautguide.
If you use Micronaut Launch, select Micronaut Application as application type and add data-jdbc, flyway, postgres, views-thymeleaf, validation, security-session, and reactor features.
|
Note
|
If you have an existing Micronaut application and want to add the functionality described here, you can view the dependency and configuration changes from the specified features, and apply those changes to your application. |
Configure Access for a Data Source
We will use Micronaut Data JDBC to access the PostgreSQL data source.
Add the following required dependencies:
annotationProcessor("io.micronaut.data:micronaut-data-processor")
implementation("io.micronaut.data:micronaut-data-jdbc")
implementation("io.micronaut.sql:micronaut-jdbc-hikari")
runtimeOnly("org.postgresql:postgresql")
Locally, the database will be provided by Micronaut Test Resources.
With the configured data source, you can access the data using the Micronaut JDBC API, which is shown later in the guide.
Database Migration with Flyway
We need a way to create the database schema. For that, we use Micronaut integration with Flyway.
Flyway automates schema changes, significantly simplifying schema management tasks, such as migrating, rolling back, and reproducing in multiple environments.
Add the following snippet to include the necessary dependencies:
implementation("io.micronaut.flyway:micronaut-flyway")We will enable Flyway in the Micronaut configuration file and configure it to perform migrations on one of the defined data sources.
|
Note
|
Configuring multiple data sources is as simple as enabling Flyway for each one. You can also specify directories that will be used for migrating each data source. Review the Micronaut Flyway documentation for additional details. |
Flyway migration will be automatically triggered before your Micronaut application starts. Flyway will read migration commands in the resources/db/migration/ directory, execute them if necessary, and verify that the configured data source is consistent with them.
Create the following migration files with the database schema creation:
CREATE TABLE role (
    id BIGSERIAL PRIMARY KEY NOT NULL,
    authority varchar(255) NOT NULL
);
CREATE TABLE "user" (
    id BIGSERIAL primary key NOT NULL,
    username varchar(255) NOT NULL,
    password varchar(255) NOT NULL,
    enabled BOOLEAN NOT NULL,
    account_expired BOOLEAN NOT NULL,
    account_locked BOOLEAN NOT NULL,
    password_expired BOOLEAN NOT NULL
);
CREATE TABLE user_role(
    role_id BIGINT NOT NULL,
    user_id BIGINT NOT NULL,
    FOREIGN KEY (role_id) REFERENCES role(id),
    FOREIGN KEY (user_id) REFERENCES "user"(id),
    PRIMARY KEY (role_id, user_id)
);
Security Session
To use Micronaut Security session, add the following dependency:
implementation("io.micronaut.security:micronaut-security-session")Security Configuration
Add this configuration to application.properties:
Validation
To use Micronaut Validation, add the following dependencies:
implementation("io.micronaut.validation:micronaut-validation")
annotationProcessor("io.micronaut.validation:micronaut-validation-processor")
Micronaut Reactor
To use Project Reactor, add the following dependency:
implementation("io.micronaut.reactor:micronaut-reactor")Entities
Role
Create Role domain class to store authorities within our application.
User
Create a UserState interface to model the user state.
imports
package example.micronaut;public interface UserState {
String getUsername();
String getPassword();
boolean isEnabled();
boolean isAccountExpired();
boolean isAccountLocked();
boolean isPasswordExpired();
}Create User domain class to store users within our application.
UserRole
The UserRole table uses a composite key which we model with UserRoleId.
Create a UserRole which stores a many-to-many relationship between User and Role.
Repositories
Role Repository
Create a repository for the Role entity.
User Repository
Create a repository for the User entity.
User Role Repository
Create a repository for the UserRole entity.
Password Encoder
Create an interface to handle password encoding:
imports
package example.micronaut;

import jakarta.validation.constraints.NotBlank;
public interface PasswordEncoder {
String encode(@NotBlank String rawPassword);
boolean matches(@NotBlank String rawPassword,
@NotBlank String encodedPassword);
}To provide an implementation, first include a dependency to Spring Security Crypto to ease password encoding.
Add the dependencies:
implementation("org.springframework.security:spring-security-crypto:@spring-security-cryptoVersion@")
implementation("org.slf4j:jcl-over-slf4j")
Then, write the implementation:
Register Service
Create a service to register a user.
Create RegisterService
If the user already exists, we throw a UserAlreadyExistsException.
imports
package example.micronaut.exceptions;public class UserAlreadyExistsException extends RuntimeException {
}Delegating Authentication Provider
We will set up a AuthenticationProvider as described in the next diagram.
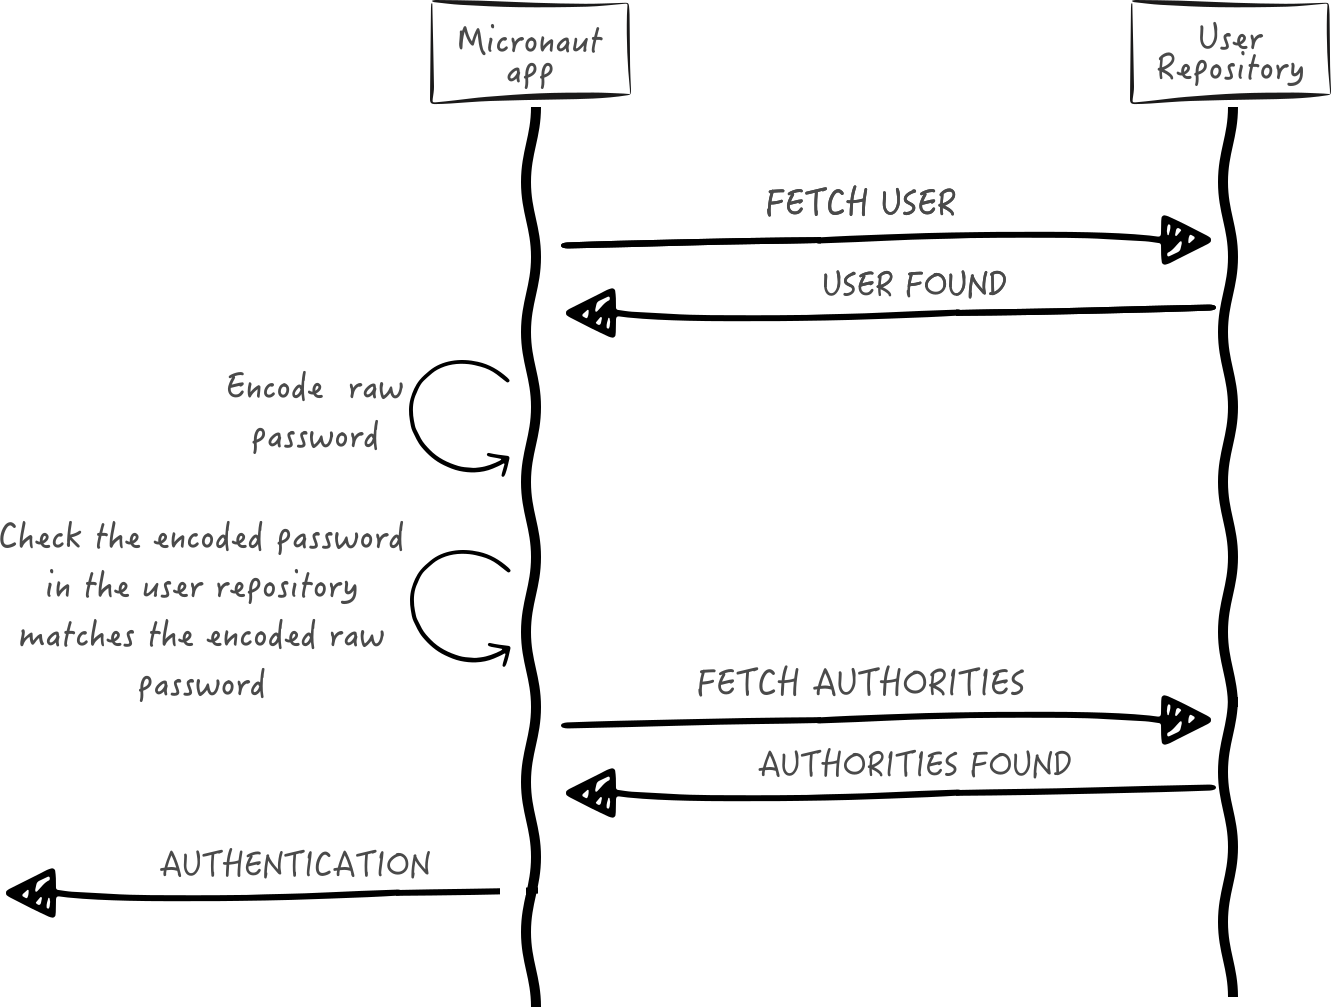
Next, we create interfaces and implementations for each of the pieces of the previous diagram.
User Fetcher
Create an interface to retrieve a UserState given a username.
imports
package example.micronaut;

import io.micronaut.core.annotation.NonNull;
import jakarta.validation.constraints.NotBlank;

import java.util.Optional;
interface UserFetcher {
Optional<UserState> findByUsername(@NotBlank @NonNull String username);
}Provide an implementation:
Authorities Fetcher
Create an interface to retrieve roles given a username.
imports
package example.micronaut;

import java.util.List;
public interface AuthoritiesFetcher {
List<String> findAuthoritiesByUsername(String username);
}Provide an implementation:
Authentication Provider
Create an authentication provider which uses the interfaces you wrote in the previous sections.
Views
To use the Thymeleaf Java template engine to render views in a Micronaut application, add the following dependency on your classpath.
implementation("io.micronaut.views:micronaut-views-thymeleaf")Views Fieldset
In this guide, we use the FieldsetGenerator API:
The FieldsetGenerator API simplifies the generation of an HTML Fieldset representation for a given type or instance. It leverages the introspection builder support.
To use it, add the following dependency on your classpath.
implementation("io.micronaut.views:micronaut-views-fieldset")Thymeleaf Fragments
|
Warning
|
The application uses several thymeleaf fragments, which are not shown in this tutorial but which you can obtain when you download the Solution |
If you select views-thymeleaf in Micronaut Launch, those fragments get generated as well.
View Model Processor
Create a ViewModelProcessor to add a logout form to the model if the user is authenticated.
Login Form
Create a Java Record to model the login form:
SignUp Form
Create a Java Record to model the signup form:
Custom Validation Annotation
Create the PasswordMatch annotation:
imports
package example.micronaut.constraints;

import jakarta.validation.Constraint;
import jakarta.validation.Payload;

import java.lang.annotation.ElementType;
import java.lang.annotation.Retention;
import java.lang.annotation.RetentionPolicy;
import java.lang.annotation.Target;@Constraint(validatedBy = PasswordMatchValidator.class)
@Target(ElementType.TYPE)
@Retention(RetentionPolicy.RUNTIME)
public @interface PasswordMatch {
String MESSAGE = "example.micronaut.constraints.PasswordMatch.message";
String message() default "{" + MESSAGE + "}";
Class<?>[] groups() default {};
Class<? extends Payload>[] payload() default {};
}Validation Factory
Creates validator for PasswordMatch and SignUpForm:
imports
package example.micronaut.constraints;

import example.micronaut.controllers.SignUpForm;
import io.micronaut.core.annotation.Introspected;
import jakarta.validation.ConstraintValidator;
import jakarta.validation.ConstraintValidatorContext;@Introspected //
public class PasswordMatchValidator implements ConstraintValidator<PasswordMatch, SignUpForm> {
@Override
public boolean isValid(SignUpForm value, ConstraintValidatorContext context) {
if (value.password() == null && value.repeatPassword() == null) {
return true;
}
if (value.password() != null && value.repeatPassword() == null) {
return false;
}
if (value.password() == null) {
return false;
}
return value.password().equals(value.repeatPassword());
}
}callout:introspected
Validation Messages
Create a default message for the PasswordMatch constraint:
Controllers
HomeController
Create a controller to render an HTML Page in the root of the application:
It uses the following Thymeleaf template:
<!DOCTYPE html>
<html lang="en" th:replace="~{layout :: layout(~{::title},~{::script},~{::main})}" xmlns:th="http://www.thymeleaf.org">
<head>
    <title></title>
    <script></script>
</head>
<body>
<main>
    <th:block th:if="${security}">
        <h2>username: <span th:text="${security.name}"></span></h2>
        <form th:replace="~{fieldset/form :: form(${logoutForm})}"></form>
    </th:block>
    <ul th:unless="${security}">
        <li><a href="/user/auth">Login</a></li>
        <li><a href="/user/signUp">SignUp</a></li>
    </ul>
</main>
</body>
</html>
UserController
Create a controller to render the login and signup pages:
The UserController controller uses the following templates for the login form:
<!DOCTYPE html>
<html lang="en" th:replace="~{layout :: layout(~{::title},~{::script},~{::main})}" xmlns:th="http://www.thymeleaf.org">
<head>
    <title></title>
    <script></script>
</head>
<body>
<main>
    <form th:replace="~{fieldset/form :: form(${form})}"></form>
    <th:block  th:if="${error}"><div th:replace="~{alerts/danger :: danger(${error})}"></div></th:block>
    <p class="mt-3"><a href="/user/signUp">Signup</a></p>
</main>
</body>
</html>
The UserController uses the following templates for the signup form:
<!DOCTYPE html>
<html lang="en" th:replace="~{layout :: layout(~{::title},~{::script},~{::main})}" xmlns:th="http://www.thymeleaf.org">
<head>
    <title></title>
    <script></script>
</head>
<body>
<main>
    <form th:replace="~{fieldset/form :: form(${form})}"></form>
    <th:block  th:if="${error}"><div th:replace="~{alerts/danger :: danger(${error})}"></div></th:block>
</main>
</body>
</html>
Running the Application
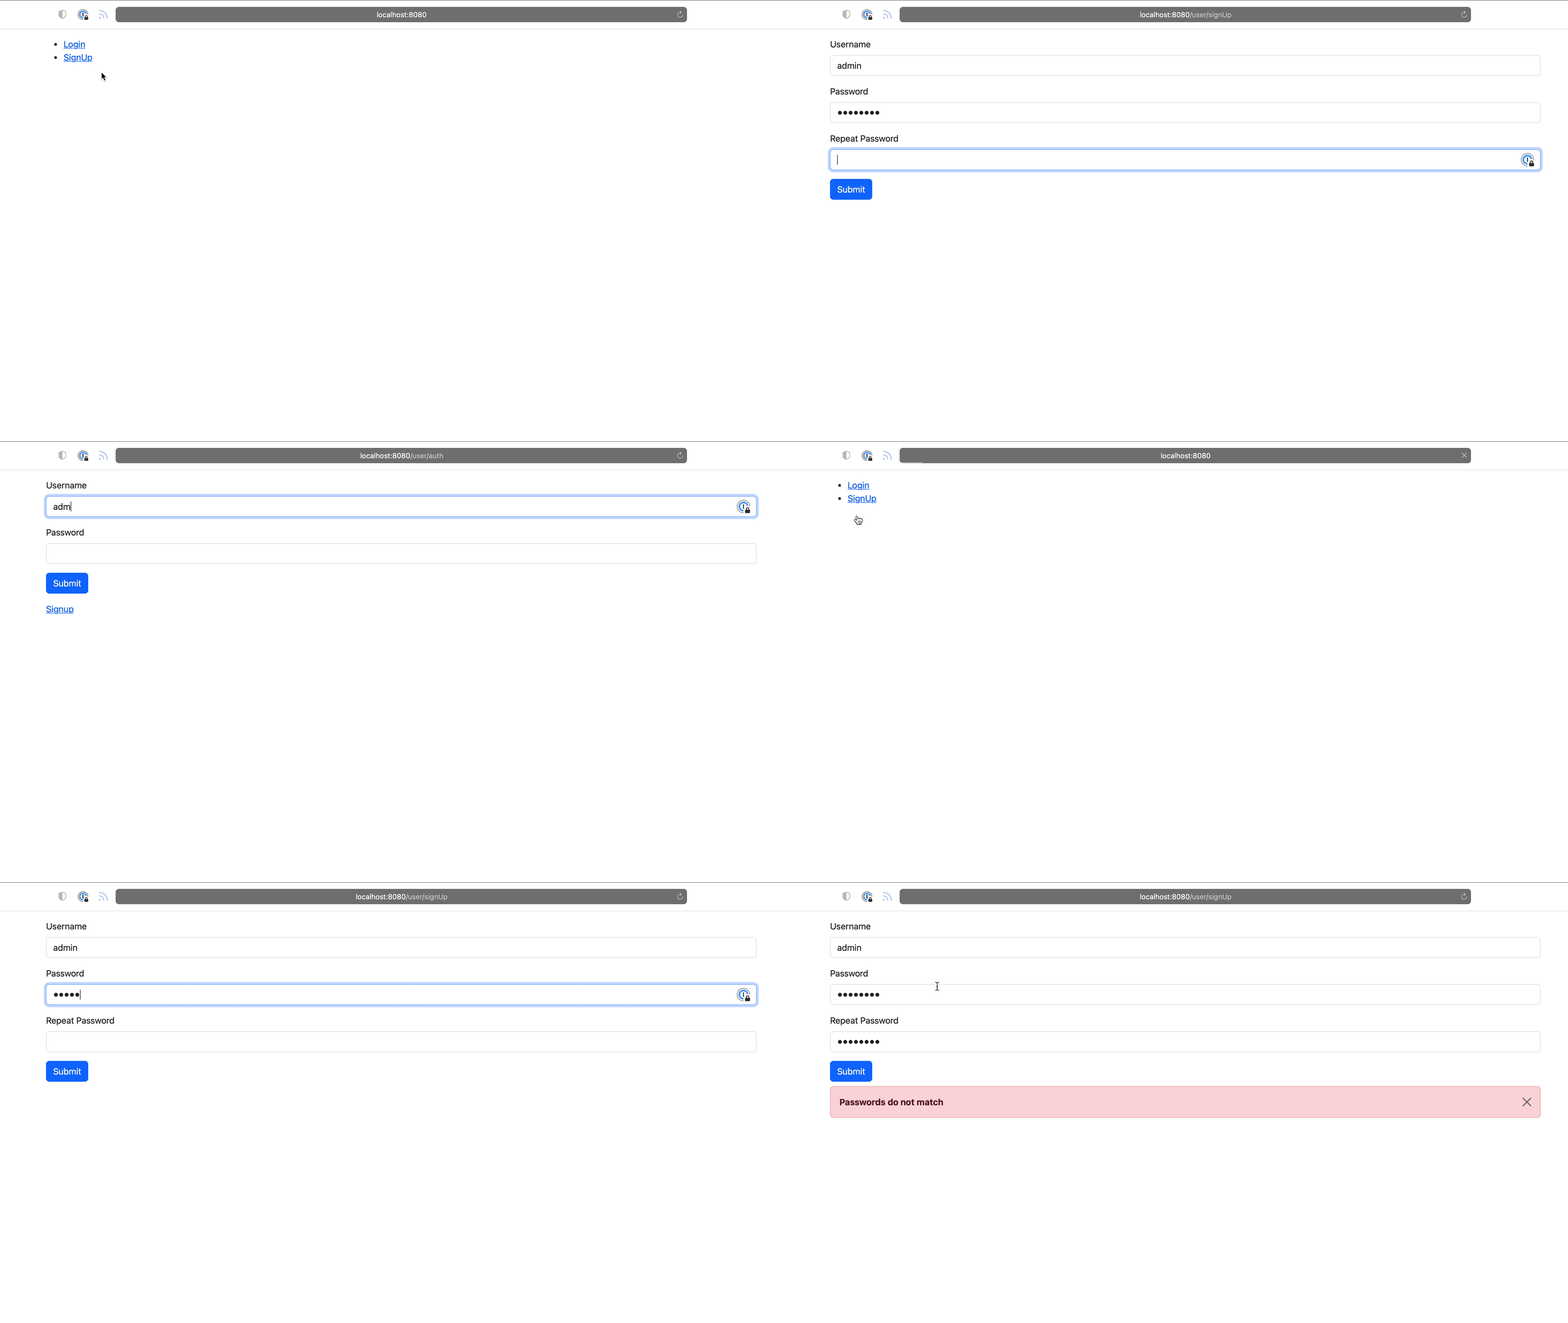
To run the application, use the ./gradlew run command, which starts the application on port 8080.
You can register a user, sign in and logout:
GraalVM Reflection Metadata
Thymeleaf accesses several Micronaut Views classes via reflection.
Reflection metadata can be provided to the native-image builder by providing JSON files stored in the META-INF/native-image/<group.id>/<artifact.id> project directory.
Create a new file src/main/resources/META-INF/native-image/example.micronaut.micronautguide/reflect-config.json:
[
  {
    "name": "io.micronaut.views.fields.Fieldset",
    "queryAllDeclaredMethods": true,
    "methods": [
      {
        "name": "errors",
        "parameterTypes": []
      },
      {
        "name": "fields",
        "parameterTypes": []
      }
    ]
  },
  {
    "name": "io.micronaut.views.fields.Form",
    "queryAllDeclaredMethods": true,
    "methods": [
      {
        "name": "action",
        "parameterTypes": []
      },
      {
        "name": "fieldset",
        "parameterTypes": []
      },
      {
        "name": "method",
        "parameterTypes": []
      }
    ]
  },
  {
    "name": "io.micronaut.views.fields.FormElement",
    "queryAllDeclaredMethods": true
  },
  {
    "name": "io.micronaut.views.fields.HtmlTag",
    "queryAllDeclaredMethods": true,
    "methods": [
      {
        "name": "toString",
        "parameterTypes": []
      }
    ]
  },
  {
    "name": "io.micronaut.views.fields.InputType",
    "queryAllDeclaredMethods": true,
    "methods": [
      {
        "name": "toString",
        "parameterTypes": []
      }
    ]
  },
  {
    "name": "io.micronaut.views.fields.elements.FormElementAttributes",
    "queryAllDeclaredMethods": true,
    "methods": [
      {
        "name": "hasErrors",
        "parameterTypes": []
      }
    ]
  },
  {
    "name": "io.micronaut.views.fields.elements.InputFormElement",
    "queryAllDeclaredMethods": true,
    "methods": [
      {
        "name": "getTag",
        "parameterTypes": []
      }
    ]
  },
  {
    "name": "io.micronaut.views.fields.elements.InputPasswordFormElement",
    "queryAllDeclaredMethods": true,
    "queryAllPublicMethods": true,
    "methods": [
      {
        "name": "errors",
        "parameterTypes": []
      },
      {
        "name": "getType",
        "parameterTypes": []
      },
      {
        "name": "id",
        "parameterTypes": []
      },
      {
        "name": "label",
        "parameterTypes": []
      },
      {
        "name": "maxLength",
        "parameterTypes": []
      },
      {
        "name": "minLength",
        "parameterTypes": []
      },
      {
        "name": "name",
        "parameterTypes": []
      },
      {
        "name": "pattern",
        "parameterTypes": []
      },
      {
        "name": "placeholder",
        "parameterTypes": []
      },
      {
        "name": "readOnly",
        "parameterTypes": []
      },
      {
        "name": "required",
        "parameterTypes": []
      },
      {
        "name": "size",
        "parameterTypes": []
      },
      {
        "name": "value",
        "parameterTypes": []
      }
    ]
  },
  {
    "name": "io.micronaut.views.fields.elements.InputStringFormElement",
    "queryAllDeclaredMethods": true
  },
  {
    "name": "io.micronaut.views.fields.elements.InputSubmitFormElement",
    "queryAllDeclaredMethods": true,
    "queryAllPublicMethods": true,
    "methods": [
      {
        "name": "getType",
        "parameterTypes": []
      },
      {
        "name": "value",
        "parameterTypes": []
      }
    ]
  },
  {
    "name": "io.micronaut.views.fields.elements.InputTextFormElement",
    "queryAllDeclaredMethods": true,
    "queryAllPublicMethods": true,
    "methods": [
      {
        "name": "errors",
        "parameterTypes": []
      },
      {
        "name": "getType",
        "parameterTypes": []
      },
      {
        "name": "id",
        "parameterTypes": []
      },
      {
        "name": "label",
        "parameterTypes": []
      },
      {
        "name": "maxLength",
        "parameterTypes": []
      },
      {
        "name": "minLength",
        "parameterTypes": []
      },
      {
        "name": "name",
        "parameterTypes": []
      },
      {
        "name": "pattern",
        "parameterTypes": []
      },
      {
        "name": "placeholder",
        "parameterTypes": []
      },
      {
        "name": "readOnly",
        "parameterTypes": []
      },
      {
        "name": "required",
        "parameterTypes": []
      },
      {
        "name": "size",
        "parameterTypes": []
      },
      {
        "name": "value",
        "parameterTypes": []
      }
    ]
  },
  {
    "name": "io.micronaut.views.fields.messages.Message",
    "queryAllDeclaredMethods": true,
    "methods": [
      {
        "name": "code",
        "parameterTypes": []
      },
      {
        "name": "defaultMessage",
        "parameterTypes": []
      }
    ]
  }
]
Generate a Micronaut Application Native Executable with GraalVM
We will use GraalVM, an advanced JDK with ahead-of-time Native Image compilation, to generate a native executable of this Micronaut application.
Compiling Micronaut applications ahead of time with GraalVM significantly improves startup time and reduces the memory footprint of JVM-based applications.
|
Note
|
Only Java and Kotlin projects support using GraalVM’s native-image tool. Groovy relies heavily on reflection, which is only partially supported by GraalVM.
|
GraalVM Installation
sdk install java 25.0.2-graalFor installation on Windows, or for a manual installation on Linux or Mac, see the GraalVM Getting Started documentation.
The previous command installs Oracle GraalVM, which is free to use in production and free to redistribute, at no cost, under the GraalVM Free Terms and Conditions.
Alternatively, you can use the GraalVM Community Edition:
sdk install java 25.0.2-graalceNative Executable Generation
To generate a native executable using Gradle, run:
./gradlew nativeCompileThe native executable is created in build/native/nativeCompile directory and can be run with build/native/nativeCompile/micronautguide.
It is possible to customize the name of the native executable or pass additional parameters to GraalVM:
Next Steps
Explore more features with Micronaut Guides.
Learn more about:
License
|
Note
|
All guides are released with an Apache License 2.0 for the code and a Creative Commons Attribution 4.0 license for the writing and media (images). |