

Session-based authentication
Learn how to secure a Micronaut application using session-based authentication.
On this guide
In this section
Getting Started
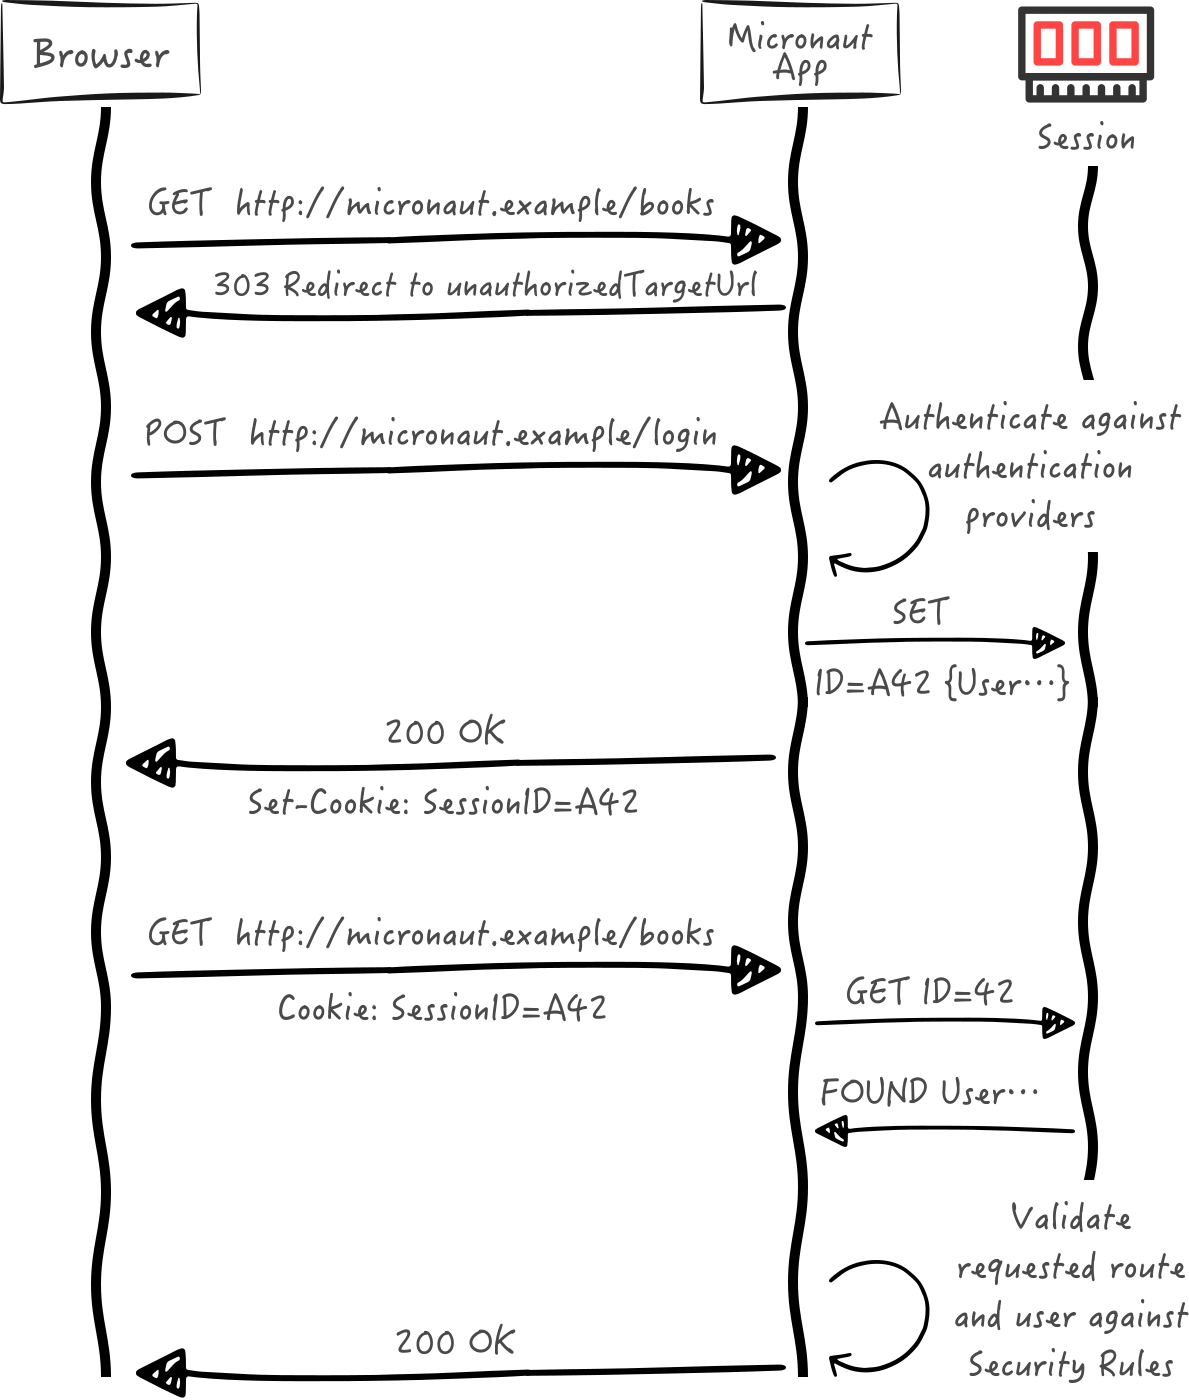
In this guide, we will create a Micronaut application written in Groovy with session-based authentication.
The following sequence illustrates the authentication flow:
What you will need
To complete this guide, you will need the following:
-
Some time on your hands
-
A decent text editor or IDE (e.g. IntelliJ IDEA)
-
JDK 21 or greater installed with
JAVA_HOMEconfigured appropriately
Solution
We recommend that you follow the instructions in the next sections and create the application step by step. However, you can go right to the completed example.
-
Download and unzip the source
Writing the Application
Create an application using the Micronaut Command Line Interface or with Micronaut Launch.
mn create-app example.micronaut.micronautguide \
    --features=security-session,views-velocity,geb,reactor \
    --build=gradle \
    --lang=groovy \
--test=spock|
Note
|
If you don’t specify the --build argument, Gradle with the Kotlin DSL is used as the build tool. If you don’t specify the --lang argument, Java is used as the language.If you don’t specify the --test argument, JUnit is used for Java and Kotlin, and Spock is used for Groovy.
|
The previous command creates a Micronaut application with the default package example.micronaut in a directory named micronautguide.
If you use Micronaut Launch, select Micronaut Application as application type and add security-session, views-velocity, geb, and reactor features.
|
Note
|
If you have an existing Micronaut application and want to add the functionality described here, you can view the dependency and configuration changes from the specified features, and apply those changes to your application. |
Configuration
Add this configuration to application.properties:
Authentication Provider
To keep this guide simple, create a naive AuthenticationProvider to simulate user authentication.
Apache Velocity
By default, Micronaut controllers produce JSON. Usually, you consume those endpoints with a mobile phone application, or a JavaScript front end (Angular, React, Vue.js, etc.). However, to keep this guide simple, we will produce HTML in our controllers.
In order to do that, we use Apache Velocity and the Micronaut Server Side View Rendering Module.
Velocity is a Java-based template engine. It permits anyone to use a simple yet powerful template language to reference objects defined in Java code.
Create two Velocity templates in src/main/resources/views:
<!DOCTYPE html>
<html>
    <head>
        <title>Home</title>
    </head>
    <body>
        #if( $loggedIn )
            <h1>username: <span>$username</span></h1>
        #else
            <h1>You are not logged in</h1>
        #end
        #if( $loggedIn )
            <form action="logout" method="POST">
                <input type="submit" value="Logout"/>
            </form>
        #else
            <p><a href="/login/auth">Login</a></p>
        #end
    </body>
</html><!DOCTYPE html>
<html>
<head>
#if( $errors )
<title>Login Failed</title>
#else
<title>Login</title>
#end
</head>
<body>
<form action="/login" method="POST">
<ol>
<li>
<label for="username">Username</label>
<input type="text" name="username" id="username"/>
</li>
<li>
<label for="password">Password</label>
<input type="password" name="password" id="password"/>
</li>
<li>
<input type="submit" value="Login"/>
</li>
#if( $errors )
<li id="errors">
<span style="color: red;">Login Failed</span>
</li>
#end
</ol>
</form>
</body>
</html>Controllers
Create HomeController which resolves the base URL /:
Login Form
Next, create LoginAuthController which renders the login form.
Tests
We also use Geb, a browser automation solution.
To use Geb, add these dependencies:
testImplementation("org.apache.groovy.geb:geb-spock:8.0.1")
testImplementation("org.seleniumhq.selenium:htmlunit-driver:4.13.0")
Geb uses the Page concept pattern; the Page Object Pattern gives us a common sense way to model content in a reusable and maintainable way.
Create three pages:
imports
package example.micronaut

import geb.Page
class HomePage extends Page {
static url = '/'
static at = { title == 'Home' }
static content = {
loginLink { $('a', text: 'Login') }
logoutButton { $('input', type: 'submit', value: 'Logout') }
usernameElement(required: false) { $('h1 span', 0) }
}
String username() {
usernameElement.empty ? null : usernameElement.text()
}
void login() {
loginLink.click()
}
void logout() {
logoutButton.click()
}
}imports
package example.micronaut

import geb.Page
class LoginPage extends Page {
static url = '/login/auth'
static at = { title.contains 'Login' }
static content = {
usernameInput { $('#username') }
passwordInput { $('#password') }
submitInput { $('input', type: 'submit') }
errorsLi(required: false) { $('li#errors') }
}
boolean hasErrors() {
!errorsLi.empty
}
void login(String username, String password) {
usernameInput = username
passwordInput = password
submitInput.click()
}
}imports
package example.micronaut

import geb.Page
class LoginFailedPage extends Page {
static at = { title == 'Login Failed' }
static url = '/login/authFailed'
}Create a test to verify the user authentication flow.
Testing the Application
To run the tests:
./gradlew testThen open build/reports/tests/test/index.html in a browser to see the results.
Running the Application
To run the application, use the ./gradlew run command, which starts the application on port 8080.
Next Steps
Explore more features with Micronaut Guides.
License
|
Note
|
All guides are released with an Apache License 2.0 for the code and a Creative Commons Attribution 4.0 license for the writing and media (images). |