

Micronaut JWT Authentication
Learn how to secure a Micronaut application using JWT (JSON Web Token) Authentication.
On this guide
In this section
Getting Started
The Micronaut framework ships with security capabilities based on JSON Web Token (JWT). JWT is an IETF standard which defines a secure way to encapsulate arbitrary data that can be sent over insecure URLs.
In this guide you will create a Micronaut application written in Java and secure it with JWT.
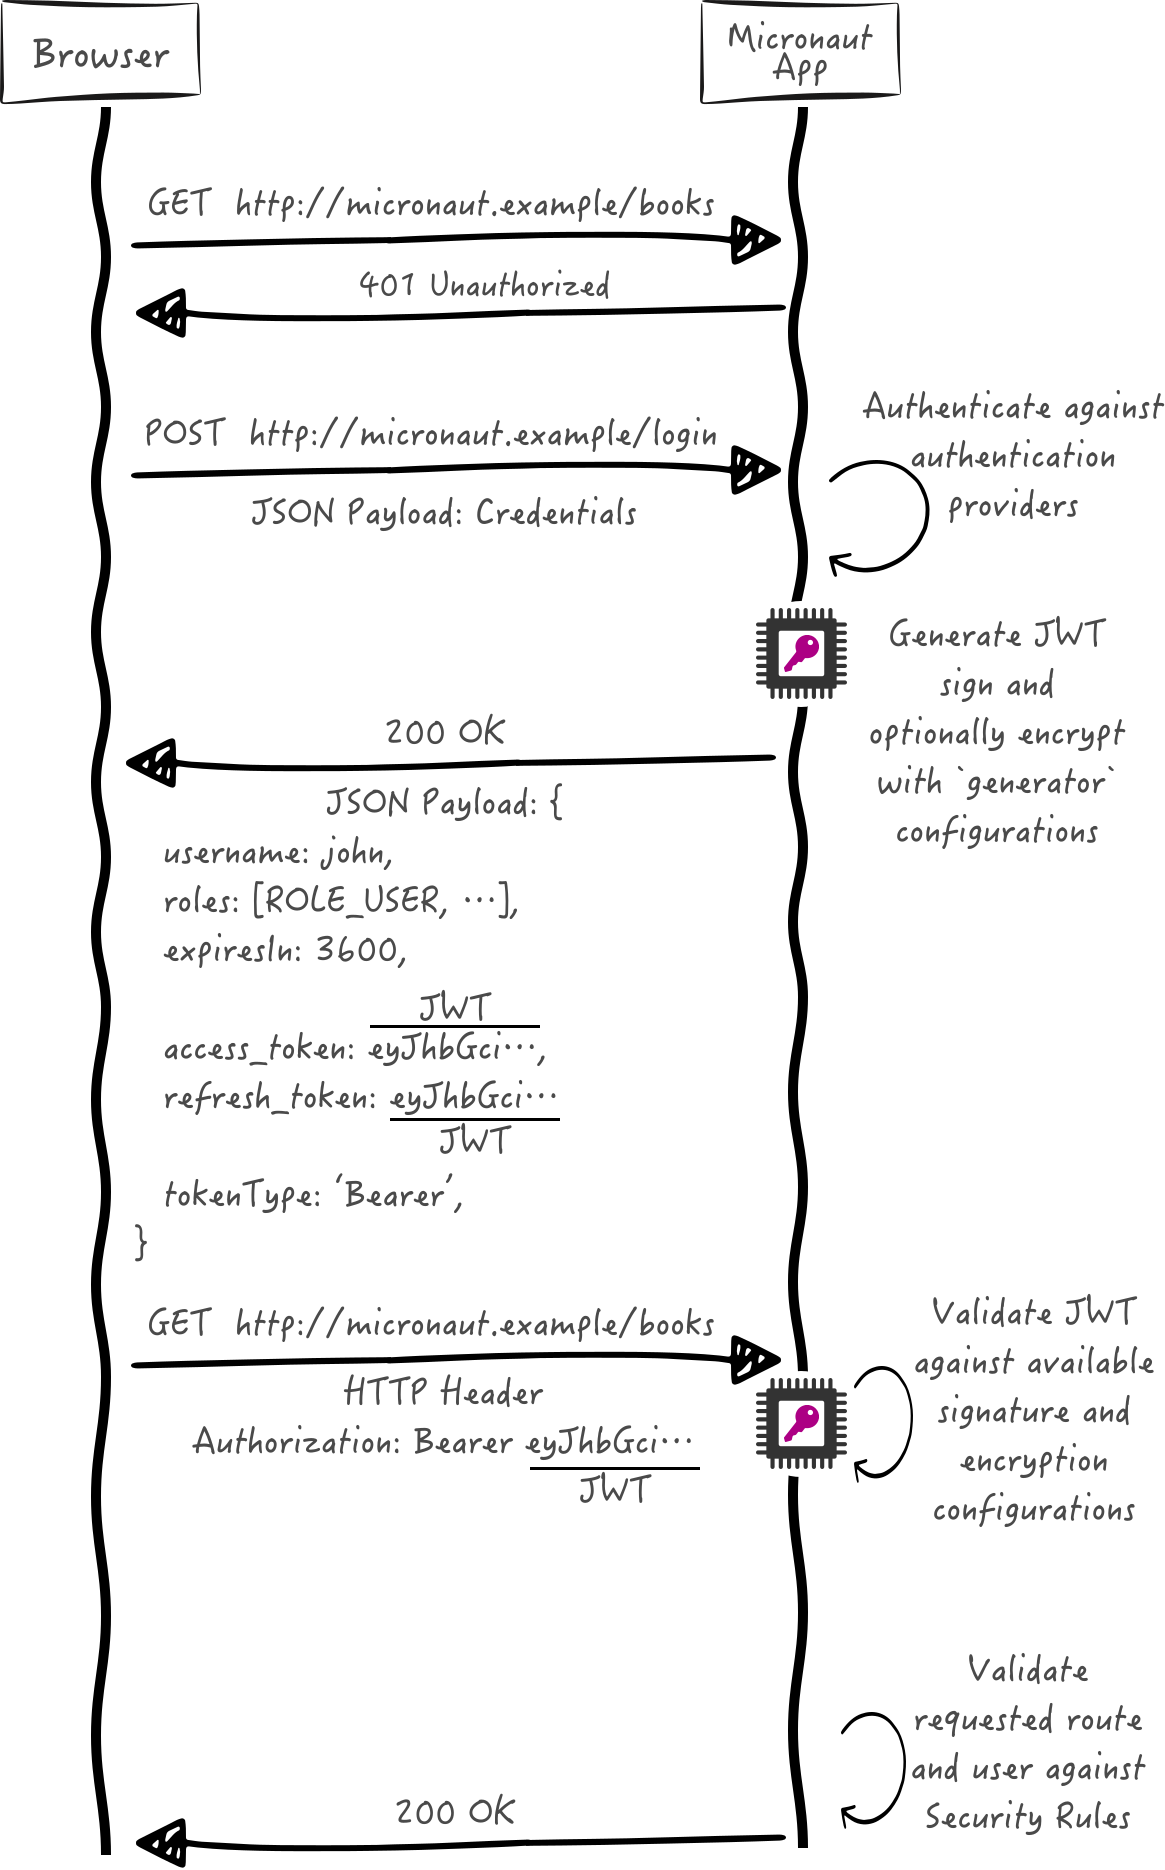
The following sequence illustrates the authentication flow:
What you will need
To complete this guide, you will need the following:
-
Some time on your hands
-
A decent text editor or IDE (e.g. IntelliJ IDEA)
-
JDK 21 or greater installed with
JAVA_HOMEconfigured appropriately
Solution
We recommend that you follow the instructions in the next sections and create the application step by step. However, you can go right to the completed example.
-
Download and unzip the source
Writing the Application
Create an application using the Micronaut Command Line Interface or with Micronaut Launch.
mn create-app example.micronaut.micronautguide \
    --features=security-jwt,data-jdbc,reactor,validation,graalvm \
    --build=gradle \
    --lang=java \
--test=junit|
Note
|
If you don’t specify the --build argument, Gradle with the Kotlin DSL is used as the build tool. If you don’t specify the --lang argument, Java is used as the language.If you don’t specify the --test argument, JUnit is used for Java and Kotlin, and Spock is used for Groovy.
|
The previous command creates a Micronaut application with the default package example.micronaut in a directory named micronautguide.
If you use Micronaut Launch, select Micronaut Application as application type and add security-jwt, data-jdbc, reactor, validation, and graalvm features.
|
Note
|
If you have an existing Micronaut application and want to add the functionality described here, you can view the dependency and configuration changes from the specified features, and apply those changes to your application. |
Configuration
Note the following configuration in the generated application.properties:
Authentication Provider
To keep this guide simple, create a naive AuthenticationProvider to simulate user authentication.
Controller
Create HomeController which resolves the base URL /:
Tests
Create a test to verify a user is able to login and access a secured endpoint.
Use the Micronaut HTTP Client and JWT
To access a secured endpoint, you can also use a Micronaut HTTP Client and supply the JWT token in the Authorization header.
First create a @Client with a method home which accepts an Authorization HTTP header.
imports
package example.micronaut;

import io.micronaut.http.annotation.Body;
import io.micronaut.http.annotation.Consumes;
import io.micronaut.http.annotation.Get;
import io.micronaut.http.annotation.Header;
import io.micronaut.http.annotation.Post;
import io.micronaut.http.client.annotation.Client;
import io.micronaut.security.authentication.UsernamePasswordCredentials;
import io.micronaut.security.token.render.BearerAccessRefreshToken;

import static io.micronaut.http.HttpHeaders.AUTHORIZATION;
import static io.micronaut.http.MediaType.TEXT_PLAIN;@Client("/")
public interface AppClient {
@Post("/login")
BearerAccessRefreshToken login(@Body UsernamePasswordCredentials credentials);
@Consumes(TEXT_PLAIN)
@Get
String home(@Header(AUTHORIZATION) String authorization);
}Create a test which uses the previous @Client
Issuing a Refresh Token
Access tokens expire. You can control the expiration with micronaut.security.token.jwt.generator.access-token.expiration. In addition to the access token, you can configure your login endpoint to also return a refresh token. You can use the refresh token to obtain a new access token.
First, add the following configuration:
RefreshTokenGenerator,
RefreshTokenValidator, and
RefreshTokenPersistence.
We will deal with the latter in the next section. For the generator and validator, Micronaut Security ships with
SignedRefreshTokenGenerator.
It creates and verifies a JWS (JSON Web Signature) encoded object whose payload is a UUID with a hash-based message authentication
code (HMAC). You need to provide a secret to use SignedRefreshTokenGenerator, which implements both RefreshTokenGenerator and RefreshTokenValidator.
Create a test to verify the login endpoint responds with both an access token and a refresh token:
Save Refresh Token
We may want to save a refresh token issued by the application, for example, to revoke a user’s refresh tokens, so that a particular user cannot obtain a new access token, and thus access the application’s endpoints.
Persist the refresh tokens with help of Micronaut Data.
Micronaut Data is a database access toolkit that uses Ahead of Time (AoT) compilation to pre-compute queries for repository interfaces that are then executed by a thin, lightweight runtime layer.
In particular, use Micronaut JDBC
Micronaut Data JDBC is an implementation that pre-computes native SQL queries (given a particular database dialect) and provides a repository implementation that is a simple data mapper between a JDBC ResultSet and an object.
The data-jdbc feature adds the following dependencies:
Create an entity to save the issued refresh tokens.
Create a CrudRepository to include methods to perform Create, Read, Update, and Delete operations with the RefreshTokenEntity.
Refresh Controller
Enable the Refresh Controller via configuration and provide an implementation of RefreshTokenPersistence.
To enable the refresh controller, create a bean of type RefreshTokenPersistence which leverages the Micronaut Data repository we coded in the previous section:
Test Refresh Token
Test Refresh Token Validation
Refresh tokens issued by SignedRefreshTokenGenerator, the default implementation of RefreshTokenGenerator, are signed.
SignedRefreshTokenGenerator implements both RefreshTokenGenerator
and RefreshTokenValidator.
The bean of type RefreshTokenValidator is used by the Refresh Controller to ensure the refresh token supplied is valid.
Create a test for this:
Test Refresh Token Not Found
Create a test to verify that sending a valid refresh token that was not persisted returns HTTP Status 400.
Test Refresh Token Revocation
Generate a valid refresh token, save it but flag it as revoked. Expect a 400.
Test Access Token Refresh
Login, obtain both access token and refresh token, with the refresh token obtain a different access token:
Testing the Application
To run the tests:
./gradlew testThen open build/reports/tests/test/index.html in a browser to see the results.
Running the Application
To run the application, use the ./gradlew run command, which starts the application on port 8080.
Send a request to the login endpoint:
curl -X "POST" "http://localhost:8080/login" -H 'Content-Type: application/json' -d $'{"username": "sherlock","password": "password"}'{"username":"sherlock","access_token":"eyJhbGciOiJIUzI1NiJ9.eyJzdWIiOiJzaGVybG9jayIsIm5iZiI6MTYxNDc2NDEzNywicm9sZXMiOltdLCJpc3MiOiJjb21wbGV0ZSIsImV4cCI6MTYxNDc2NzczNywiaWF0IjoxNjE0NzY0MTM3fQ.cn8bOjlccFqeUQA7x7MnfacMNPjSVAtWP65z1c8eaJc","refresh_token":"eyJhbGciOiJIUzI1NiJ9.NDI1ZjAxZTktYTRmYS00MmU5LTllYjctOWU2ZTNhNTI5YmQ1.RUc2iCfZdPQdwg2U0Nw_LLzZQIIDp5_Is2UWeHVZT7E","token_type":"Bearer","expires_in":3600}Generate a Micronaut Application Native Executable with GraalVM
We will use GraalVM, an advanced JDK with ahead-of-time Native Image compilation, to generate a native executable of this Micronaut application.
Compiling Micronaut applications ahead of time with GraalVM significantly improves startup time and reduces the memory footprint of JVM-based applications.
|
Note
|
Only Java and Kotlin projects support using GraalVM’s native-image tool. Groovy relies heavily on reflection, which is only partially supported by GraalVM.
|
GraalVM Installation
sdk install java 25.0.2-graalFor installation on Windows, or for a manual installation on Linux or Mac, see the GraalVM Getting Started documentation.
The previous command installs Oracle GraalVM, which is free to use in production and free to redistribute, at no cost, under the GraalVM Free Terms and Conditions.
Alternatively, you can use the GraalVM Community Edition:
sdk install java 25.0.2-graalceNative Executable Generation
To generate a native executable using Gradle, run:
./gradlew nativeCompileThe native executable is created in build/native/nativeCompile directory and can be run with build/native/nativeCompile/micronautguide.
It is possible to customize the name of the native executable or pass additional parameters to GraalVM:
Send the same curl request as before to test that the native executable application works.
Next Steps
Learn more about JWT Authentication in the official documentation.
License
|
Note
|
All guides are released with an Apache License 2.0 for the code and a Creative Commons Attribution 4.0 license for the writing and media (images). |