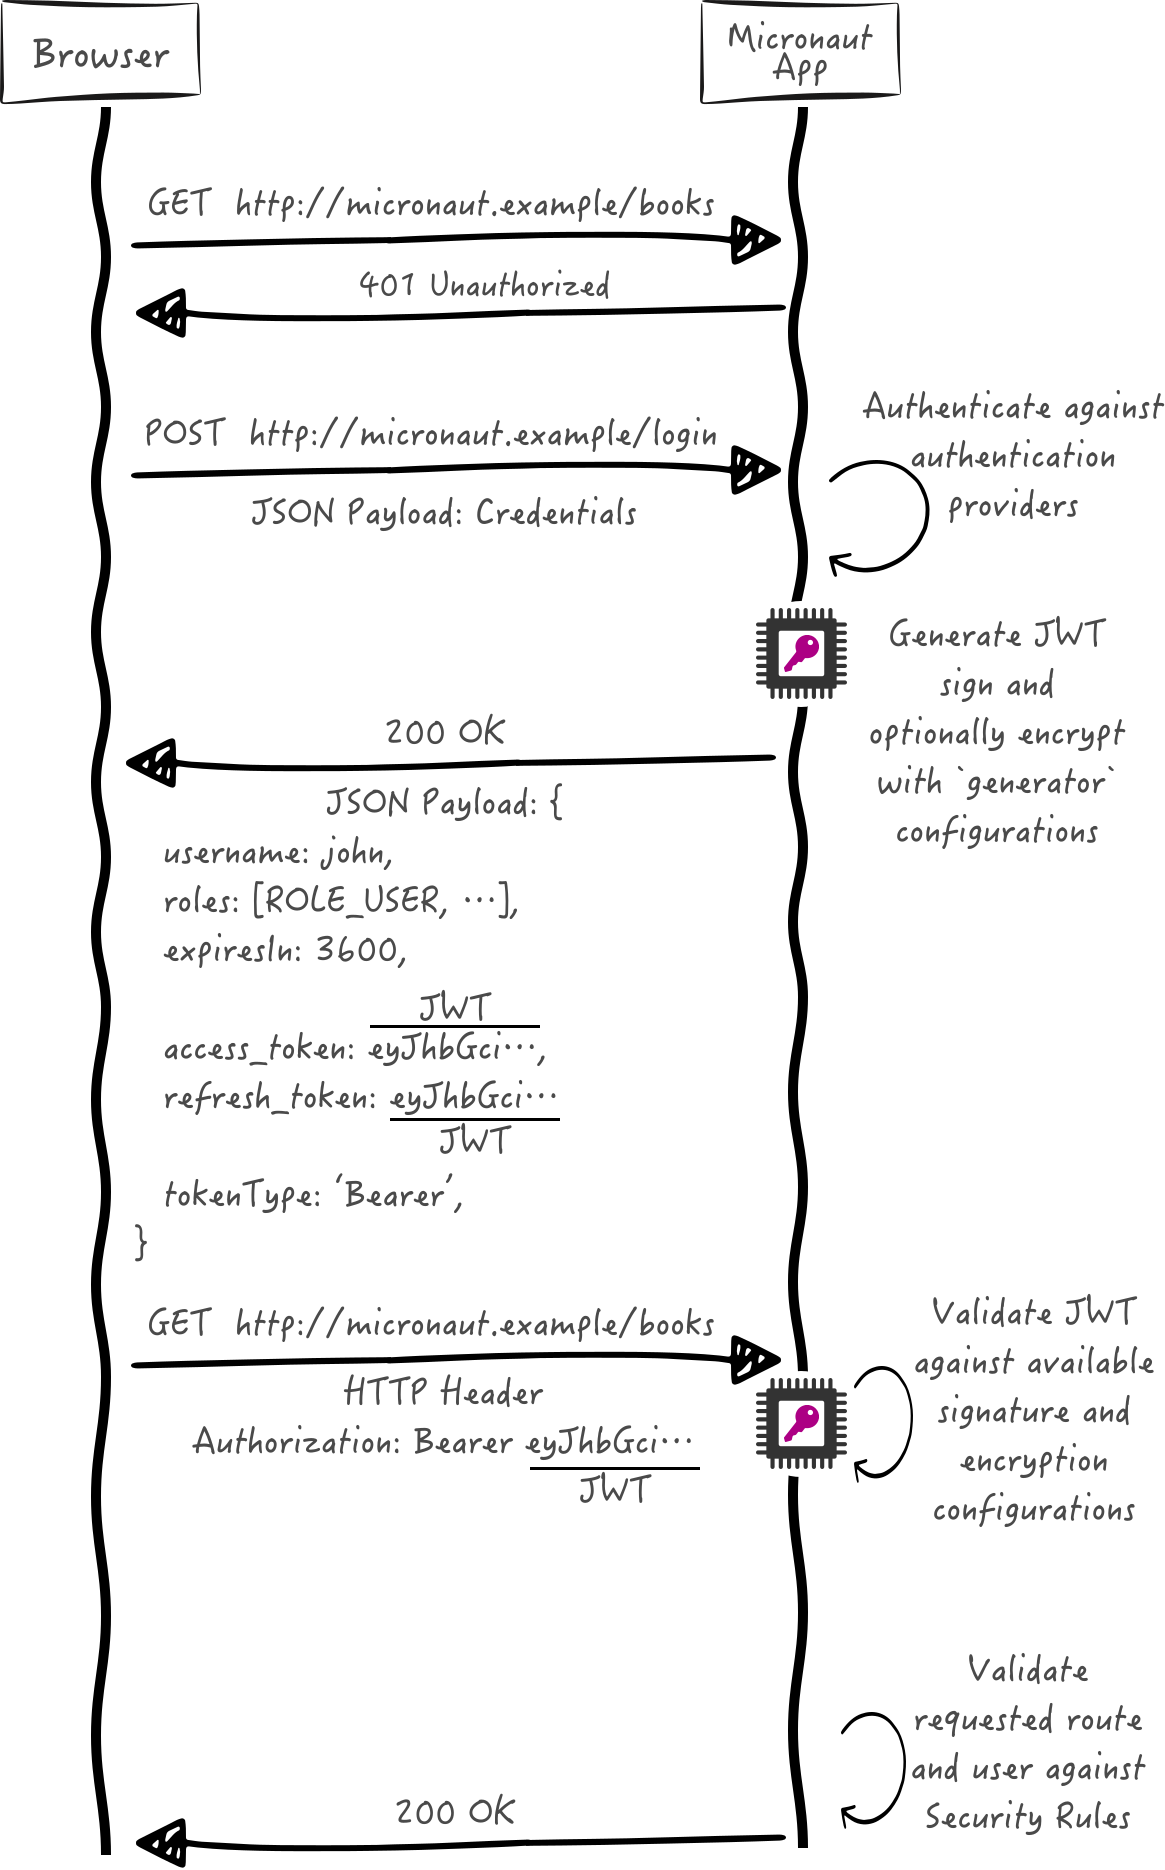
Access tokens expire. You can control the expiration with micronaut.security.token.jwt.generator.access-token.expiration. In addition to the access token, you can configure your login endpoint to also return a refresh token. You can use the refresh token to obtain a new access token.
First, add the following configuration:
src/main/resources/application.properties
micronaut.security.token.jwt.generator.refresh-token.secret ="${JWT_GENERATOR_SIGNATURE_SECRET:pleaseChangeThisSecretForANewOne}"'
RefreshTokenGenerator ,
RefreshTokenValidator , and
RefreshTokenPersistence .
We will deal with the latter in the next section. For the generator and validator, Micronaut Security ships with
SignedRefreshTokenGenerator .
It creates and verifies a JWS (JSON Web Signature) encoded object whose payload is a UUID with a hash-based message authentication
code (HMAC). You need to provide a secret to use SignedRefreshTokenGenerator, which implements both RefreshTokenGenerator and RefreshTokenValidator.
Create a test to verify the login endpoint responds with both an access token and a refresh token:
groovy/src/test/groovy/example/micronaut/LoginIncludesRefreshTokenSpec.groovy
imports package example.micronautimport com.nimbusds.jwt.JWTParserimport com.nimbusds.jwt.SignedJWTimport io.micronaut.http.HttpRequestimport io.micronaut.http.client.HttpClientimport io.micronaut.http.client.annotation.Clientimport io.micronaut.security.authentication.UsernamePasswordCredentialsimport io.micronaut.security.token.render.BearerAccessRefreshTokenimport io.micronaut.test.extensions.spock.annotation.MicronautTestimport jakarta.inject.Injectimport spock.lang.Specification@MicronautTest class LoginIncludesRefreshTokenSpec extends Specification { @Inject @Client ("/" ) HttpClient client void "upon successful authentication, the user gets an access token and a refresh token" () { when : 'Login endpoint is called with valid credentials' UsernamePasswordCredentials creds = new UsernamePasswordCredentials ("sherlock" , "password" ) HttpRequest request = HttpRequest. POST ('/login' , creds) BearerAccessRefreshToken rsp = client. toBlocking(). retrieve(request, BearerAccessRefreshToken ) then : rsp. username == 'sherlock'
rsp. accessToken
rsp. refreshToken //
and : 'access token is a JWT' JWTParser. parse(rsp. accessToken) instanceof SignedJWT }
}
Save Refresh Token
We may want to save a refresh token issued by the application, for example, to revoke a user’s refresh tokens, so that a particular user cannot obtain a new access token, and thus access the application’s endpoints.
Micronaut Data is a database access toolkit that uses Ahead of Time (AoT) compilation to pre-compute queries for repository interfaces that are then executed by a thin, lightweight runtime layer.
In particular, use Micronaut JDBC
Micronaut Data JDBC is an implementation that pre-computes native SQL queries (given a particular database dialect) and provides a repository implementation that is a simple data mapper between a JDBC ResultSet and an object.
The data-jdbc feature adds the following dependencies:
<dependency > //
<groupId >io.micronaut.data</groupId >
<artifactId >micronaut-data-processor</artifactId >
<scope >compile</scope >
</dependency >
<dependency > //
<groupId >io.micronaut.data</groupId >
<artifactId >micronaut-data-jdbc</artifactId >
<scope >compile</scope >
</dependency >
<dependency > //
<groupId >io.micronaut.sql</groupId >
<artifactId >micronaut-jdbc-hikari</artifactId >
<scope >compile</scope >
</dependency >
<dependency > //
<groupId >com.h2database</groupId >
<artifactId >h2</artifactId >
<scope >runtime</scope >
</dependency >
Create an entity to save the issued refresh tokens.
groovy/src/main/groovy/example/micronaut/RefreshTokenEntity.groovy
imports package example.micronautimport groovy.transform.CompileStaticimport io.micronaut.core.annotation.NonNullimport io.micronaut.data.annotation.DateCreatedimport io.micronaut.data.annotation.GeneratedValueimport io.micronaut.data.annotation.Idimport io.micronaut.data.annotation.MappedEntityimport jakarta.validation.constraints.NotBlankimport jakarta.validation.constraints.NotNullimport java.time.Instant@CompileStatic @MappedEntity // class RefreshTokenEntity { @Id // @GeneratedValue // @NonNull Long id @NonNull @NotBlank String username @NonNull @NotBlank String refreshToken @NonNull @NotNull Boolean revoked @DateCreated // @NonNull @NotNull Instant dateCreated }
Create a CrudRepository to include methods to perform Create, Read, Update, and Delete operations with the RefreshTokenEntity.
groovy/src/main/groovy/example/micronaut/RefreshTokenRepository.groovy
imports package example.micronautimport io.micronaut.core.annotation.NonNullimport io.micronaut.data.jdbc.annotation.JdbcRepositoryimport io.micronaut.data.repository.CrudRepositoryimport jakarta.transaction.Transactionalimport jakarta.validation.constraints.NotBlankimport jakarta.validation.constraints.NotNullimport static io.micronaut.data.model.query.builder.sql.Dialect.H2@JdbcRepository (dialect = H2 ) // interface RefreshTokenRepository extends CrudRepository<RefreshTokenEntity, Long> { // @Transactional RefreshTokenEntity save (@NonNull @NotBlank String username , @NonNull @NotBlank String refreshToken , @NonNull @NotNull Boolean revoked ) // Optional<RefreshTokenEntity> findByRefreshToken (@NonNull @NotBlank String refreshToken ) // long updateByUsername (@NonNull @NotBlank String username , boolean revoked ) // }
Refresh Controller
To enable the refresh controller, create a bean of type
RefreshTokenPersistence which leverages the Micronaut Data repository we coded in the previous section:
groovy/src/main/groovy/example/micronaut/CustomRefreshTokenPersistence.groovy
imports package example.micronautimport io.micronaut.security.authentication.Authenticationimport io.micronaut.security.errors.OauthErrorResponseExceptionimport io.micronaut.security.token.event.RefreshTokenGeneratedEventimport io.micronaut.security.token.refresh.RefreshTokenPersistenceimport jakarta.inject.Singletonimport org.reactivestreams.Publisherimport reactor.core.publisher.Fluximport reactor.core.publisher.FluxSinkimport static io.micronaut.security.errors.IssuingAnAccessTokenErrorCode.INVALID_GRANT@Singleton // class CustomRefreshTokenPersistence implements RefreshTokenPersistence { private final RefreshTokenRepository refreshTokenRepository CustomRefreshTokenPersistence (RefreshTokenRepository refreshTokenRepository ) { // this . refreshTokenRepository = refreshTokenRepository }
@Override void persistToken (RefreshTokenGeneratedEvent event ) { // if (event?. refreshToken && event?. authentication?. name) { String payload = event. refreshToken refreshTokenRepository. save(event. authentication. name, payload, false ) //
}
}
@Override Publisher<Authentication> getAuthentication (String refreshToken ) { Flux. create(emitter -> { Optional<RefreshTokenEntity> tokenOpt = refreshTokenRepository. findByRefreshToken(refreshToken) if (tokenOpt. isPresent()) { RefreshTokenEntity token = tokenOpt. get() if (token. getRevoked()) { emitter. error(new OauthErrorResponseException (INVALID_GRANT , "refresh token revoked" , null )) //
} else {
emitter. next(Authentication. build(token. username)) //
emitter. complete()
}
} else {
emitter. error(new OauthErrorResponseException (INVALID_GRANT , "refresh token not found" , null )) //
}
}, FluxSink.OverflowStrategy. ERROR )
}
}
Test Refresh Token
Test Refresh Token Validation
The bean of type RefreshTokenValidator is used by the Refresh Controller to ensure the refresh token supplied is valid.
groovy/src/test/groovy/example/micronaut/UnsignedRefreshTokenSpec.groovy
imports package example.micronautimport io.micronaut.core.type.Argumentimport io.micronaut.http.HttpRequestimport io.micronaut.http.client.HttpClientimport io.micronaut.http.client.annotation.Clientimport io.micronaut.http.client.exceptions.HttpClientResponseExceptionimport io.micronaut.security.endpoints.TokenRefreshRequestimport io.micronaut.security.token.render.BearerAccessRefreshTokenimport io.micronaut.test.extensions.spock.annotation.MicronautTestimport jakarta.inject.Injectimport spock.lang.Specificationimport static io.micronaut.http.HttpStatus.BAD_REQUEST@MicronautTest class UnsignedRefreshTokenSpec extends Specification { @Inject @Client ("/" ) HttpClient client void 'Accessing a secured URL without authenticating returns unauthorized' () { given : String unsignedRefreshedToken = "foo" // when : Argument<BearerAccessRefreshToken> bodyArgument = Argument. of(BearerAccessRefreshToken ) Argument<Map> errorArgument = Argument. of(Map ) client. toBlocking(). exchange(
HttpRequest. POST ("/oauth/access_token" , new TokenRefreshRequest (TokenRefreshRequest. GRANT_TYPE_REFRESH_TOKEN , unsignedRefreshedToken)), bodyArgument,
errorArgument)
then : HttpClientResponseException e = thrown() e. status == BAD_REQUEST
when : Optional<Map> mapOptional = e. response. getBody(Map ) then : mapOptional. isPresent()
when : Map m = mapOptional. get() then : m. error == 'invalid_grant'
m. error_description == 'Refresh token is invalid'
}
}
Test Refresh Token Not Found
Create a test to verify that sending a valid refresh token that was not persisted returns HTTP Status 400.
groovy/src/test/groovy/example/micronaut/RefreshTokenNotFoundSpec.groovy
imports package example.micronautimport io.micronaut.core.type.Argumentimport io.micronaut.http.HttpRequestimport io.micronaut.http.client.HttpClientimport io.micronaut.http.client.annotation.Clientimport io.micronaut.http.client.exceptions.HttpClientResponseExceptionimport io.micronaut.security.authentication.Authenticationimport io.micronaut.security.token.generator.RefreshTokenGeneratorimport io.micronaut.security.endpoints.TokenRefreshRequestimport io.micronaut.security.token.render.BearerAccessRefreshTokenimport io.micronaut.test.extensions.spock.annotation.MicronautTestimport jakarta.inject.Injectimport spock.lang.Specificationimport static io.micronaut.http.HttpStatus.BAD_REQUEST@MicronautTest class RefreshTokenNotFoundSpec extends Specification { @Inject @Client ("/" ) HttpClient client @Inject RefreshTokenGenerator refreshTokenGenerator void 'Accessing a secured URL without authenticating returns unauthorized' () { given : Authentication user = Authentication. build("sherlock" ) when : String refreshToken = refreshTokenGenerator. createKey(user) Optional<String> refreshTokenOptional = refreshTokenGenerator. generate(user, refreshToken) then : refreshTokenOptional. isPresent()
when : String signedRefreshToken = refreshTokenOptional. get() // Argument<BearerAccessRefreshToken> bodyArgument = Argument. of(BearerAccessRefreshToken ) Argument<Map> errorArgument = Argument. of(Map ) HttpRequest req = HttpRequest. POST ("/oauth/access_token" , new TokenRefreshRequest (TokenRefreshRequest. GRANT_TYPE_REFRESH_TOKEN , signedRefreshToken)) client. toBlocking(). exchange(req, bodyArgument, errorArgument)
then : HttpClientResponseException e = thrown() e. status == BAD_REQUEST
when : Optional<Map> mapOptional = e. response. getBody(Map ) then : mapOptional. isPresent()
when : Map m = mapOptional. get() then : m. error == 'invalid_grant'
m. error_description == 'refresh token not found'
}
}
Test Refresh Token Revocation
Generate a valid refresh token, save it but flag it as revoked. Expect a 400.
groovy/src/test/groovy/example/micronaut/RefreshTokenRevokedSpec.groovy
imports package example.micronautimport io.micronaut.context.ApplicationContextimport io.micronaut.core.type.Argumentimport io.micronaut.http.HttpRequestimport io.micronaut.http.client.HttpClientimport io.micronaut.http.client.exceptions.HttpClientResponseExceptionimport io.micronaut.runtime.server.EmbeddedServerimport io.micronaut.security.authentication.Authenticationimport io.micronaut.security.token.generator.RefreshTokenGeneratorimport io.micronaut.security.endpoints.TokenRefreshRequestimport io.micronaut.security.token.render.BearerAccessRefreshTokenimport spock.lang.AutoCleanupimport spock.lang.Sharedimport spock.lang.Specificationimport static io.micronaut.http.HttpStatus.BAD_REQUESTclass RefreshTokenRevokedSpec extends Specification { @AutoCleanup @Shared EmbeddedServer embeddedServer = ApplicationContext. run( EmbeddedServer , [:]) @Shared HttpClient client = embeddedServer . applicationContext . createBean( HttpClient , embeddedServer.URL ) @Shared RefreshTokenGenerator refreshTokenGenerator = embeddedServer . applicationContext . getBean( RefreshTokenGenerator ) @Shared RefreshTokenRepository refreshTokenRepository = embeddedServer . applicationContext . getBean( RefreshTokenRepository ) void 'Accessing a secured URL without authenticating returns unauthorized' () { given : Authentication user = Authentication. build("sherlock" ) when : String refreshToken = refreshTokenGenerator. createKey(user) Optional<String> refreshTokenOptional = refreshTokenGenerator. generate(user, refreshToken) then : refreshTokenOptional. isPresent()
when : String signedRefreshToken = refreshTokenOptional. get() refreshTokenRepository. save(user. name, refreshToken, true ) //
then : refreshTokenRepository. count() == old(refreshTokenRepository. count()) + 1
when : Argument<BearerAccessRefreshToken> bodyArgument = Argument. of(BearerAccessRefreshToken ) Argument<Map> errorArgument = Argument. of(Map ) client. toBlocking(). exchange(
HttpRequest. POST ("/oauth/access_token" , new TokenRefreshRequest (TokenRefreshRequest. GRANT_TYPE_REFRESH_TOKEN , signedRefreshToken)), bodyArgument,
errorArgument)
then : HttpClientResponseException e = thrown() e. status == BAD_REQUEST
when : Optional<Map> mapOptional = e. response. getBody(Map ) then : mapOptional. isPresent()
when : Map m = mapOptional. get() then : m. error == 'invalid_grant'
m. error_description == 'refresh token revoked'
cleanup : refreshTokenRepository. deleteAll()
}
}
Test Access Token Refresh
Login, obtain both access token and refresh token, with the refresh token obtain a different access token:
groovy/src/test/groovy/example/micronaut/OauthAccessTokenSpec.groovy
imports package example.micronautimport io.micronaut.http.HttpRequestimport io.micronaut.http.client.HttpClientimport io.micronaut.http.client.annotation.Clientimport io.micronaut.security.authentication.UsernamePasswordCredentialsimport io.micronaut.security.endpoints.TokenRefreshRequestimport io.micronaut.security.token.render.AccessRefreshTokenimport io.micronaut.security.token.render.BearerAccessRefreshTokenimport io.micronaut.test.extensions.spock.annotation.MicronautTestimport jakarta.inject.Injectimport spock.lang.Sharedimport spock.lang.Specificationimport spock.util.concurrent.PollingConditions@MicronautTest (rollback = false ) // class OauthAccessTokenSpec extends Specification { @Inject @Client ("/" ) HttpClient client // @Shared @Inject RefreshTokenRepository refreshTokenRepository void "Verify JWT access token refresh works" () { given : String username = 'sherlock' when : 'login endpoint is called with valid credentials' def creds = new UsernamePasswordCredentials (username, "password" ) HttpRequest request = HttpRequest. POST ('/login' , creds) BearerAccessRefreshToken rsp = client. toBlocking(). retrieve(request, BearerAccessRefreshToken ) then : 'the refresh token is saved to the database' new PollingConditions (). eventually { assert refreshTokenRepository. count() == old(refreshTokenRepository. count()) + 1 }
and : 'response contains an access token token' rsp. accessToken
and : 'response contains a refresh token' rsp. refreshToken
when : sleep(1_000) // sleep for one second to give time for the issued at `iat` Claim to change
AccessRefreshToken refreshResponse = client. toBlocking(). retrieve(HttpRequest. POST ('/oauth/access_token' , new TokenRefreshRequest (TokenRefreshRequest. GRANT_TYPE_REFRESH_TOKEN , rsp. refreshToken)), AccessRefreshToken ) // then : refreshResponse. accessToken
refreshResponse. accessToken != rsp. accessToken //
cleanup : refreshTokenRepository. deleteAll()
}
}